How to unzip files contained in a zip archive

Many people struggle when faced with a zip file and don’t understand what to do with it. I’ll try to explain and look at options for different devices.

Why use zip and what is it?

When you want to download large or small files to your Windows or Mac PC or tablet computer, the standard format is a compressed file such as zip. There are other compressed file formats such as rar, gzip, 7-zip and many others, but they are all effectively a ‘container’ for the files that you ultimately want to download.

how to unzip 7zipWe use zip to reduce the overall file size and make the transfer over the internet much quicker. The files can then be extracted from their container (the zip file) by ‘unzipping’. This is also known as extracting or decompressing. To do this, we use a utility program such as 7Zip.  There is also built-in unzipping in Windows XP, Vista, Windows 7 and Windows 8, although it is not as competent as the 7zip program. 7zip is completely free, it’s stable and reliable and it can be installed on any Windows computer. Download it here:

https://www.7-zip.org/  (opens in a new window for you).

Make sure you get the correct version for your computer, there are 2 versions – 32 and 64 bit. If in doubt, get the 32 bit.

Using 7Zip to compress and extract files

Look at this video that explains both in detail:

How do I unpack zipped or compressed files on my Android device?

The Android operating system does not come with an unzipping program but you can download them from Google Play. Look at WinZip, AndroZip File Manager or WinRAR. As usual, note that some applications on Google Play are free but many carry advertising or a hidden price.

To download and install them, visit Play Store from your Android device’s home screen. Check user reviews if you are unsure which to go for.

Personally, I like to unzip the files on my desktop PC and send them to the tablet using a file sharing and syncing utility such as Dropbox (free) or the excellent Livedrive (Free trial). This type of seamless file sharing is such an aid to moving files around devices you own and also backs up these files in ‘the cloud’.

Using WinZip to create a zip archive

WinZip is proprietary software that has an evaluation period. This allows you to use the program for free for a limited time, after which you should purchase a licence.

For Windows 7, Windows 8 or Vista

Tip – hold down Ctrl and left click to select multiple files at once.

  • Open WinZip and select Add files
  • Choose the first file you want to add and click Zip
  • Choose a name and where to save your zip archive then click Create
  • Click Add files to choose another file Zip to add it to the archive
  • Repeat until all of your files have been added

For Windows XP

  • Open WinZip and select New
  • Choose a name and where to save your zip archive then click Ok
  • Choose the first file you want to add and click Add
  • To add more files, click the Add button in WinZip and choose another file

Using 7-Zip to create an archive

7-Zip is free software that allows you to create and view many types of archive formats including zip.

Tip – hold down Ctrl and click to select multiple files at once.

  • Select the files on your computer
  • Right click on the highlighted files and choose 7-Zip then Add to archive
  • Under Archive choose a name for your file and where you want to save it
  • Change the archive format to zip, everything else can be left as the default values
  • Click Ok


Hope this helps you to understand and use zip files.


Cheapest Norton 360 renewal

cheap norton security discountI’m frequently asked by customers how to get the cheapest renewal price on Norton 360.  Symantec’s renewal price is really one of the highest for any Internet Security product.  It is a capable package though and worth keeping on your PC. The best way by far is to purchase a new fully licensed program at a reduced price and install that. Nothing underhand, just a new product at a price much lower than Norton currently quote for renewal.

The beauty of this is that you don’t have to uninstall your current product if it is the same ‘family’ as the one you are installing, simply match the product family. For example, if you have Norton Security, get a Norton Security package with any version number as they all qualify for Norton’s free upgrade to the latest version anyway! If you have the older Norton 360 then get Norton Security and uninstall Norton 360 first.

Do Norton really offer a free upgrade?

Yes, most versions of Norton qualify for a free upgrade to the latest version in that product family. If you download the latest installation program, Norton will auto-detect and remove your older version and then install the newer one too, making it even simpler to install.

Please note

You can change to another security software at this point. From doing lots of virus clean-up work and labs testing, I would recommend uninstalling the Norton product and installing my preferred security suite and consistent labs test winner Kaspersky Total Security. Norton is quite capable but Kaspersky definitely has the edge on speed and low resource usage.

A word of warning. Norton products such as Norton 360, Norton Internet Security and Norton Antivirus are now retired in favour of “Norton Security” and “Norton Security with Backup”. Confused? This article explains more: New Norton product family (opens in a new window).

So to recap, if your Norton 360 has expired, then take a look in my software shop (opens in a new tab) and buy either a Norton or Kaspersky product at prices cheaper than Symantec’s renewal rates. If you want to upgrade to another software product (such as Kaspersky) then simply uninstall the existing Norton software, restart the computer and then install the Kaspersky product.

Don’t forget to ‘Tweet’ or Facebook ‘like’ this article if it saved you some cash!

Shop for Norton products now


Outlook emails stay in Outbox after Windows 10 upgrade

email-settings-pop-imap-btconnect-outlookAre you getting your Outlook emails stuck in your Outbox after upgrading to Windows 10? I’ve seen this happen on several machines and it really seems to be a problem where Windows corrupts the Outlook database and/or profile on many versions of Microsoft Office (2007, 2010 and 2013). The easiest fix and one that I’d recommend here is to delete or move the stuck emails then close all programs that are open such as Outlook.

Now we can use the in-built Windows “System File Checker” that will scan your PC and repair any corrupt files that it finds. To do this:

  • Click Start
  • Type cmd in the Search box
  • Right-click Command Prompt and then click ‘Run as administrator’. If you are prompted for an administrator password or for a confirmation then type the password or click ‘Allow’
  • In this black window (the command prompt) that appears, type in sfc /scannow noting the space before the forward slash
  • Press enter and go and grab a delicious cup of coffee because this will take a while

Note: Do not close this Command Prompt window until the verification is 100% complete. The scan results will be shown after this process is finished.

Technical information for nerds
The sfc /scannow command will scan all protected system files, and replace corrupted files with a cached copy that is located in a compressed folder at %WinDir%\System32\dllcache.
The %WinDir% placeholder represents the Windows operating system folder. For example, C:\Windows.

The time taken to complete this scan is different on every PC but usually can range from 20 minutes to an hour or more. If it solves your problem (which it has on over 50 client PCs to date) then please take a minute to drop a comment below or maybe buy something through our shop to say thanks.


Reset Windows Server 2012 Administrator password

server 2012 password resetTo reset the Administrator password on your Windows server 2012 installation, you’ll need to do the following:
Boot from the Microsoft Windows Server 2012 DVD

  1. From the Windows setup menu, click “Next”
  2. Select “Repair your computer”
  3. Click on “Troubleshoot”
  4. Under Advanced options, click “Command Prompt”
  5. Type “diskpart” and hit Enter
  6. Type “list volume” and hit Enter. This will show you your (current) drive letter allocated to the drive where Windows is installed. Note  – if you don’t see any volumes listed and this is the first boot cycle for a new Server 2012 installation, then I have seen this on a few HP servers and you’ll need to go and run the setup again from within the Intelligent Provisioning area.
  7. Make a note of the drive letter and type “exit” then press enter to leave diskpart (but stay in the command prompt window)
  8. Presuming the letter is d, then type “d:” and press enter to change to this drive
  9. Now type  “cd Windows\system32” and press enter which will take you into the system32 folder
  10. Type “ren Utilman.exe Utilman.bak” and press enter
  11. Type “copy cmd.exe Utilman.exe” and press enter
  12. Close the command prompt and then click “Continue”
  13. The server should now reboot to the logon screen. Press the Windows key + u to open a command prompt
  14. At the prompt you can change the password by typing “net user administrator xyz” where xyz is your new super-secure password!
  15. Now, for security we must do one last thing. Once we are back in Windows, open Explorer, navigate to Windows\system32 and rename Utilman.bak to Utilman.exe


Hopefully this gets you out of a sticky situation, leave me a comment if it has helped.


Crash Plan backup software full review

CrashPlan has been around for a while now and is looking like one of the best solutions out there for business and personal backups.

With no storage size limits, bandwidth caps or file-type restrictions, Crash Plan really has lots going for it. On top of this, there’s enterprise-class hardware and military-grade security with no extra fees payable.

What I particularly like about Crash Plan is that there is free backup to an external drive and any trusted, internet-connected computer. You can also subscribe to their robust cloud-based destination, “CrashPlan Central” and this is certainly worth the extra money. It’s as quick as any cloud-based backup we have tested and the interface is functional and quite slick.

See what Crash Plan can offer here


crashplan online backup


Kaspersky Pure replaced by Total Security

Since I am getting a lot of questions on where Kaspersky Pure has gone and how to upgrade, I’ll try to clarify a few things. Yes, the main Kaspersky.com website has now dropped Pure as a product, seemingly without notification. The localized websites (such as .co.uk etc) have followed too. It seems that Kaspersky Pure has been phased out in favour of ‘Total Security’. There are a lot of Pure installation CDs out there so what to do?

OK, so here comes the terminology first:

  • KTS stands for Kaspersky Total Security
  • KIS stands for Kaspersky Internet Security
  • KAV stands for Kaspersky Anti-Virus
  • Changing from one installed product to another is called ‘migrating’

If you have an active or expired Kaspersky PURE 2.0 or 3.0 license, you have special options of migrating to Kaspersky Total Security. You can also migrate to Kaspersky Total Security from Kaspersky Internet Security and Kaspersky Anti-Virus or vice-versa.

Who can’t upgrade to Kaspersky Total Security?

Note that free migration to Kaspersky Total Security is not possible for the oldest versions of Pure. These were the original ‘version 1’ programs but are called:

Kaspersky PURE
Kaspersky PURE R2 (note that this is NOT the same as Kaspersky Pure 2.0)

They can’t be upgraded because their activation codes are incompatible with Kaspersky Total Security.

Now we know what versions can’t be upgraded, let’s upgrade those that can…

Free upgrades to Total Security

Successful upgrading depends on the current status of your license:

  • If you have an active licence for Kaspersky PURE 2.0 or Kaspersky PURE 3.0, you can simply use your current activation code for migration (upgrading) to Kaspersky Total Security.
  • If your license for Kaspersky PURE 2.0 or Kaspersky PURE 3.0 has expired, you can visit my shop here to buy Total Security at a cheaper price than renewal, then install it which migrates the licence for you automatically.

Migrating the Pure licence key to Total security

If you have Kaspersky PURE 2.0 or Kaspersky PURE 3.0 installed on your computer, do the following to upgrade to Kaspersky Total Security:

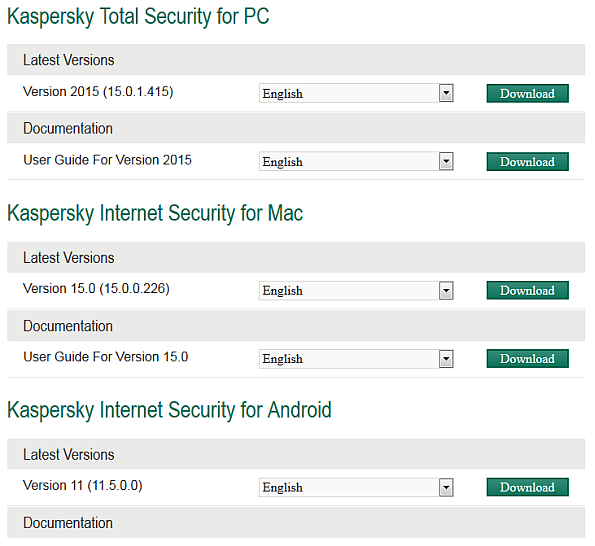
Download the Total Security package here (opens in a new window for you). This is what you should see:

kaspersky download total security

Grab the top one in my screenshot above, Total Security, and download it. Now we have 2 options, either installing over the top of Pure or removing Pure and installing your downloaded KTS. I have listed both below:

Option 1 – Install Kaspersky Total Security without removing Kaspersky PURE

When you install Kaspersky Total Security on top of Kaspersky PURE 2.0 or Kaspersky PURE 3.0, the following data is preserved:

  • License information
  • Quarantined objects
  • Product settings (config settings including Backup tasks)
  • Encrypted containers (including all data)
  • Password Manager databases for all user accounts. All data that was available when working with Password Manager, such as passwords to programs and accounts, identities, notes, etc.
  • Anti-Spam databases (if the Anti-Spam component was previously used)
  • Backup stores

This makes it the easier option for most users. If you are not experiencing any issues with Pure then do this. If you have slowdown issues, configuration problems or just want a fresh install (which is always nicer) then jump to Option 2 below.

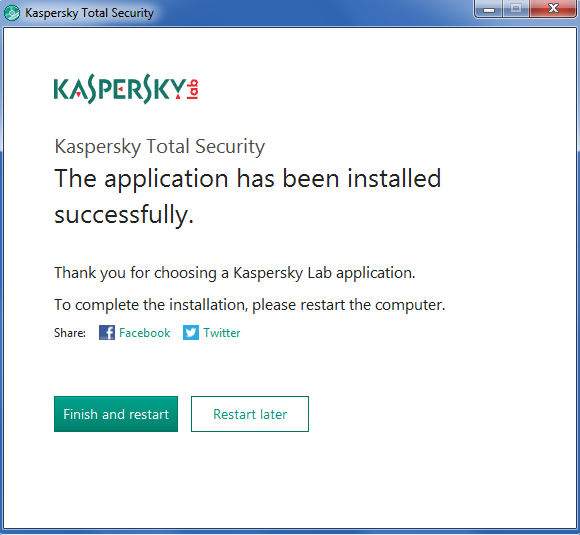
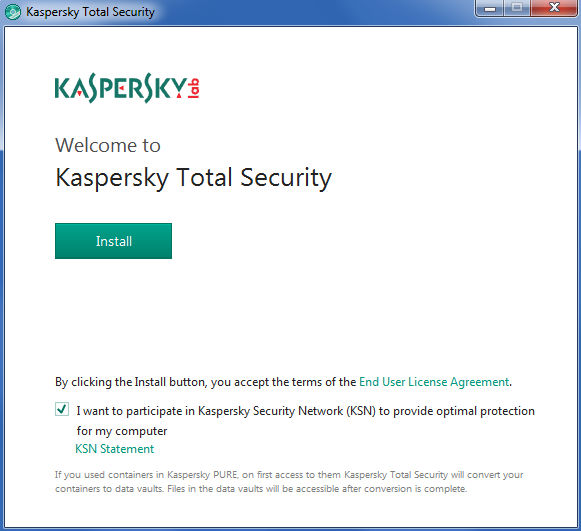
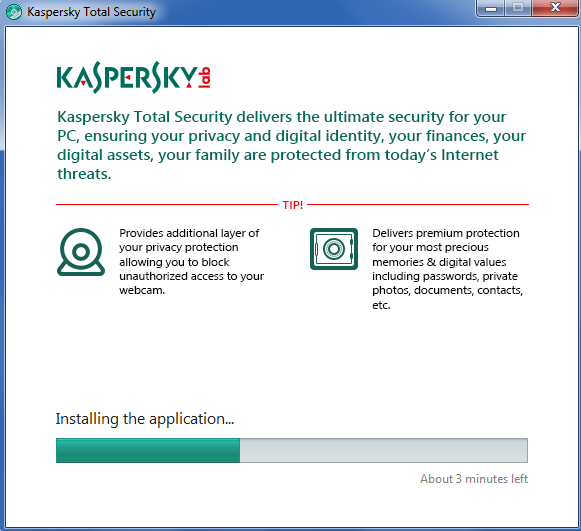
Screenshots of the installation process when installing over Kaspersky Pure:

install-kaspersky-total-security

installing-total-security

finish-restart-total-security

This took about 3 minutes for us to complete including the restart, just accept the defaults.

Option 2 – Install Kaspersky Total Security, removing Kaspersky PURE first

CAVEAT – You must have your licence key available which can be found on the card inside the product case.

CAVEAT 2 – You will lose any saved passwords in the Kaspersky Password Manager. Not everyone uses this and it won’t affect other password managers such as LastPass, Roboform, Keepass etc.

CAVEAT 3 – You will lose any quarantined files, backup stores, encrypted containers and spam databases (if used) which are again specific to Kaspersky Pure

  • Fully uninstall Kaspersky Pure via your control panel.
  • Reboot your PC
  • Install Total Internet Security from the file you downloaded earlier or from a packaged CD

If you have never installed a program before, here is some help how to do it:


I hope that this helps answer your questions on installation, upgrading and compatibility. Kaspersky remains the most effective of all the antivirus and Internet security suites that we have tested in our workshop and Total Security is a worthy replacement for Pure.


Slow Windows 8 update speeds fixed

Slow update speeds in Windows 8 (and slow network speeds in general) are often because of the ‘poisoned’ DNS cache. This is because it can contain invalid or expired DNS records. Symptoms may be difficulty in opening websites or even problems with Windows updates. What we’ll do here to attempt to rectify this is to clear the DNS cache by simply flushing the invalid or expired DNS entries.

How to Flush the DNS Cache to speed up Windows 8

  • Logon to your Windows 8 computer with an administrative account.
  • Click on the desktop tile from the Start screen to go to the desktop window.
  • Hover the mouse over the bottom right corner of the window.
  • From the displayed options, click “Search”.
  • On the opened Search pane at the top right, ensure that the Apps category is selected.
  • Type in “cmd” without the speech marks.
  • From the displayed results on the Apps window, right-click on Command Prompt.
  • From the displayed advanced options at the bottom of the window, left click on “Run as administrator”.
  • When you see the User Account Control box, click “Yes” to provide the administrator approval to open the command prompt with the elevated privileges.
  • At the black command prompt window, type “ipconfig /flushdns” and press enter. This will delete the DNS cache.
  • Close the command prompt window when done.
  • Restart the computer.

After flushing the DNS cache, the IP address of any website or network device is then automatically resolved by the DNS resolver using a DNS server.


Cheap Norton Internet Security anyone?

Norton Internet Security

When Norton’s internet Security product is about to expire, people often renew automatically. Norton offers a ‘nag’ screen to pester the user into submission. Well there is a cheaper way. A MUCH cheaper way that is totally legitimate. Read on….

Norton Internet Security has a well kept secret. If you are running the 2006, 2007, 2008, 2009, 2010, 2011, 2012, 2013, 2014 or 2015 versions you qualify for a free upgrade to the latest product.

The old product can be upgraded or uninstalled and the new version installed. We would always recommend a clean uninstall, a reboot and then a fresh install of the new product, although installing a later version of Norton usually detects and removes older ones for you.

There are some incredible deals for Norton Internet Security at the moment, you can pay a price that is up to 90% cheaper than the renewal – and you get the latest version thrown in! My method is to buy a cheap 2009 or later version and use the product key from that.   Don’t install this though, instead simply install the latest trial version from Norton’s website, Cnet or Softpedia. Use your 2009 (or later) product key to register the current version when prompted, no need to install the earlier product!

Just remember, if you need more than one licence then make sure you get a “3-user” copy. They are often as cheap as the single user licence.

Before you do this though, please note that I do sell discounted antivirus packages in my software store so you might get the latest version much cheaper anyway. Worth checking as they are currently very good value:

Check prices in the software store

Don’t want to keep Norton Internet Security? Then click here for the cheapest Norton 360 renewalcheapest Norton Antivirus renewal cheapest McAfee renewal cheapest Kaspersky Internet Security renewal Cheapest Kaspersky Pure renewal

Of these I would say that Kaspersky Pure is currently my favourite and best performing package.

Don’t forget to ‘Tweet’ or Facebook ‘like’ this article if it saved you some cash! Here are some more great deals on Norton:


Failure configuring windows updates reverting changes do not turn off your computer

This is quite a common fault on systems I have seen on PC systems ranging from XP through to Win 8. There are various ‘fixes’ mentioned out there, some of which are potentially damaging, so I thought I’d share my method of repair here. It has worked on 99% of computers we have had through the repair shop.

The fault often is triggered by a single downloaded update that does not want to apply itself. Subsequently, all the other downloaded updates fail too. If left, these updates will grow in quantity every week until they are difficult to diagnose, so do this sooner rather than later.

  • First off, check you are logged in as an administrator on the system.
  • Make sure that your clock set to the correct time, date, year and timezone. Don’t skip this, double check it!
  • In the following steps, make sure you download the correct version for your operating system, eg Windows 7 64-bit etc. If you are not sure which version you have, look in Control Panel, Select “View by small icons” then click on System. Here, you’ll see your Windows Edition and Sytem Type. While you are in here, check that you can see “Windows is activated”. If not, this is your problem and you need to activate Windows. To do this, click Start, type in “activate” then click on Activate Windows.
  • You can disable your antivirus temporarily but this is not necessary unless you try this method and it fails. Make sure if you do this that you are behind a firewall, either the Windows one or one in your router.
  • Open ‘Computer’ and navigate to C:\Windows\SoftwareDistribution\Download then delete everything you find in this folder.
  • Now, go to Windows update history on the computer (Control Panel, Windows Updates and select View Update History). Look at the ones that failed and note the KB number. You can then go to Microsoft Download Center and download each one individually by searching on the KB number. Use Internet Explorer for this, not Firefox/Chrome etc. After manually downloading and installing each one, restart the computer and repeat the process until each update is applied. Don’t skip the restart, this is necessary to apply many updates.
  • Once the list of downloads is finished you can create a restore point and then try an automatic Windows Update again, it should work now.


You can also give this a try – Windows Update Troubleshooter.  While this is, in theory, an automatic fix to the ‘failure configuing Windows updates’ issue, it doesn’t always work so I prefer to use my method above first which can isolate the problem to a single download. Good luck!


How to clear the DNS cache

clear dns cache mac windows

Your DNS cache stores IP addresses of webservers. These servers have delivered pages which you and others have recently viewed. If the location of the web server changes for any reason before the entry in your DNS cache automatically updates, you will find yourself unable to access the website. You may also see a lot of 404 error codes, which generally happens when your DNS cache is messed up.

This is particularly prevalent for Webmasters who are setting up a new website and suddenly get presented with an old page or no page at all. Often it is visble on another computer or mobile phone which makes it even more frustrating.

By clearing this DNS cache, your computer will then re-query the nameservers for the new DNS information.

How to clear your computer’s DNS cache in Windows 2000, XP, Vista, 7 or 8

  • Click the Start button
  • On the Start menu, click Run
  • If you do not see the Run command in Vista/7/8, enter “run” in the Search bar just above the start orb
  • Type the following in the Run text box: ipconfig /flushdns
  • Press Enter

Pay attention to the space between the g and the forward slash.

Close the command window and retry your browser.

How to clear your computer’s DNS cache in Mac OS 10.7 onwards

Please note that for this to work you require the Admin account password.

  • Click Applications
  • Click Utilities
  • Double click the Terminal application
  • Type in: sudo killall -HUP mDNSResponder

Close the terminal window and retry your browser.

How to clear your computer’s DNS cache in Mac OS 10.6 and below

  • Click Applications
  • Click Utilities
  • Double-click the Terminal application
  • Type in: dscacheutil -flushcache

That’s it and you should now be able to fire up your browser and get a fresh version of the page.