Krystal hosting review – VPS, Shared and Dedicated packages


Krystal are a UK-based host that offers configurable VPS, Shared and Dedicated packages. There’s not much choice in the UK hosting market so consequently there are some pretty steep prices out there compared to their USA datacentre counterparts. That said, Krystal seem to have all bases covered, let’s take a look at their offerings…

Krystal’s standard hosting features and guarantees

All Krystal plans share a common set of features, like premium control panel and a longer-than-most money-back guarantee. They have been in business since 2002 so they are here to stay and with over 90% of their customers recommending their hosting, it’s a no-brainer decision.

The Krystal difference

Their CEO, Simon Blackler, gives his reasons why they are different to other hosts:

In 2002, frustrated by poor service and bad business practices, I created Krystal to provide an “Honest, Reliable & Personal” alternative to the large faceless hosting corporations. We’re named Krystal because the company embodies values often associated with precious crystals, such as quality, rarity and transparency.

Over the last 15 years our unique approach to business has won us a reputation for excellence and a loyal following.
We’re now the largest independent UK web host and are rated the best web hosting company by popular review sites.

We’re in business because we’re passionate about technology and solving problems.
I hope that you’ll join us today and experience the Krystal difference for yourself.

Well, it’s true that many hosts have poor service and some even downright shady business practices, but judging on the reviews coming back from established sites such as Trust Pilot, Krystal are a force to be reckoned with.


At the time of writing, Krystal offer entry-level hosting for £3.99 monthly with these features:

  • FREE 256-bit SSL certificate
  • FREE website builder
  • 100% SSD cloud hosting
  • Unlimited bandwidth
  • Optimised for WordPress & more

There’s a configurable VPS from £9.99 monthly with these features:

  • 100% SSD cloud VPS
  • Full root access
  • Free DDoS protection
  • Free dedicated IP
  • No setup fee

For businesses requiring PCI compliance, £29.99 monthly gets you:

  • Fully PCI-DSS Compliant
  • FREE DDoS protection
  • FREE 256-bit SSL certificate
  • FREE backups every 6 hours
  • FREE domain name for life

The big plus is that you get a 60 day money back guarantee with everything, so a full refund can be had and you lose nothing (except your time testing their servers). In our experience you’ll probably stay with them as the ping times are as good as anything we have seen on the UK market and server configuration options are up there with the best.

Verdict

What we really like is the company’s transparency. They are trying to do things differently and succeeding – a refreshing thing in the murky world of hosting. They use green technology, which means 100% renewable energy at all of their sites, which we love because reducing the impact of these datacentres is a must.

With a more-than-standard offering, Krystal have certainly raised the bar. For the price-conscious, the VPS and dedicated prices are spot-on, being considerably cheaper than the opposition such as FastHosts, Rackspace, Ionos, 123-Reg and more (comparison reviews coming soon). There’s 24/7 ticket and email support, extremely friendly telephone support (10:00 to 17:00 UK time), cPanel, free migration assistance, automated backups, PHP (5.6 to current) and all the usual stuff like MySQL, PHPMyAdmin, SSH and even the ubiquitous Softaculous. What isn’t there to like? Click the link below to get hosting from what we believe is the best available for UK hosts:

Try Krystal free for 60 days


Accuranker review 2019

accuranker review coupon 2019 2020


Accuranker is a very impressive tool that helps you to accurately monitor keywords for your websites. We were that impressed that we now run this tool daily and wanted to put together a mini Accuranker review.

This tool is aimed at users with single websites, right up to agencies with hundreds of sites. You can see at a quick glance how your keywords are performing daily, and you don’t even need to run a report, you can see live data on the website or get scheduled reports sent through to you by email.

Initial Accuranker setup

Initial setup is simple, just choose Google or Bing (or both) and select desktop or mobile (or both) to see how your keywords perform on these devices. Your package will include a limited number of keywords and this is different for each subscription level. Note that if you have, for example, a site with 10 keywords tracked, then checking results for Google Desktop counts as 10 keywords. If you add Google mobile too, this would then count as 20 keywords. Add Bing desktop and mobile into the mix and you’ll be up to 40 keywords. It’s easy to forget this when ordering a package, so make sure you get the right one for you. Their keyword allowance is quite generous though, especially given that Accuranker check them daily by default.

Google analytics linking

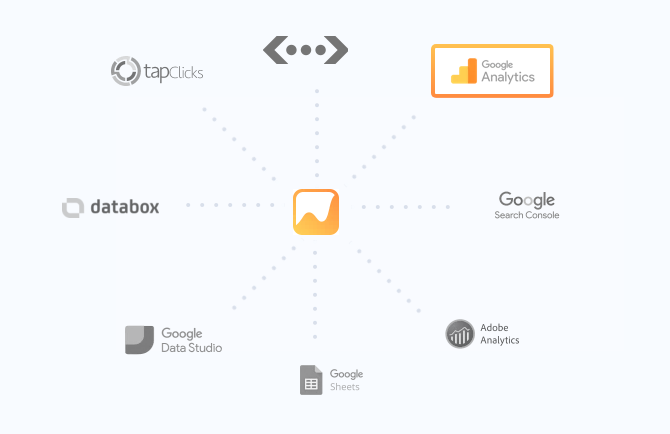
Impressively, this tool links into your Google Analytics account to pull even more data for you. As you can see from their image below, you can integrate with many more services such as DataStudio, Sheets and more:

accuranker review discount

So with this tool you can now see your ranking in the Search Engine Results Pages (SERPs). The graphing software on the site is impressive, allowing you to drill down into each keyword’s ranking history with a few clicks.

Accuranker updates, good or bad?

AccuRanker is maintained by some clever people and updates come through quite regularly adding new functionality. All the updates we have seen have been useful and have added more value to the tool. You can also take advantage of their 14-day free trial to see if it is the right SEO tool for your needs.

An SEO tool for agencies

Agencies will love the automatic monitoring and reporting features. You can even send a scheduled report out to your clients, a great bonus. Different data export formats will suit most agencies (and beginners too). If you’re still using Excel and CSV for your reporting or metrics then this is easily available for export.

Competitor Monitoring

One great SEO trick is checking how your keywords stack up against the same ones for other websites. Accuranker monitors keyword competition and lets you know who ranks higher than you, which is great for beating your competitors. Accuranker also uses “Share of Voice” which is a cool name for their trickest feature. This allows you to view who has more share of the search engine results for given keywords. It’s a great metric to quickly see if you are pushing your competitors further away or if they’re catching you up.

Verdict

All in all, the clear layout, the impressive charting and reporting make this package the best we have seen for SEO reporting. We now use it daily to monitor and track our keywords too.

With a 14-day free trial, clear navigation and simple yet effective reporting, AccuRanker is now the keyword tracking SEO tool to beat.


Test Accuranker now


Beautiful post snippets and auto resized images in WordPress

Beautiful post displays

I’m going to show you how to create a really nice post display page that automatically brings in your posts AND takes the first image, resizes it and pops it at the side of a ‘teaser’ of your article. This is a very neat approach and builds on the work you have already done in creating the post, then automates a slick output of your work. More importantly, you don’t have to create a thumbnail image as resizing is done ‘on the fly’.

First off, we need to add a small function to functions.php. Open it up and at the very end add this:

function pcrmbimagegrab() { //https:www.pcrepairmansblog.com //Grabs the first image from the post global $post, $posts; $first_img = ''; ob_start(); ob_end_clean(); $output = preg_match_all('/<img.+src=[\'"]([^\'"]+)[\'"].*>/i', $post->post_content, $matches); $first_img = $matches [1] [0]; //Get default image instead if(empty($first_img)){ $first_img = "/images/default.png"; }return $first_img;}

Make sure this is within a php call, ie

Now we need to create a category, eg “Articles”

Now go into the WP admin area and open the categories from the WP sidebar menu (under ‘Posts’). Hover your mouse over the new category and you’ll see the category number at the end of the link shown in Firefox/IE etc (at the bottom left of the browser window). This is what we need for our special new php page that we’ll create now.

Create a new page and call it category-15.php (where 15 is the number of your category above – modify accordingly!). Into this copy and paste the following:


<?php get_header(); ?> <div class="post-box"> <h1> <?php single_cat_title(); ?> </h1> <hr>	<?php get_template_part('loop', 'dvccategory'); ?>

Now open up your archive.php file and see where the differences lie. Your header may be different, your div ids will be too, but make this new category file look like archive.php in terms of header, footer, content divs etc. I have added a class of pcrmbcategory. Ensure this is a div class and not a div id as it is repeated for each post.

Go to your template’s stylesheet, normally style.css, and insert our new div class:

/* Fix category view by https://www.pcrepairmansblog.com */ .pcrmbcategory { float: left; width: 590px; margin: 0px; padding: 10px; display: inline; } .pcrmbcategory img { border: none; margin: 0px; height: 130px; }

Note, I have fixed just the height of the image to keep the aspect ratios proportionate. You can set a width but this won’t maintain the aspect ratio and some images may appear stretched. Fixing height and limiting the content maintains a nice even spacing on article posts. I have added a dotted line to separate posts but be creative, sky’s the limit here!

The 590px width is ideal for many single sidebar themes but experiment with this and validate your code. Test it in several browsers too. Don’t forget to create a default image to display when you don’t have one in your post. Drop this into the yourdomain.com/images folder. You can make this any size but ideally make it to the same height that is referenced in the code for quicker page loads. Good luck and give me some feedback if it works for you!


Install Irfanview and resize images easily

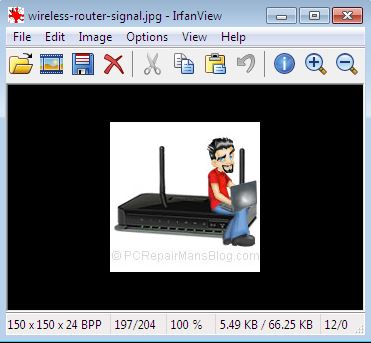
Here’s a quick tutorial how to resize images quickly and easily using a great free program called Irfanview.

First, if you haven’t already, download and install Irfanview from https://www.irfanview.com

When starting the program for the first time go to the top menu and select:
Options > Set file associations > Images only > OK
Now all images will open in this nifty program, it’s good and fast.

Note that with the latest Windows 10 updates, you need to go to Settings > Default Apps and set IrfanView as your default viewer. Some Windows updates are known to actually remove IrfanView altogether!

Resizing an image with Irfanview

Resizing images really depends on what you want to achieve as an end result. There are a few common scenarios here:

  1. You want to resize pictures to keep the file size down because you are sending by email. This option is usually when sending family pictures or work images to a colleague.
  2. You want to create an avatar, logo or smaller image from the original image.
  3. You want to crop a section of the image and resize it afterwards.

In each of these cases, we shall be using the resize dialog box so let’s see how to open this now.

Open Irfanview from the shortcut or All Programs menu, and click on File > Open.

In the box that opens, navigate to the image you want to resize. Double click it or click on the Open button.

The image will open up in the main Irfanview window.

Irfanview resize image tutorial

From the toolbar menu at the top, click Image and select Resize/Resample. This will open the Resize/Resample image dialog box which is where you will select the settings that will be applied to your final image.

Now we want to either use some of the handy presets you see to the right side or manually add our image sizes. Think of 800 x 600 pixels as a landscape orientation, postcard sized image and you won’t be far wrong. This is an ideal size to send pics to family and friends by email and not have them clogging up their inbox. Most digital cameras now have extremely high pixel count so your original could be something like 2992 x 2000. This is obviously a landscape image because the first figure quoted is always the width, the second being the height. Resizing this image to 800 x 600 would work as landscape photos are generally close to a 4:3 ratio (although that example of 2992 x 2000 is not quite 4:3). Because some stretching of the image would occur in that case, we can actually check the box preserve aspect ratio. Now, typing in your desired width should alter the height accordingly and vice versa, resulting in a non-stretched image. It’s up to you if you want to apply sharpen after resample, this is generally better when going to a very small image such as used for icons and avatars, so I would generally avoid it for larger photos. For images on web pages such as WordPress powered sites, a width of 500 pixels (px) is usually sufficient for the content areas, going down to 150 px where we are wrapping text around the image.

In the Size Method box, put a tick next to Resample (better quality), and using the dropdown arrow, select Lanczos filter (slowest). What we are doing when resizing is effectvely getting rid of pixels, so the image needs to have a degree of loss applied to it that the human eye can’t see that well. The jpeg format is called a ‘lossy’ format for this reason. When you see a pixellated image, this is generally because it has been compressed a bit too much and too many critical pixels have been lost.

When you have the settings the way you want them, click on the OK button. Irfanview renders the image in its new size, although it may still be zoomed in or out. Use the + or – magnifying glass on the toolbar to zoom in or out until you see 100% displayed on the lower toolbar of Irfanview. This is your actual image size, as rendered by your monitor.

IMPORTANT NEXT STEP

You currently have the resized file in the main Irfanview window but it isn’t saved. Most photographs are better quality when they are original and making them smaller reduces quality, so we generally don’t save the image at this point. We do a File > Save As. Think of this as duplicating the file and you won’t go wrong, we are saving another copy of the image but in a different size. You have the chance to navigate to a new folder (I usually create one called Resized) and save the image with a descriptive name, something like:

dave-birthday-party-may-2014.jpg

I like to keep all filenames lowercase and separate words with hyphens as it’s much better for search engines and for web server semantics when uploaded to the web.

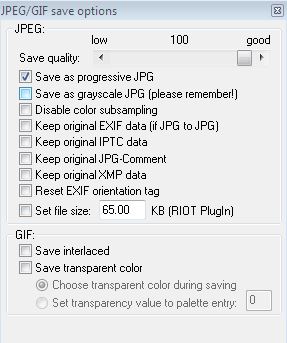
Saving in Jpeg format is generally good for photos, it results in smaller file sizes. Slide the quality slider up to 100 for best quality though.

Resize image irfanview jpeg quality

Now all that remains is to click on Save and you are done.

I hope that helped to clear up a bit of resizing mystery, please drop me a comment below if you have any questions or just to let me know it helped.


Install mod_GeoIP2 on Apache2 in CentOS 7

geoip-centos

If you need to install the excellent mod_geoip2 extension for Apache2 then it can be done fairly painlessly. First off, we need to make sure that we have gcc installed:

gcc --version


If you don’t have it then you could ‘yum install gcc’, but I prefer to install all development tools because they include gcc anyway:

yum groupinstall 'Development Tools'


Install the GeoIP development package

yum install geoip-devel


Install mod_geoip2 by fetching the latest version with wget. To check the latest version, take a look here first:

https://github.com/maxmind/geoip-api-mod_geoip2/releases


I’m installing 1.2.10 here with this, but replace the code in lines 1, 2 and 3 here with their latest version:

 wget https://github.com/maxmind/geoip-api-mod_geoip2/archive/1.2.10.tar.gz
 tar -zxvf 1.2.10.tar.gz
 cd geoip-api-mod_geoip2-1.2.10


Now we use the apxs (Apache Extension Tool) to build our extension modules for Apache:

apxs -i -a -L/usr/local/lib -I/usr/local/include -lGeoIP -c mod_geoip.c


If you haven’t got apxs then you’ll need to install httpd-devel.

Be aware that this overwrites httpd so backup your server in case this fails or you get strange results.

yum install httpd-devel


If this fails with “Error: Nothing to do”, then it’s fairly common. You’ll probably find that /etc/yum.conf is blocking the installation. We can get around this by either editing the configuration file or typing:

yum --disableexcludes=all install httpd-devel


You should now have mod_geoip2 installed on your server!


Country codes for mod_security, CSF and htaccess

Her’s a list of useful country codes that we can use in many rule-based filtering situations on servers.

AD Andorra
AE United Arab Emirates
AF Afghanistan
AG Antigua and Barbuda
AI Anguilla
AL Albania
AM Armenia
AN Netherlands Antilles
AO Angola
AQ Antarctica
AR Argentina
AS American Samoa
AT Austria
AU Australia
AW Aruba
AZ Azerbaijan
BA Bosnia and Herzegovina
BB Barbados
BD Bangladesh
BE Belgium
BF Burkina Faso
BG Bulgaria
BH Bahrain
BI Burundi
BJ Benin
BM Bermuda
BN Brunei Darussalam
BO Bolivia
BR Brazil
BS Bahamas
BT Bhutan
BV Bouvet Island
BW Botswana
BY Belarus
BZ Belize
CA Canada
CC Cocos (Keeling) Islands
CF Central African Republic
CG Congo
CH Switzerland
CI Cote D’Ivoire (Ivory Coast)
CK Cook Islands
CL Chile
CM Cameroon
CN China
CO Colombia
CR Costa Rica
CS Czechoslovakia (former Republic)
CU Cuba
CV Cape Verde
CX Christmas Island
CY Cyprus
CZ Czech Republic
DE Germany
DJ Djibouti
DK Denmark
DM Dominica
DO Dominican Republic
DZ Algeria
EC Ecuador
EE Estonia
EG Egypt
EH Western Sahara
ER Eritrea
ES Spain
ET Ethiopia
FI Finland
FJ Fiji
FK Falkland Islands (Malvinas)
FM Micronesia
FO Faroe Islands
FR France
FX France, Metropolitan
GA Gabon
GB Great Britain (UK)
GD Grenada
GE Georgia
GF French Guiana
GH Ghana
GI Gibraltar
GL Greenland
GM Gambia
GN Guinea
GP Guadeloupe
GQ Equatorial Guinea
GR Greece
GS S. Georgia and S. Sandwich Isls.
GT Guatemala
GU Guam
GW Guinea-Bissau
GY Guyana
HK Hong Kong
HM Heard and McDonald Islands
HN Honduras
HR Croatia (Hrvatska)
HT Haiti
HU Hungary
ID Indonesia
IE Ireland
IL Israel
IN India
IO British Indian Ocean Territory
IQ Iraq
IR Iran
IS Iceland
IT Italy
JM Jamaica
JO Jordan
JP Japan
KE Kenya
KG Kyrgyzstan
KH Cambodia
KI Kiribati
KM Comoros
KN Saint Kitts and Nevis
KP Korea (North)
KR Korea (South)
KW Kuwait
KY Cayman Islands
KZ Kazakhstan
LA Laos
LB Lebanon
LC Saint Lucia
LI Liechtenstein
LK Sri Lanka
LR Liberia
LS Lesotho
LT Lithuania
LU Luxembourg
LV Latvia
LY Libya
MA Morocco
MC Monaco
MD Moldova
MG Madagascar
MH Marshall Islands
MK Macedonia
ML Mali
MM Myanmar
MN Mongolia
MO Macau
MP Northern Mariana Islands
MQ Martinique
MR Mauritania
MS Montserrat
MT Malta
MU Mauritius
MV Maldives
MW Malawi
MX Mexico
MY Malaysia
MZ Mozambique
NA Namibia
NC New Caledonia
NE Niger
NF Norfolk Island
NG Nigeria
NI Nicaragua
NL Netherlands
NO Norway
NP Nepal
NR Nauru
NT Neutral Zone
NU Niue
NZ New Zealand (Aotearoa)
OM Oman
PA Panama
PE Peru
PF French Polynesia
PG Papua New Guinea
PH Philippines
PK Pakistan
PL Poland
PM St. Pierre and Miquelon
PN Pitcairn
PR Puerto Rico
PT Portugal
PW Palau
PY Paraguay
QA Qatar
RE Reunion
RO Romania
RU Russian Federation
RW Rwanda
SA Saudi Arabia
Sb Solomon Islands
SC Seychelles
SD Sudan
SE Sweden
SG Singapore
SH St. Helena
SI Slovenia
SJ Svalbard and Jan Mayen Islands
SK Slovak Republic
SL Sierra Leone
SM San Marino
SN Senegal
SO Somalia
SR Suriname
ST Sao Tome and Principe
SU USSR (former)
SV El Salvador
SY Syria
SZ Swaziland
TC Turks and Caicos Islands
TD Chad
TF French Southern Territories
TG Togo
TH Thailand
TJ Tajikistan
TK Tokelau
TM Turkmenistan
TN Tunisia
TO Tonga
TP East Timor
TR Turkey
TT Trinidad and Tobago
TV Tuvalu
TW Taiwan
TZ Tanzania
UA Ukraine
UG Uganda
UK United Kingdom
UM US Minor Outlying Islands
US United States
UY Uruguay
UZ Uzbekistan
VA Vatican City State (Holy See)
VC Saint Vincent and the Grenadines
VE Venezuela
VG Virgin Islands (British)
VI Virgin Islands (U.S.)
VN Viet Nam
VU Vanuatu
WF Wallis and Futuna Islands
WS Samoa
YE Yemen
YT Mayotte
YU Yugoslavia
ZA South Africa
ZM Zambia
ZR Zaire
ZW Zimbabwe

A few lesser-used ones below, but for completeness here they are:

ARPA Arpanet
COM US Commercial
EDU US Educational
GOV US Government
INT International
MIL US Military
NATO Nato field
NET Network
ORG Non-Profit Organization


Search everything plugin returns no posts

I came across a recent bug today on a client site where the excellent ‘Search Everything’ plugin was updated to the latest version (currently 8.1.3) and the search suddenly returned no results on the website.

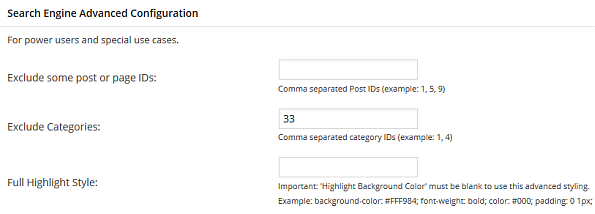
I narrowed it down to the ‘category exclude’ option as unchecking this box in the admin area made the plugin work as it should again. As you can see below, I had just one category in there for exclusion:


search everything not working


Unfortunately, unchecking this also broke my client’s search functionality as they had over 2000 posts we had to exclude from their search results, all in that one category.

Examining the code a bit further, it seemed something was probably amiss in wp-content/plugins/search-everything/search-everything.php around line 735:


// create the Categories exclusion query
	function se_build_exclude_categories() {
		global $wpdb;
		$excludeQuery = '';
		if ( !empty( $this->query_instance->query_vars['s'] ) ) {
			$excludedCatList = trim( $this->options['se_exclude_categories_list'] );
			if ( $excludedCatList != '' ) {
				$excluded_cat_list = array();
				foreach(explode( ',', $excludedCatList ) as $cat_id) {
					$excluded_cat_list[] = (int)$cat_id;
				}
				$excl_list = implode( ',', $excluded_cat_list);
				if ( $this->wp_ver23 ) {
					$excludeQuery = " AND ( ctax.term_id NOT IN ( ".$excl_list." ) OR (wp_posts.post_type IN ( 'page' )))";
				}
				else {
					$excludeQuery = ' AND (c.category_id NOT IN ( '.$excl_list.' ) OR (wp_posts.post_type IN ( \'page\' )))';
				}
			}
			$this->se_log( "ex category where: ".$excludeQuery );
		}
		return $excludeQuery;
	}


Glad to see that the developers have neatly laid out and commented the code, usually the sign of a decent plugin. I initially thought that escaping the apostrophes in the first reference to ‘page’ may work but it didn’t seem to. Here’s my temporary fix that works for my client until the developer can take a look:


	// create the Categories exclusion query
	function se_build_exclude_categories() {
		global $wpdb;
		$excludeQuery = '';
		if ( !empty( $this->query_instance->query_vars['s'] ) ) {
			$excludedCatList = trim( $this->options['se_exclude_categories_list'] );
			if ( $excludedCatList != '' ) {
				$excluded_cat_list = array();
				foreach(explode( ',', $excludedCatList ) as $cat_id) {
					$excluded_cat_list[] = (int)$cat_id;
				}
				$excl_list = implode( ',', $excluded_cat_list);
				if ( $this->wp_ver23 ) {
					$excludeQuery = " AND ( ctax.term_id NOT IN ( ".$excl_list." ))";
				}
				else {
					$excludeQuery = ' AND (c.category_id NOT IN ( '.$excl_list.' ))';
				}
			}
			$this->se_log( "ex category where: ".$excludeQuery );
		}
		return $excludeQuery;
	}


If you are a bit unsure of messing with php files, do this:

  • FTP into your server
  • Copy search-everything.php to your PC (full path is wp-content/plugins/search-everything/search-everything.php)
  • Open it in a text editor such as Notepad (or better still the free and excellent Notepad++) and modify the code to read as above
  • Rename search-everything.php on your server to search-everythingORIG.php
  • Upload the search-everything.php file from your PC to the server in the same location as it was.
  • Test and do the happy dance if it works

If you do apply this, don’t forget to keep an eye out for the bugfix from the plugin developers.

Hope it works for you!


Failure configuring windows updates reverting changes do not turn off your computer

This is quite a common fault on systems I have seen on PC systems ranging from XP through to Win 8. There are various ‘fixes’ mentioned out there, some of which are potentially damaging, so I thought I’d share my method of repair here. It has worked on 99% of computers we have had through the repair shop.

The fault often is triggered by a single downloaded update that does not want to apply itself. Subsequently, all the other downloaded updates fail too. If left, these updates will grow in quantity every week until they are difficult to diagnose, so do this sooner rather than later.

  • First off, check you are logged in as an administrator on the system.
  • Make sure that your clock set to the correct time, date, year and timezone. Don’t skip this, double check it!
  • In the following steps, make sure you download the correct version for your operating system, eg Windows 7 64-bit etc. If you are not sure which version you have, look in Control Panel, Select “View by small icons” then click on System. Here, you’ll see your Windows Edition and Sytem Type. While you are in here, check that you can see “Windows is activated”. If not, this is your problem and you need to activate Windows. To do this, click Start, type in “activate” then click on Activate Windows.
  • You can disable your antivirus temporarily but this is not necessary unless you try this method and it fails. Make sure if you do this that you are behind a firewall, either the Windows one or one in your router.
  • Open ‘Computer’ and navigate to C:\Windows\SoftwareDistribution\Download then delete everything you find in this folder.
  • Now, go to Windows update history on the computer (Control Panel, Windows Updates and select View Update History). Look at the ones that failed and note the KB number. You can then go to Microsoft Download Center and download each one individually by searching on the KB number. Use Internet Explorer for this, not Firefox/Chrome etc. After manually downloading and installing each one, restart the computer and repeat the process until each update is applied. Don’t skip the restart, this is necessary to apply many updates.
  • Once the list of downloads is finished you can create a restore point and then try an automatic Windows Update again, it should work now.


You can also give this a try – Windows Update Troubleshooter.  While this is, in theory, an automatic fix to the ‘failure configuing Windows updates’ issue, it doesn’t always work so I prefer to use my method above first which can isolate the problem to a single download. Good luck!


Cannot modify header information – headers already sent

So what exactly is ‘modify header information’ anyway? Well, it’s quite a common problem and one that has no definitive answer because there are many different code reasons why it occurs. That said, if you understand why it’s happening you should be able to diagnose your issue more easily. I’ll give an explanation first and then go on to provide a fix for WordPress template files as these seem to be the most prevalent code examples that get hacked and chopped about.

Headers sent to your browser explained

So, this issue rears its ugly head when someone visits your website and requests a page. Your server duly sends the page but before the visitor’s browser has completed the rendering of that page on the screen, it gets told to redirect to another page. This is unacceptable and the browser doesn’t like this so you see the error “Cannot modify header information – headers already sent”. Take this code example:

<html>
<?php
header('Location: https://www.pcrepairmansblog.com/');
exit;
?>

It’s simple enough php code where the object is to redirect the user’s browser to another website. This will not work though because the <html> line has started to output the code to the browser already. Remember that header() must be called before any actual output is sent and this can be by standard HTML, via PHP or even via the presence of blank lines.

The blank lines header error

The presence of blank lines within PHP in a file can cause errors. Here’s another example:

/*Some file*/

<?php

header('Location: https://www.pcrepairmansblog.com/');

exit;

? >

Spot the mistake? It’s a common one but the extra space after the final question mark is actually output to the browser and can be the difference between the page working or not. Extra whitespace where it shouldn’t be is tricky for coding beginners to spot, so work logically through the code and try to structure it as cleanly as possible. Compare any modifications you have made to the original file and try the original again to see if that triggers the error. Typical problems include whitespace or new lines before the opening <?php or after the closing ?> which works in many cases but often causes this error. Try to code more cleanly and remember this can cause big problems later on.

If your code has more than one PHP block in it and they are directly after each other, remove any spaces in between them. Try to consolidate the PHP into one block if possible here too.


Modify headers error where session_start() is used

Here’s another scenario:

<html>

<?php session_start(); ?>

<head>

<title>What's wrong?</title>

</head>

</html>

So what is going wrong here? Well, the session_start() function attempts to send headers with the session cookie to the client. Unfortunately, PHP already sent headers when it wrote the title element to the ‘output stream’. To resolve this, you would need to move the session_start() code to the top, above the <html> line.

Often, the error indicates exactly where you should be looking in your code so look for php and html output around there.

Script encoding errors, UTF-8 and BOM

The Byte Order Mark (BOM) is a Unicode character used to signal the byte order (aka ‘Endianness’) of a text file or stream. Still with me? If you’re not, don’t worry, all you need to do is to try to make sure you don’t have any Byte Order Marks in your code as this messes up the headers too. There is, in my mind, little place for BOM on a WordPress installation. The Unicode standard permits BOM in UTF-8 but doesn’t recommend it.

Errors caused by the inclusion of BOM are generally because

  • You viewed the source in a bad text editor and saved it (hint use Notepad++ which is free and brilliant)
  • You used a poor FTP client (hint: use WinSCP, also free and brilliant)
  • You had the BOM in there originally (hint: don’t download files from dodgy sites).

The simple solution is to open up all the offending files in Notepad++ (or a similar good text editor) and swap the file format from Windows/Mac to Unix and turn off the BOM.

For advanced users, you can run this nifty ‘find’ code on the server to remove all BOM code. Use with caution as it can modify any file.

find . -type f -exec sed '1s/^\xEF\xBB\xBF//' -i.bak {} \; -exec rm {}.bak \;

If you prefer to tread cautiously, use this code to simply display those BOM files:

grep -rl $'\xEF\xBB\xBF' .

The code above cleverly looks in the first line only which is where we find the BOM byte sequence (the UTF-8 representation of this is 0xEF,0xBB,0xBF). This means it runs pretty quickly.

Code your way out in functions.php

Well, I said I would give you a solution that works for WordPress and here it is. Please note, I would thoroughly recommend attacking the other solutions above first but if you are at your wits end try adding this to your theme’s functions.php file:

add_action('init', 'do_output_buffer');
function do_output_buffer() {
        ob_start();
}

PHP will now not send any input to the browser until the page is fully loaded. This in turn allows your WordPress installation to redirect users as it sees fit.

Summary

Remember, what you are trying to find is basically two lots of output to your browser and this is often via HTML code and PHP code being run at the same time. Track it down and your error should be removed. Don’t underestimate the widespread duff code in 3rd party plugins too, disable these one by one and try again.

Hope this helps you to sort out your ‘headers already sent’ issues, please use the social links to recommend this page to others before they pull their hair out too 🙂


How to clear the DNS cache

clear dns cache mac windows

Your DNS cache stores IP addresses of webservers. These servers have delivered pages which you and others have recently viewed. If the location of the web server changes for any reason before the entry in your DNS cache automatically updates, you will find yourself unable to access the website. You may also see a lot of 404 error codes, which generally happens when your DNS cache is messed up.

This is particularly prevalent for Webmasters who are setting up a new website and suddenly get presented with an old page or no page at all. Often it is visble on another computer or mobile phone which makes it even more frustrating.

By clearing this DNS cache, your computer will then re-query the nameservers for the new DNS information.

How to clear your computer’s DNS cache in Windows 2000, XP, Vista, 7 or 8

  • Click the Start button
  • On the Start menu, click Run
  • If you do not see the Run command in Vista/7/8, enter “run” in the Search bar just above the start orb
  • Type the following in the Run text box: ipconfig /flushdns
  • Press Enter

Pay attention to the space between the g and the forward slash.

Close the command window and retry your browser.

How to clear your computer’s DNS cache in Mac OS 10.7 onwards

Please note that for this to work you require the Admin account password.

  • Click Applications
  • Click Utilities
  • Double click the Terminal application
  • Type in: sudo killall -HUP mDNSResponder

Close the terminal window and retry your browser.

How to clear your computer’s DNS cache in Mac OS 10.6 and below

  • Click Applications
  • Click Utilities
  • Double-click the Terminal application
  • Type in: dscacheutil -flushcache

That’s it and you should now be able to fire up your browser and get a fresh version of the page.