
Here’s a quick tutorial how to resize images quickly and easily using a great free program called Irfanview.
First, if you haven’t already, download and install Irfanview from https://www.irfanview.com
When starting the program for the first time go to the top menu and select:
Options > Set file associations > Images only > OK
Now all images will open in this nifty program, it’s good and fast.
Note that with the latest Windows 10 updates, you need to go to Settings > Default Apps and set IrfanView as your default viewer. Some Windows updates are known to actually remove IrfanView altogether!
Resizing an image with Irfanview
Resizing images really depends on what you want to achieve as an end result. There are a few common scenarios here:
- You want to resize pictures to keep the file size down because you are sending by email. This option is usually when sending family pictures or work images to a colleague.
- You want to create an avatar, logo or smaller image from the original image.
- You want to crop a section of the image and resize it afterwards.
In each of these cases, we shall be using the resize dialog box so let’s see how to open this now.
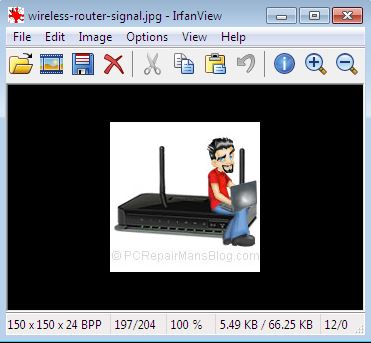
Open Irfanview from the shortcut or All Programs menu, and click on File > Open.
In the box that opens, navigate to the image you want to resize. Double click it or click on the Open button.
The image will open up in the main Irfanview window.
From the toolbar menu at the top, click Image and select Resize/Resample. This will open the Resize/Resample image dialog box which is where you will select the settings that will be applied to your final image.
Now we want to either use some of the handy presets you see to the right side or manually add our image sizes. Think of 800 x 600 pixels as a landscape orientation, postcard sized image and you won’t be far wrong. This is an ideal size to send pics to family and friends by email and not have them clogging up their inbox. Most digital cameras now have extremely high pixel count so your original could be something like 2992 x 2000. This is obviously a landscape image because the first figure quoted is always the width, the second being the height. Resizing this image to 800 x 600 would work as landscape photos are generally close to a 4:3 ratio (although that example of 2992 x 2000 is not quite 4:3). Because some stretching of the image would occur in that case, we can actually check the box preserve aspect ratio. Now, typing in your desired width should alter the height accordingly and vice versa, resulting in a non-stretched image. It’s up to you if you want to apply sharpen after resample, this is generally better when going to a very small image such as used for icons and avatars, so I would generally avoid it for larger photos. For images on web pages such as WordPress powered sites, a width of 500 pixels (px) is usually sufficient for the content areas, going down to 150 px where we are wrapping text around the image.
In the Size Method box, put a tick next to Resample (better quality), and using the dropdown arrow, select Lanczos filter (slowest). What we are doing when resizing is effectvely getting rid of pixels, so the image needs to have a degree of loss applied to it that the human eye can’t see that well. The jpeg format is called a ‘lossy’ format for this reason. When you see a pixellated image, this is generally because it has been compressed a bit too much and too many critical pixels have been lost.
When you have the settings the way you want them, click on the OK button. Irfanview renders the image in its new size, although it may still be zoomed in or out. Use the + or – magnifying glass on the toolbar to zoom in or out until you see 100% displayed on the lower toolbar of Irfanview. This is your actual image size, as rendered by your monitor.
IMPORTANT NEXT STEP
You currently have the resized file in the main Irfanview window but it isn’t saved. Most photographs are better quality when they are original and making them smaller reduces quality, so we generally don’t save the image at this point. We do a File > Save As. Think of this as duplicating the file and you won’t go wrong, we are saving another copy of the image but in a different size. You have the chance to navigate to a new folder (I usually create one called Resized) and save the image with a descriptive name, something like:
fred-birthday-party-may-2024.jpg
I like to keep all filenames lowercase and separate words with hyphens as it’s much better for search engines and for web server semantics when uploaded to the web.
Saving in Jpeg format is generally good for photos, it results in smaller file sizes. Slide the quality slider up to 100 for best quality though as the JPEG format is ‘lossy’. This means that the new image will be slightly poorer quality but much faster to load over the web and much smaller to send via email or social media.
If you’re saving for the web you’ll want to uncheck ‘Keep original EXIF data’ for your privacy. Remember, EXIF data can tell people where the photo was taken and on what device.
Now all that remains is to click on Save and you are done.
I hope that helped to clear up a bit of resizing mystery, please drop me a comment below if you have any questions or just to let me know it helped.


 It’s difficult for us to write an unbiased HDD Regenerator review because we use it all of the time in our repair shop. It’s the single best tool out there for repairing corrupt hard drives, and we get lots of them in. That said, we’ll try to remain objective and give an honest review.
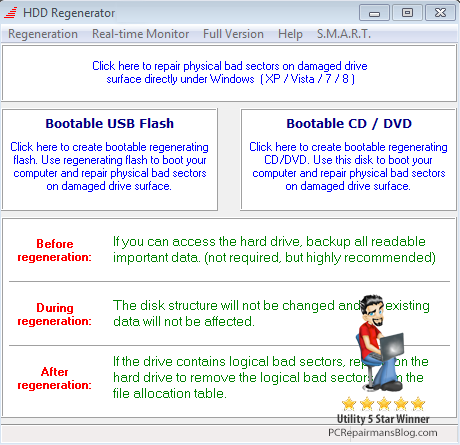
 Since I wrote the original
 Being asked often about where to find the lowest priced Norton Antivirus renewal made me come up with this article. Symantec offer a renewal by credit card that is often too pricey for most people. With Norton Anti-virus being a capable product, it’s a shame to uninstall it so here are a few tips to get a new and fully licensed program at a much reduced price. And there’s nothing illegal about it!