Cryptocurrency hardware wallets explained

trezor comparison best price uk

By far the biggest market leaders in hardware wallets are Trezor and Ledger. Most people are lazy and won’t do anything about security until the proverbial poop hits the fan. And wow, it certainly has done this for a lot of cryptocurrency owners. It seems like most days we hear about crypto hacks and scams, so wouldn’t it be nice to have just one device that you can treat like a bank vault? Well that’s a hardware wallet.

You’re probably here because you want to own (or already own) cryptocurrency and you probably know that the right thing to do is to get it off the exchange or your computer where it is extremely vulnerable to attacks, so you’re already on the path to securing your data.

Who are the market leaders in hardware wallets?

Without a doubt, Trezor and Ledger offer the most popular and reliable products currently available. If you buy either device, make sure you get it from the manufacturer’s website or from an authorised reseller. Amazon sell these items, but again make sure you buy from a known source. In the UK this will link to a Trezor with a reduced price but it actually comes from Trezor’s official Amazon outlet. If they are out of stock, just select another colour on that page.

Make sure when you receive it that the holographic sticker on the box shows no sign of tampering. It’s unlikely to happen but it’s there for a reason. Likewise, here’s the official Ledger store link

So how do hardware wallets work?

Well, they are small USB devices that store your private keys, heavily encrypted. These keys are kept offline as opposed to online such as on an exchange or on a computer. This eliminates the risk of your funds being stolen. By using them, you’ll have extremely strong protection against malware and viruses.

Transaction verification

Importantly, any transactions that you do are verified on the USB device itself, not the computer. As mentioned, computers are prone to all sorts of manipulation and software attacks. In the case of the Trezor and Ledger devices, these hardware wallets are encrypted with a pin code that you create which protects you against loss or theft.

Can I use a wallet on a computer with a virus?

In theory you could, but honestly, if you asked me to do this to demonstrate then I wouldn’t use my own cryptocurrency! Hardware wallets are as secure a solution as we have at the moment, but I have been around computers for a long time and know that where there’s a potential of financial reward the hackers will attempt to circumvent any method possible. Combine your hardware wallet with a nice, clean computer and you effectively become your own bank.

Are my private keys ever stored on a computer?

When you finish a transaction using a hardware wallet, your private keys stay on the hardware. In short, your private keys are never actually required to be stored on your computer, your cloud storage or anywhere else (such as a website) that would be open to attack.

How do I recover my hardware wallet?

You recover the hardware wallets through the use of a recovery phrase, also known as your seed phrase or private key. This is usually a string of words that you would write down on a piece of paper at the time of setting up your hardware device. Lose these and it is ‘Game over’ for ever retrieving your money. That said, there are methods of storing your seed phrase better than on a piece of paper, and I’ll go on to talk about that in another article.

What if I lose my hardware wallet?

You simply buy another one and restore your ‘account’ by entering your seed phrase.

Summary

Cryptocurrencies can be stored on a number of mediums such as on an exchange or in a digital wallet on your computer, tablet or phone. Without a doubt, I would endorse the use of a dedicated hardware wallet as it is currently offers the highest levels of security against theft or loss.

Get an Official Trezor

Get an Official Ledger

Trezor official UK Amazon store


2 Terabytes of backup storage for life only $45

zools-lifetime-backup-2tb-offer-cheapest

It’s becoming increasingly difficult to keep up with the ever-changing world of physical information storage. New hard drives and flash drives are constantly hitting the market and obsolescence is inevitable. There has never been a better time to store your data in the cloud, and cloud security has also never been better.

Get 1TB of cloud storage for just $45!

Cloud services, however, can be costly or they just don’t offer enough storage. You need a service that’ll securely back you up for life, and you need a service that won’t cost you thousands a year because you need terabytes of storage. This is especially prudent in a business scenario where you may have to provide cloud storage to multiple employees.

Zoolz Cloud Storage offers an elegant solution. You can get 1TB of cloud storage for data you access regularly PLUS with 1TB of cold storage that lets you store those important files you can’t afford to lose. The Instant Vault is easy to use — just drag and drop files via a web browser. The cold storage will allow you to automatically back up two devices at one time.

Store all of your most important files in a secure cloud

You can get 1TB of highly secure cloud storage data for just $45. Zoolz typically charges $3,600 for a lifetime subscription, but you won’t pay anywhere near that much. Incredible but true, you can save an amazing 98% with this time limited offer and back up all your data now!

Choose your desired package


My new Smart TV doesn’t support Amazon Video

We have had an upturn in calls about linking Smart TVs to services such as Amazon Prime Video and Netflix.

Many new smart television sets aren’t actually that smart it seems. Some give you a very basic set of apps just so they can use the term ‘smart’ on their advertising it seems. Common offenders seem to be JVC, Sony, Panasonic and many more big names.

So let’s look at what you can do if you purchased one of these and can’t get your favourite service on there. I’ll use Amazon Video as an example but you can substitute Netflix or similar apps here too.

Search for the Amazon app on your TV

First off, go into the app section of your television and see if there is an area to install new apps. If so, use the search facility to find ‘Amazon’ and if you see their video app then install it. Now, streaming video should be a matter of opening the app and signing in (just once) with your Amazon credentials.

If your TV doesn’t allow you to install other apps or you can’t find the Amazon one, then you’ll need to buy an external device such as a Fire stick. Amazon Fire sticks are pretty cheap and work well providing you have half decent WiFi. Clicking the image below links to their best seller:

Amazon Fire app install on smart tv JVC Sony Netflix

Alternatively, you can look at the same Fire stick, but buy a 4K version to match your 4K television. If you have one of these, then your streamed video will be as good quality as you can get. They aren’t much more and are pretty future-proof. They are also compatible with any TV (4K or not). Click on the image below:

Amazon Fire stick 4k tv video streaming

Can I connect a Fire stick by Ethernet? 

If you have Ethernet cabling close by, then you can buy an optional adapter because later Fire sticks have micro Ethernet ports. Ethernet basically uses a cable that plugs into the back of your router. A cabled connection is always faster and more stable than a WiFi one. Here’s the adapter:

How can I connect multiple devices to one Ethernet cable?

Well, there is a caveat here and that’s because people generally have just one cable from the router that goes close to the TV (if any at all). This means that you can’t use the TV on the same cable for other Smart functions – it’s either the TV or the Amazon box, unless you use one of them over WiFi.

My favoured solution, and one that we install for many clients, is to use a cable from the back of the router into what is called a ‘switch’, generally located in your TV cabinet. A switch will allow multiple devices with cabled connections to transmit and receive data from the internet.  

Buy an 8-port Gigabit one which are cheap but have the capacity to deliver the best speeds. Something like this very low power consumption Netgear GS308:

You insert the cable from the router into one port and then you have 7 free ports to connect to other devices such as your TV, DVR, Fire stick, Xbox, Playstation etc. For that you’ll use a few patch cables. We use
Cat 6 patch cables which are more than capable of supporting Gigabit speeds and can be had very cheaply. 

If you can’t shell out for any of these (student, we’re looking at you!) then you can also consider using an existing laptop or tablet and an HDMI cable if that suits your viewing habits better. It’s a bit clunky though and we’d definitely recommend using the Fire sticks above, especially because they both have excellent remote controls and are portable.


HDD Regenerator review

HDD Regenerator reviewIt’s difficult for us to write an unbiased HDD Regenerator review because we use it all of the time in our repair shop.  It’s the single best tool out there for repairing corrupt hard drives, and we get lots of them in. That said, we’ll try to remain objective and give an honest review.

If I mention that we get on average 10 to 15 corrupt drives a week through our medium sized repair shop alone, then you’ll see why this is such a big problem. For you to decide whether it’s right for you, you first you may need to understand what happens to corrupt a hard drive and why your PC won’t start when there is corruption on the disk.

What is hard drive corruption?

Hard drive corruption happens quite often to laptop and desktop computers. This is generally because of a few things:

  1. The battery going completely flat (in laptops) or a sudden power cut before the system has had time to write all of its data to the hard disk
  2. Knocks or bumps to a laptop or desktop PC while in use
  3. The hard drive is mechanically failing.

The result is a hard drive that has one or more areas on it which are unreadable (known as ‘bad sectors’). These sectors may contain your data, such as documents or images, or a file that your operating system (Windows, Linux, Mac etc.) needs to read information from. If it’s a Windows file, then the whole installation is effectively rendered useless as Windows cannot start. Likewise Mac or Linux will refuse to power up. This can happen to computers, often when the power is suddenly cut or a software crash occurs. The dreaded ‘Blue Screen of Death’ can also result in drive errors.

How do I know if my hard drive has a fault or is corrupted?

Symptoms of this type of error are computers that boot so far into Windows then display a black screen. Many will restart automatically and end up ‘looping’. This is because Windows cannot find the files it requires, throws an error and your PC will restart automatically on seeing that error. Even safe mode will usually do this looping, a sure sign that you need a software tool to repair the hard drive’s bad sector errors.

The majority of hard drives with bad sectors have an incorrectly magnetized disk surface. Fortunately, there are solutions and the clever guys at Abstradrome have developed an algorithm which is used to repair damaged disk surfaces. This technology supports many types of hard disk drives and can repair damage that even low-level disk formatting can’t repair. Because of the way the repair is made, the existing information on the hard drive (e.g. your data and the important Windows files) will not be affected.

For our repair shop where we repair Linux and Mac devices as well as Windows this is simply a brilliant, cross-platform tool.

HDD Regenerator review – the features

Let’s look at the features and benefits of this software

Program features

  • It can detect physical bad sectors on a hard disk drive surface.
  • It is able to repair bad sectors (magnetic errors) on a hard disk surface.
  • The product ignores your file system and scans the disk at physical level.
  • It can be used with FAT, NTFS or any other file system
  • It can read and repair unformatted or unpartitioned disks.
  • Starts within Windows environment (XP/Vista/7/8/10)
  • Bootable CD or USB flash drive allows the HDD Regenerator to work on a non-starting PC

This is an impressive feature set. The manufacturer also offers:

  • A no-quibble 30 day money back guarantee
  • Unlimited license period
  • Free 1 year minor upgrades (although the software works on all drives exceptionally well)
  • Large discounts on major upgrades

Main benefits

When a hard drive is damaged with bad sectors, the disk not only becomes unfit for use as there are areas which are damaged that you will ultimately write data to.  You then also risk losing information you have already stored on it. HDD Regenerator REPAIRS damaged hard disks without affecting or changing existing data so it is one of only a few tools that can actually do this task.  Currently we have found no products that outperform this one, so it is worth the investment.

Downloading the disk repair software

Purchase and download a copy and install it to a working Windows computer. You can then create a bootable CD, DVD or flash drive that will run on your problem computer and scan the drive for bad sectors, the most common hard drive error that we see in our workshop.

If you’re a bit confused by this, the term ‘bootable’ means that it starts up from your computer and runs WITHOUT using your hard disk drive that has Windows on it. Clever stuff!

So, the program takes about 1 minute to install and, when started, it immediately scans the disk(s) on the PC it is installed on. This is no problem if it is installed on a friend’s or family member’s PC as it will be simply carry out a very quick scan of the ‘SMART’ data on the drive. What we now need to do is to create a bootable CD to insert on the dead (or dying) PC.

Create a bootable CD, DVD or USB pen drive

hdd regenerator 2019 fix drive error

Open the program from the tray icon (bottom right of the screen) or from the Programs menu’.  Select the bootable flash drive or CD/DVD option. Follow the on-screen prompts until you have created your bootable medium.

Insert this bootable media into your problem computer and run a full scan and repair. It could a few hours depending on the size of the hard disk and the speed of the computer.

Can HDD Regenerator repair my hard drive?

The vast majority of damaged hard disks can be repaired by regeneration and there is a full money-back guarantee if you’re not satisfied. If the first found bad sector has been successfully regenerated, it is very promising and you can generally regenerate all bad sectors on your hard drive. If the first bad sector has NOT been successfully regenerated, then you will probably need to recover your data and replace your hard disk drive as soon as possible. A few bad sectors is acceptable but more than a few and we suggest replacing the hard drive because it will fail imminently. The latest generation of SSD drives give a significant speed increase to most systems, they are relatively cheap and you can copy over your data once recovered.

Personally we would advise purchasing this tool over any others currently on the market as the success rates are so high. HDD Regenerator is available direct from the vendor here at a price we think is a bargain for the power of the software:


If you wish to add your personal experiences to this hdd regenerator review, please contact me via the site or drop a comment below.


Avgidseh.sys error when starting Windows

avgidseh
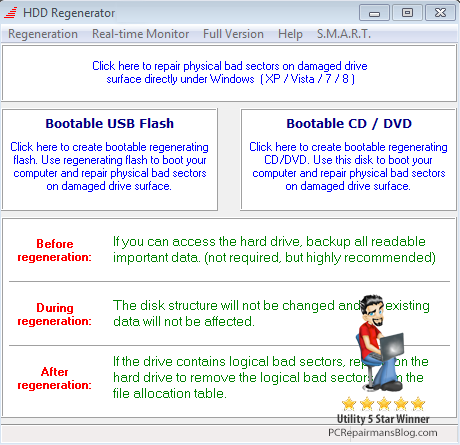
Since I wrote the original avgidseh.sys fix article, there have been lots of other affected PCs that have passed through our workshop. This is not a rogue update fault now as it was back in late 2010, rather an issue that is, as yet, untrackable to a single problem. AVG are getting the blame for many bad startup errors as the users only see the last driver to load which is often AVGIDSEH.SYS. I have, however, noted that applying an AVG-specific fix works in many cases.

To resolve issues that are AVG related, follow the steps below.

Boot your PC with a boot CD. I recommend UBCD4WIN which is an excellent tool to have in your armoury for PC repair. Download the program and install onto your computer. Build an image from your Windows XP CD (required). If you don’t have a Windows XP disc then you can download the AVG boot disc from here. Please make reference to my original avgidseh.sys fix article for creation and method. Use my updated folder renaming fix listed below in both cases.

What we shall be doing is renaming the AVG folders so they are not loaded on startup. For UBCD4Win, start the computer with the disc inserted and boot from it. This may involve changing the boot order that your PC or laptop uses. Once we have a new ‘environment’ – that is the computer is running from the CD – then we can start a file explorer such as A43, Agent Ransack, Xplorer2 or Free Commander. This will give us access to the files on the hard drive. Folders to rename are as follows:

Windows XP and 2000 (Note: Later AVG versions do not run on Windows 2000 so forget a reinstall afterwards!)

  1. C:\Program Files\AVG  –  This is also named C:\Program files(x86)\AVG  when you have a 64bit operating system
  2. C:\Documents and settings\All users\Application data\AVG8
  3. C:\Documents and settings\All users\Application data\AVG9
  4. C:\Documents and settings\All users\Application data\AVG10

Windows Vista, 7, 8 and 10

  1. C:\Program Files\AVG  –  This is also named C:\Program files(x86)\AVG  when you have a 64bit operating system
  2. C:\ProgramData\AVG8
  3. C:\ProgramData\AVG9
  4. C:\ProgramData\AVG10
  5. C:\Users\<user>\AppData\Roaming\AVG8
  6. C:\Users\<user>\AppData\Roaming\AVG9
  7. C:\Users\<user>\AppData\Roaming\AVG10

Example:

rename C:\Program Files\AVG to C:\Program Files\OLDAVG

Once renamed, they will no longer load on startup.

Avgidseh.sys is not the only possible cause…

Now I like to run a CHKDSK while still in this ‘running from cd’ environment as it fixes any errors on the hard drive. These are often caused by the PC being shut down while writing to the drive and can also be the main reason the computer failed to start, don’t always blame AVG because the avgidseh.sys driver was the last thing to load! In UBCD4Win we would run Disk Check which does a full scan and repair of the sectors on the hard drive. Just fire it up, tell it your target drive (usually c:) and let it run. Have a cuppa as this takes a while.

The professional method

If you want to do a complete scan and repair of your disk using a professional repair tool that we use in our workshop and lab, you should investigate HDD Regenerator. We have carried out a full review of HDD Regenerator here. It has fixed the majority of the faulty drives we see that cause constant ‘looping’ of the Windows boot procedure and it’s in daily use in our workshop. It’s not too expensive and is a better solution than the free methods we list above for many people as it is much easier to use. It also blows CHKDSK into the weeds for being able to recover data and salvage your hard drive. Where CHKDSK marks the sector as bad, HDDRegenerator actually recovers the data from it and moves it to a new, good sector. As mentioned, this tool isn’t free (it does give you a free trial) but you can buy it once and fix as many drives as you want with it. It also creates a simple to use bootable USB drive or CD/DVD disk for you. Any self-respecting PC geek or computer repair shop shouldn’t be without it in the toolkit.

Check out HDDRegen here

As mentioned in other articles, despite AVG being a capable free antivirus, I heartily recommend the brilliant Kaspersky Pure as a set and forget internet security solution. Here is my method to get the cheapest Kaspersky Total Security and be fully protected against viruses and malware.

Finally, let me know by commenting below if this avgidseh.sys fix works for you and please leave any other information you can share with the community.


Install Irfanview and resize images easily

Here’s a quick tutorial how to resize images quickly and easily using a great free program called Irfanview.

First, if you haven’t already, download and install Irfanview from https://www.irfanview.com

When starting the program for the first time go to the top menu and select:
Options > Set file associations > Images only > OK
Now all images will open in this nifty program, it’s good and fast.

Note that with the latest Windows 10 updates, you need to go to Settings > Default Apps and set IrfanView as your default viewer. Some Windows updates are known to actually remove IrfanView altogether!

Resizing an image with Irfanview

Resizing images really depends on what you want to achieve as an end result. There are a few common scenarios here:

  1. You want to resize pictures to keep the file size down because you are sending by email. This option is usually when sending family pictures or work images to a colleague.
  2. You want to create an avatar, logo or smaller image from the original image.
  3. You want to crop a section of the image and resize it afterwards.

In each of these cases, we shall be using the resize dialog box so let’s see how to open this now.

Open Irfanview from the shortcut or All Programs menu, and click on File > Open.

In the box that opens, navigate to the image you want to resize. Double click it or click on the Open button.

The image will open up in the main Irfanview window.

Irfanview resize image tutorial

From the toolbar menu at the top, click Image and select Resize/Resample. This will open the Resize/Resample image dialog box which is where you will select the settings that will be applied to your final image.

Now we want to either use some of the handy presets you see to the right side or manually add our image sizes. Think of 800 x 600 pixels as a landscape orientation, postcard sized image and you won’t be far wrong. This is an ideal size to send pics to family and friends by email and not have them clogging up their inbox. Most digital cameras now have extremely high pixel count so your original could be something like 2992 x 2000. This is obviously a landscape image because the first figure quoted is always the width, the second being the height. Resizing this image to 800 x 600 would work as landscape photos are generally close to a 4:3 ratio (although that example of 2992 x 2000 is not quite 4:3). Because some stretching of the image would occur in that case, we can actually check the box preserve aspect ratio. Now, typing in your desired width should alter the height accordingly and vice versa, resulting in a non-stretched image. It’s up to you if you want to apply sharpen after resample, this is generally better when going to a very small image such as used for icons and avatars, so I would generally avoid it for larger photos. For images on web pages such as WordPress powered sites, a width of 500 pixels (px) is usually sufficient for the content areas, going down to 150 px where we are wrapping text around the image.

In the Size Method box, put a tick next to Resample (better quality), and using the dropdown arrow, select Lanczos filter (slowest). What we are doing when resizing is effectvely getting rid of pixels, so the image needs to have a degree of loss applied to it that the human eye can’t see that well. The jpeg format is called a ‘lossy’ format for this reason. When you see a pixellated image, this is generally because it has been compressed a bit too much and too many critical pixels have been lost.

When you have the settings the way you want them, click on the OK button. Irfanview renders the image in its new size, although it may still be zoomed in or out. Use the + or – magnifying glass on the toolbar to zoom in or out until you see 100% displayed on the lower toolbar of Irfanview. This is your actual image size, as rendered by your monitor.

IMPORTANT NEXT STEP

You currently have the resized file in the main Irfanview window but it isn’t saved. Most photographs are better quality when they are original and making them smaller reduces quality, so we generally don’t save the image at this point. We do a File > Save As. Think of this as duplicating the file and you won’t go wrong, we are saving another copy of the image but in a different size. You have the chance to navigate to a new folder (I usually create one called Resized) and save the image with a descriptive name, something like:

dave-birthday-party-may-2014.jpg

I like to keep all filenames lowercase and separate words with hyphens as it’s much better for search engines and for web server semantics when uploaded to the web.

Saving in Jpeg format is generally good for photos, it results in smaller file sizes. Slide the quality slider up to 100 for best quality though.

Resize image irfanview jpeg quality

Now all that remains is to click on Save and you are done.

I hope that helped to clear up a bit of resizing mystery, please drop me a comment below if you have any questions or just to let me know it helped.


Kaspersky Internet Security licence renewal instructions

These are the instructions to follow when renewing the licence on Kaspersky Internet Security. I’ll presume that you have a new licence key to hand from a recent version and that the product is the same (eg not Kaspersky Pure etc). If you don’t have a new licence yet, you’ll find them for sale at discounted prices here [Hint: search for ‘kaspersky internet security 3 user’ or however many computers you need to protect]

You can buy the new licence in advance of your current product expiring, but you don’t need to wait until the existing licence has expired to install it any more. Kaspersky now seems to add on the remaining days from your current licence to your new licence, providing the product is the same.

First, open Kaspersky. The quickest way is to double click the icon in your system tray (bottom right of your desktop screen). If you can’t see it there, use the little arrow on the left to expand the icons and find it. It’s a red letter K like this one below:


kaspersky-internet-security-1


Now, look in the bottom right of the Kaspersky window and click on ‘License: xx days remaining’ (where xx is your actual days remaining).


kaspersky-internet-security-2


Now click on the ‘Enter activation code’ button.


kaspersky-internet-security-3


Finally, type in your activation code, or copy and paste it if you received it by email. Be careful to get EXACTLY the right code as some letters do look similar! You can copy and paste the whole of the new licence key into the first entry field, it will separate them for you.


kaspersky-internet-security-4


Press the ‘Save activation code’ button and you’re done. Give the PC a restart, open Kaspersky again and you should be able to see your licence has the correct amount of days remaining.

I sell full versions in my shop here at discounted prices that are often much cheaper than renewal. Grab the code from those and you won’t need to install anything, just follow the method above.


Four ways to execute a shell script

shebang script explainedIf you need to execute a shell script and can’t get your head around the conflicting information out there, I’ll try to clear things up. There are quite a few ways to execute a shell script and each has its pros and cons. If you are coming from a Windows environment where the file extension dictates how we handle the file, then try not to think like this. A script can have no extension but still be run. So, let’s take a look at our four ways to execute a shell script.


Execute shell script by calling the filename (Method 1)

This method simply changes into the script’s containing directory and calls the script’s file name to execute it.

We can change into the directory first

$ cd /usr/bin


and then call the script thus:

$ ./myscript


Now, my preferred method is to consolidate these 2 lines into 1 , calling it from any directory by simply adding the full path to the file:

$ /usr/bin/myscript


If you have the shebang at the start of this script, then it will be executed by using the command interpreter that is specified directly after it.

Execute shell script by specifying an interpreter (Method 2)

You can also run a shell script by specifying the interpreter. You do this by adding the preferred interpreter within the command thus:

Execute the script using the bash interpreter

$ bash myscript


Execute the script using the sh interpreter

$ sh myscript


There are usually several interpreters available such as bash, sh,  csh, ksh and more.  Note that if you use a different interpreter in the shebang, this will be overridden by the one you specify.

Execute shell script with . ./ (Method 3)

If you execute the shell script by using . ./ (aka ‘dot space dot slash’), it will not fork a sub shell and you’ll see it executed in the current shell.

$ . ./myscript


Why do this? Well it’s normally used after we have changed something in the .bashrc or .bash_profile. Using this method of execution we won’t need to logout and login again.

$ cd ~

$ . ./.bashrc

$ . ./.bash_profile

Execute shell script with source command (Method 4)

source is a bash shell built-in command that executes the contents of the file, which is passed as argument, in the current shell. It has a synonym that you can use which is the dot or period (.)

This can replace the ‘dot space dot slash’ method.

source myscript [arguments]

. myscript [arguments]


A word of warning here though because ./ and source are not quite the same.

./myscript runs myscript as an executable file in a new shell
source myscript reads and executes commands in the current shell environment

To help further, ./myscript is not the same as . myscript, but . myscript is exactly the same as source myscript


Do you have a preferred method for executing shell scripts and if so, why? Let me know below.


Cannot find unread emails in Gmail inbox

I have had quite a few customers calling over the years to say that they cannot find unread emails in their Gmail inbox. It’s a common complaint and one which I have found can be quickly cured by doing the following.

Logon to Gmail in your browser (Chrome, Firefox, Internet Explorer, Safari etc).

Go to the search bar at the top of the Google page (the one with the blue and white ‘magnifying glass’ search button that looks like this):

cannot-find-unread-email-inbox-gmail

In that box, type this:

is:unread in:anywhere

Note that there is a space after the word ‘unread’ but not anywhere else. Copy and paste my text above if you aren’t sure.

Now press enter and you should see all of your unread emails! You can click to read individual ones or select them using their check boxes and then do ‘More’, then ‘Mark as read’.

Try some new search terms to get more out of Gmail

If you want to take things further, there are lots of useful search ‘operators’ that you can use within Gmail too. Get used to using these and you’ll open up a whole new level for this great email tool. Here’s a list of the most popular ones:


What you can search by Search operator & example
Specify the sender from:

Example: from:amy

Specify a recipient to:

Example: to:david

Words in the subject line Subject:

Example: subject:dinner

Messages that match multiple terms OR or { }

Example: from:amy OR from:david

Example: {from:amy from:david}

Remove messages from your results -

Example: dinner -movie

Find messages with words near each other. Use the number to say how many words apart the words can be AROUND

Example: dinner AROUND 5 friday

Messages that have a certain label label:

Example: label:friends

Messages that have an attachment has:attachment

Example: has:attachment

Messages that have a Google Drive, Docs, Sheets, or Slides attachment or link has:drive

has:document

has:spreadsheet

has:presentation

Example: has:drive has:document

Messages that have a YouTube video has:youtube

Example: has:youtube

Messages from a mailing list list:

Example: list:[email protected]

Attachments with a certain name or file type filename:

Example: filename:pdf

Example: filename: homework.txt

Search for an exact word or phrase " "

Example: "dinner and movie tonight"

Group multiple search terms together ( )

Example: subject:(dinner movie)

Messages in any folder, including Spam and Trash in:anywhere

Example: in:anywhere movie

Search for messages that are marked as important is:important

label: important

Example: is:important 


Starred, unread, or read messages is:starred

is:unread

is:read

Example: is:read is:starred

Messages that include an icon of a certain color has:yellow-star

has:blue-info

Example: has:purple-star

Recipients in the cc or bcc field cc:

bcc:

Example: cc:david

Note: You can’t find messages that you received on bcc.

Search for messages sent during a certain time period after:

before:

older:

newer:

Example: after:2004/04/16

Example: before:2004/04/18

Search for messages older or newer than a time period using d (day), m (month), and y (year) older_than:

newer_than:

Example: newer_than:2d

Chat messages is:chat

Example: is:chat movie

Messages delivered to a certain email address deliveredto:

Example: deliveredto:[email protected]

Messages in a certain category category:

Example: category:updates

Messages larger than a certain size in bytes size:

Example: size:1000000

Messages larger or smaller than a certain size in bytes larger:

smaller:

Example: larger:10M

Results that match a word exactly +

Example: +unicorn

Messages with a certain message-id header Rfc822msgid:

Example: rfc822msgid:[email protected] 

Messages that have or don’t have a label has:userlabels

has:nouserlabels

Example: has:nouserlabels 

Note: Labels are only added to a message, and not an entire conversation.

Credit for search operator list:  https://support.google.com/mail/answer/7190?hl=en


Outlook emails stay in Outbox after Windows 10 upgrade

email-settings-pop-imap-btconnect-outlookAre you getting your Outlook emails stuck in your Outbox after upgrading to Windows 10? I’ve seen this happen on several machines and it really seems to be a problem where Windows corrupts the Outlook database and/or profile on many versions of Microsoft Office (2007, 2010 and 2013). The easiest fix and one that I’d recommend here is to delete or move the stuck emails then close all programs that are open such as Outlook.

Now we can use the in-built Windows “System File Checker” that will scan your PC and repair any corrupt files that it finds. To do this:

  • Click Start
  • Type cmd in the Search box
  • Right-click Command Prompt and then click ‘Run as administrator’. If you are prompted for an administrator password or for a confirmation then type the password or click ‘Allow’
  • In this black window (the command prompt) that appears, type in sfc /scannow noting the space before the forward slash
  • Press enter and go and grab a delicious cup of coffee because this will take a while

Note: Do not close this Command Prompt window until the verification is 100% complete. The scan results will be shown after this process is finished.

Technical information for nerds
The sfc /scannow command will scan all protected system files, and replace corrupted files with a cached copy that is located in a compressed folder at %WinDir%\System32\dllcache.
The %WinDir% placeholder represents the Windows operating system folder. For example, C:\Windows.

The time taken to complete this scan is different on every PC but usually can range from 20 minutes to an hour or more. If it solves your problem (which it has on over 50 client PCs to date) then please take a minute to drop a comment below or maybe buy something through our shop to say thanks.