2 Terabytes of backup storage for life only $45

zools-lifetime-backup-2tb-offer-cheapest

It’s becoming increasingly difficult to keep up with the ever-changing world of physical information storage. New hard drives and flash drives are constantly hitting the market and obsolescence is inevitable. There has never been a better time to store your data in the cloud, and cloud security has also never been better.

Get 1TB of cloud storage for just $45!

Cloud services, however, can be costly or they just don’t offer enough storage. You need a service that’ll securely back you up for life, and you need a service that won’t cost you thousands a year because you need terabytes of storage. This is especially prudent in a business scenario where you may have to provide cloud storage to multiple employees.

Zoolz Cloud Storage offers an elegant solution. You can get 1TB of cloud storage for data you access regularly PLUS with 1TB of cold storage that lets you store those important files you can’t afford to lose. The Instant Vault is easy to use — just drag and drop files via a web browser. The cold storage will allow you to automatically back up two devices at one time.

Store all of your most important files in a secure cloud

You can get 1TB of highly secure cloud storage data for just $45. Zoolz typically charges $3,600 for a lifetime subscription, but you won’t pay anywhere near that much. Incredible but true, you can save an amazing 98% with this time limited offer and back up all your data now!

Choose your desired package


Crash Plan backup software full review

CrashPlan has been around for a while now and is looking like one of the best solutions out there for business and personal backups.

With no storage size limits, bandwidth caps or file-type restrictions, Crash Plan really has lots going for it. On top of this, there’s enterprise-class hardware and military-grade security with no extra fees payable.

What I particularly like about Crash Plan is that there is free backup to an external drive and any trusted, internet-connected computer. You can also subscribe to their robust cloud-based destination, “CrashPlan Central” and this is certainly worth the extra money. It’s as quick as any cloud-based backup we have tested and the interface is functional and quite slick.

See what Crash Plan can offer here


crashplan online backup


Online backup and coupon code for 20% off Mozy

Mozy online backup discount coupon codeOnline backup just got a whole lot cheaper with the latest coupon code from Mozy.   Click the link below and type in the coupon code ENCRYPTION for 20% discount:

Mozy online backup coupon code

Note: Enter the code into the promotional code box at signup to get the full discount.


Other recent contenders for our recommended backup software:

Crash Plan


Get more space on Dropbox

Here’s a great way to get more space on Dropbox, the free secure online file storage service.

Recently, Dropbox offered an increase to customers who used the Camera Upload facility. This method takes advantage of their generous offer and allows you to use that free space to the maximum.

First, if you haven’t got this great free online storage tool then click here to download it with a free gift of extra storage from me!

Note down your current Dropbox allowance by left clicking once on the tray icon (eg 1GB% of 2.5GB used). Don’t skip this step.

Copy 2.5 GB or more of video files to a pen drive or external hard drive. Don’t try to just copy to a folder on your PC as this won’t work!  You can use photos (or even a combination of photos and videos) but lots of small files take much longer to upload. Try to avoid a single movie that is very large, eg 3.5GB as syncing this is often flaky. If you’re in a hurry, increase your syncing speed by right clicking the tray icon then Preferences > Bandwidth and select ‘Don’t limit’ on both upload and download speeds.

Switch off other Dropbox devices that sync, just use one PC.

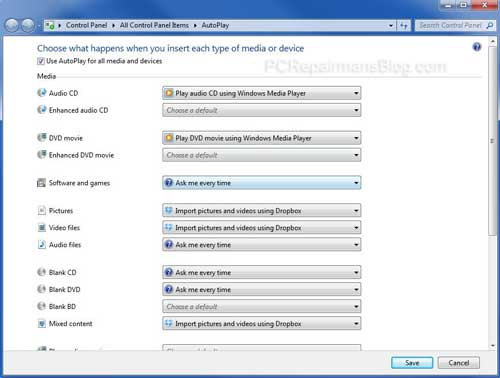
Put the pen drive in, allow the Dropbox pop-up import box to show. If it doesn’t show, select it from the Windows autoplay box. Note: if autoplay is not enabled, click on Start > Windows > Type “autoplay” and click the Autoplay link in the panel above at the top. You should set “Import pictures and videos using Dropbox” in the following fields as shown:

Windows autoplay Dropbox


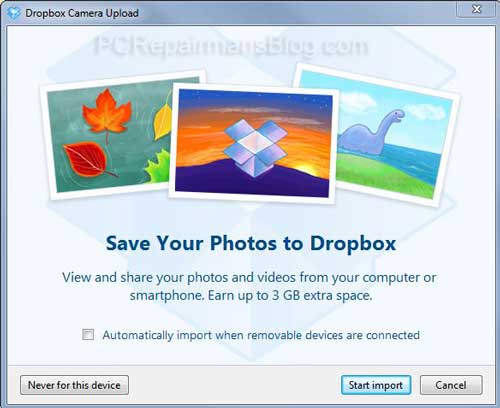
Once you see the Dropbox Camera Upload box, untick the ‘always do this’ box (IMPORTANT if you are not interested in always using the feature).
Import to your Camera Uploads folder in Dropbox.

Dropbox camera upload

Let the import finish, syncing starts immediately. Note this may take several hours or days depending on your connection speed! Watch your allowance go up to 3GB more than you had before (eg 4GB% of 5.5GB used).
Delete the files if you want to, but leave 1 in there. Rinse and repeat using the same pen drive for any other Dropbox accounts, family or friends. Rename a few files and swap one each time just in case. Now you have extra space and can use it whenever you want.


Dropbox free space FAQ

Why copy 2.5GB not 3GB of files to Dropbox?

This is because Dropbox currently give you 0.5GB for using the Camera Upload feature and 0.5GB for each further 0.5GB of files that you copy over.

What about Dropbox’s upload and download speed settings that I changed?

Change them to whatever you are comfortable with. If you have a slow connection then limit it to 50kB/s download and 10kB/s upload, otherwise don’t limit it.

Does this work on the iPad/iPhone?

Sure does. Download the iPad and iPhone app here. This link takes you directly to the App Store and allows you to download the free Dropbox app. Once installed, any future camera photos and videos will be seamlessly transferred to secure online storage. Dropbox is indispensable for the iPad and you can use it to upload files (including movies) to the iPad too, without iTunes!


Final thoughts

If your friends don’t have Dropbox then please point them to this article and get them to use my download link above to say thanks. Dropbox is a great tool and has been completely stable on my systems and client systems for many years.


Syncback blank account password not accepted

Syncback scheduled backup softwareSyncback is an excellent backup tool which we use here to control client backups. There’s a free version and a more powerful paid version. They both suffer the same problem as other backup tools which is the inability to schedule a backup for a user profile that has a blank password.

Usually the error is something like this:

“An error has occurred while attempting to set task account information. The specific error is: 0x8007007: Access is denied. You do not have permission to perform the requested operation”

No problem because we can head over to the trusty Windows Registry Editor to force Windows to accept blank passwords.
Now first off I want to say that any account without a password is running the risk of being compromised, especially those that are Administrator accounts. However, if you need to have your passwords blank for any reason, here’s my fix:

  • Start
  • Run and type in “regedit” without the quotes
  • Press enter
  • Navigate to HKEY_LOCAL_MACHINE\SYSTEM\CurrentControlSet\Control\Lsa
  • Double click it the subkey “LimitBlankPasswordUse”.  If it’s set to 1 it will not allow blank passwords so change this to 0 (zero).
  • Exit the registry editor and you should now have the ability to schedule without passwords.

Hope that helps!


Mozy discount code for 10 percent off

mozy-online-backup-dicount-coupon-code-freeWe have a  Mozy discount code for those of you who want to take advantage of this clever online backup service. Mozy is one of the foremost online backup providers with a very stable, simple and accessible platform.
2 easy steps…


1. Click here – MOZY DISCOUNT CODE

2. Type in the PCRepairmansBlog.com promotional code SAVEME10 for a generous 10% off of any Mozy subscription. This offer officially expires on October 1, but may carry on beyond that date.


Mozy Stash

Mozy is also beta testing a synchronising feature called Stash. If you are a Mozy Online Backup user and you haven’t got Stash already, apply for the stash beta here.


Backup WordPress database tutorial

wordpress backup

This is a tutorial on how to backup your WordPress database manually using phpMyAdmin and the SQL export method. It may sound difficult for the non-technical but it isn’t really and is something that is essential for the maintenance of any WordPress site. If you have ever lost any data before you’ll know what a huge and time consuming problem this can lead to so let’s get going.

First off, please bookmark this page in your browser, you’ll probably need to refer to it again for the first few backups!

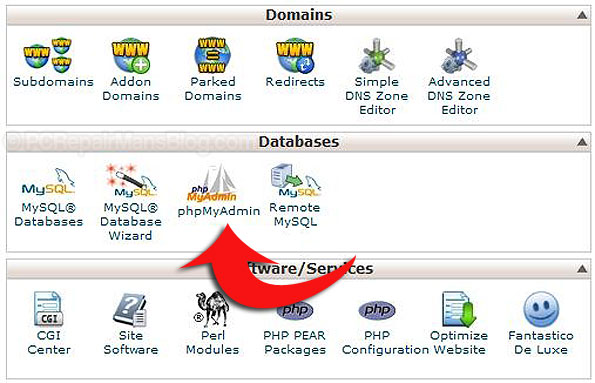
Login to your cPanel. This is where you will see lots of useful tools and the one we shall use is phpMyAdmin shown below.

php myadmin wordpress backup

Click to open it and you will now have to select your database from the left hand side, usually something like mysite_wrdp1. Don’t select the information_schema as this is not the one we want.

Now you look to the right of the screen and you can see tabs relating to functions we can actually run on the database.

phpmyadmin sql wordpress

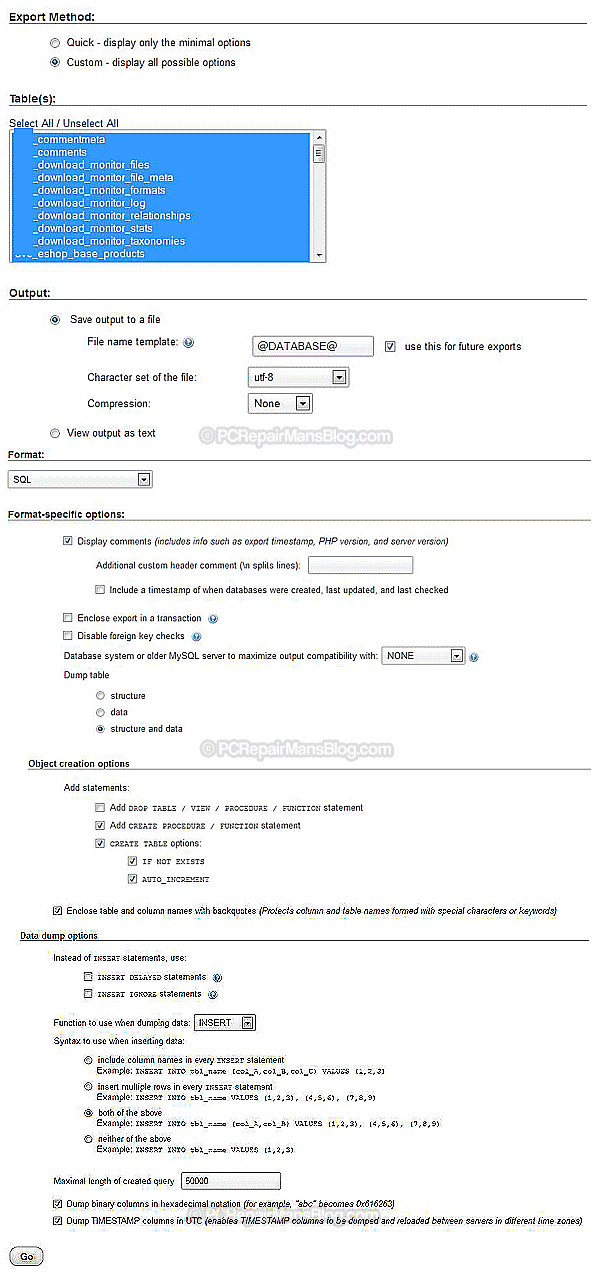
We want to select ‘Export’ here. Now for the bit everybody gets wrong…. You should select the ‘Custom export method’ which gives you greater control over the final exported database. For ease of reference, I have compiled a screenshot of the best options to select for the majority of users. Make sure you click to select all tables in your database, I have seen so many people just backup one table within the database and the backup is effectively useless. Here are all the settings you need to have in the latest version of  phpMyAdmin:

database backup wordpress phpmyadmin latest

Notice I have removed the prefix from the table names (shown in blue above) as you or a program may have modified this. By default it is wp_ but many security packages rename it. There is nothing to do here, I’m just pointing this out for clarity.

Now you can click on ‘Go’ and you should be able to download a working copy of your database. You can’t really view this file as it requires a database server (although you can connect to it with a few software tools that exist). You can however upload it to a new installation or use it when the poop hits the fan and disaster strikes on your server.

That’s about all you need to do to have a working backup of your database. Remember to FTP into your server and copy all the files over too as many files and folders are necessary to get back up and running as you were. For example, your wp-content/uploads folder is not backed up automatically and this is where most images used on your blog are stored.

Automatic WordPress SQL backups and file copying features

If you want a click-and-forget solution then I would heartily recommend the excellent WP-Twin which you can download here https://wp-twin.com
This neat program not only backs up your database but also ALL of your files on the server, meaning that any special folders outside of WordPress get copied over too. It has an easy reinstall option that takes the pain out of disasters, well worth it if you aren’t too sure how to go about reinstallation.

I hope this helps you to start a decent WordPress backup regime and I’d be happy to know if this helped you, please drop me a comment below or click the social buttons to share with others.