Install Irfanview and resize images easily

Here’s a quick tutorial how to resize images quickly and easily using a great free program called Irfanview.

First, if you haven’t already, download and install Irfanview from https://www.irfanview.com

When starting the program for the first time go to the top menu and select:
Options > Set file associations > Images only > OK
Now all images will open in this nifty program, it’s good and fast.

Note that with the latest Windows 10 updates, you need to go to Settings > Default Apps and set IrfanView as your default viewer. Some Windows updates are known to actually remove IrfanView altogether!

Resizing an image with Irfanview

Resizing images really depends on what you want to achieve as an end result. There are a few common scenarios here:

  1. You want to resize pictures to keep the file size down because you are sending by email. This option is usually when sending family pictures or work images to a colleague.
  2. You want to create an avatar, logo or smaller image from the original image.
  3. You want to crop a section of the image and resize it afterwards.

In each of these cases, we shall be using the resize dialog box so let’s see how to open this now.

Open Irfanview from the shortcut or All Programs menu, and click on File > Open.

In the box that opens, navigate to the image you want to resize. Double click it or click on the Open button.

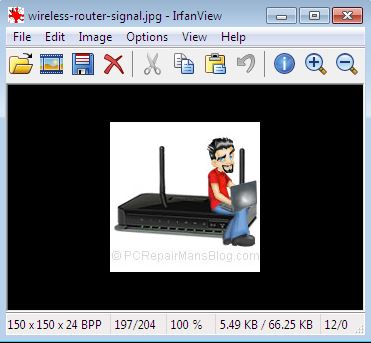
The image will open up in the main Irfanview window.

Irfanview resize image tutorial

From the toolbar menu at the top, click Image and select Resize/Resample. This will open the Resize/Resample image dialog box which is where you will select the settings that will be applied to your final image.

Now we want to either use some of the handy presets you see to the right side or manually add our image sizes. Think of 800 x 600 pixels as a landscape orientation, postcard sized image and you won’t be far wrong. This is an ideal size to send pics to family and friends by email and not have them clogging up their inbox. Most digital cameras now have extremely high pixel count so your original could be something like 2992 x 2000. This is obviously a landscape image because the first figure quoted is always the width, the second being the height. Resizing this image to 800 x 600 would work as landscape photos are generally close to a 4:3 ratio (although that example of 2992 x 2000 is not quite 4:3). Because some stretching of the image would occur in that case, we can actually check the box preserve aspect ratio. Now, typing in your desired width should alter the height accordingly and vice versa, resulting in a non-stretched image. It’s up to you if you want to apply sharpen after resample, this is generally better when going to a very small image such as used for icons and avatars, so I would generally avoid it for larger photos. For images on web pages such as WordPress powered sites, a width of 500 pixels (px) is usually sufficient for the content areas, going down to 150 px where we are wrapping text around the image.

In the Size Method box, put a tick next to Resample (better quality), and using the dropdown arrow, select Lanczos filter (slowest). What we are doing when resizing is effectvely getting rid of pixels, so the image needs to have a degree of loss applied to it that the human eye can’t see that well. The jpeg format is called a ‘lossy’ format for this reason. When you see a pixellated image, this is generally because it has been compressed a bit too much and too many critical pixels have been lost.

When you have the settings the way you want them, click on the OK button. Irfanview renders the image in its new size, although it may still be zoomed in or out. Use the + or – magnifying glass on the toolbar to zoom in or out until you see 100% displayed on the lower toolbar of Irfanview. This is your actual image size, as rendered by your monitor.

IMPORTANT NEXT STEP

You currently have the resized file in the main Irfanview window but it isn’t saved. Most photographs are better quality when they are original and making them smaller reduces quality, so we generally don’t save the image at this point. We do a File > Save As. Think of this as duplicating the file and you won’t go wrong, we are saving another copy of the image but in a different size. You have the chance to navigate to a new folder (I usually create one called Resized) and save the image with a descriptive name, something like:

fred-birthday-party-may-2024.jpg

I like to keep all filenames lowercase and separate words with hyphens as it’s much better for search engines and for web server semantics when uploaded to the web.

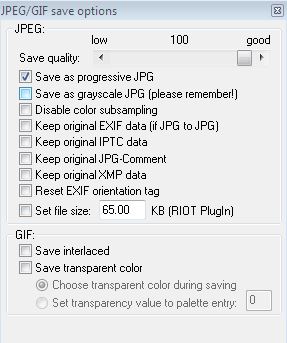
Saving in Jpeg format is generally good for photos, it results in smaller file sizes. Slide the quality slider up to 100 for best quality though as the JPEG format is ‘lossy’. This means that the new image will be slightly poorer quality but much faster to load over the web and much smaller to send via email or social media.

Resize image irfanview jpeg quality

If you’re saving for the web you’ll want to uncheck ‘Keep original EXIF data’ for your privacy. Remember, EXIF data can tell people where the photo was taken and on what device.

Now all that remains is to click on Save and you are done.

I hope that helped to clear up a bit of resizing mystery, please drop me a comment below if you have any questions or just to let me know it helped.


Krystal hosting review – VPS, Shared and Dedicated packages


Krystal are a UK-based host that offers configurable VPS, Shared and Dedicated packages. There’s not much choice in the UK hosting market so consequently there are some pretty steep prices out there compared to their USA datacentre counterparts. That said, Krystal seem to have all bases covered, let’s take a look at their offerings…

Krystal’s standard hosting features and guarantees

All Krystal plans share a common set of features, like premium control panel and a longer-than-most money-back guarantee. They have been in business since 2002 so they are here to stay and with over 90% of their customers recommending their hosting, it’s a no-brainer decision.

The Krystal difference

Their CEO, Simon Blackler, gives his reasons why they are different to other hosts:

In 2002, frustrated by poor service and bad business practices, I created Krystal to provide an “Honest, Reliable & Personal” alternative to the large faceless hosting corporations. We’re named Krystal because the company embodies values often associated with precious crystals, such as quality, rarity and transparency.

Over the last 15 years our unique approach to business has won us a reputation for excellence and a loyal following.
We’re now the largest independent UK web host and are rated the best web hosting company by popular review sites.

We’re in business because we’re passionate about technology and solving problems.
I hope that you’ll join us today and experience the Krystal difference for yourself.

Well, it’s true that many hosts have poor service and some even downright shady business practices, but judging on the reviews coming back from established sites such as Trust Pilot, Krystal are a force to be reckoned with.


At the time of writing, Krystal offer entry-level hosting for £3.99 monthly with these features:

  • FREE 256-bit SSL certificate
  • FREE website builder
  • 100% SSD cloud hosting
  • Unlimited bandwidth
  • Optimised for WordPress & more

There’s a configurable VPS from £9.99 monthly with these features:

  • 100% SSD cloud VPS
  • Full root access
  • Free DDoS protection
  • Free dedicated IP
  • No setup fee

For businesses requiring PCI compliance, £29.99 monthly gets you:

  • Fully PCI-DSS Compliant
  • FREE DDoS protection
  • FREE 256-bit SSL certificate
  • FREE backups every 6 hours
  • FREE domain name for life

The big plus is that you get a 60 day money back guarantee with everything, so a full refund can be had and you lose nothing (except your time testing their servers). In our experience you’ll probably stay with them as the ping times are as good as anything we have seen on the UK market and server configuration options are up there with the best.

Verdict

What we really like is the company’s transparency. They are trying to do things differently and succeeding – a refreshing thing in the murky world of hosting. They use green technology, which means 100% renewable energy at all of their sites, which we love because reducing the impact of these datacentres is a must.

With a more-than-standard offering, Krystal have certainly raised the bar. For the price-conscious, the VPS and dedicated prices are spot-on, being considerably cheaper than the opposition such as FastHosts, Rackspace, Ionos, 123-Reg and more (comparison reviews coming soon). There’s 24/7 ticket and email support, extremely friendly telephone support (10:00 to 17:00 UK time), cPanel, free migration assistance, automated backups, PHP (5.6 to current) and all the usual stuff like MySQL, PHPMyAdmin, SSH and even the ubiquitous Softaculous. What isn’t there to like? Click the link below to get hosting from what we believe is the best available for UK hosts:

Try Krystal free for 60 days


Can Cat 5 cable achieve Gigabit speeds?

cat5-vs-cat6-vs-cat7-ethernet-cables

I was asked this question twice this week so thought I’d clarify a few things. Cat 5 and Cat 5e cable (note the ‘e’ for ‘enhanced’) can certainly achieve Gigabit speeds, this is what it was designed for. This is achievable but only when all twisted pairs are used and you have short run lengths. The reality of being able to push Gigabit speeds from other equipment on the line has to be addressed too, don’t focus solely on the cable.

Most new PC equipment over the last few years can do these speeds but there are some new PCI Gigabit network cards that I have tested and they are a way off data transmission at 500Gbps, let alone Gigabit.

Clearing up the terminology

I’ll break here to look at quickly at speed terminology in a little more detail as there is lots of confusion here for non-techy people. First off, let’s define speed and fix a common mistake. Take a speed of “100MB/sec” what does this represent? Well, it means that you achieve 100 MegaBytes per second (important to note the large B in there). Since there are 8 bits in a Byte, we are actually achieving 800Mbps (800 Megabits per second). Got it?

Older Ethernet equipment typically ran at 10/100 speeds. The big jump from 100M bit/sec to Gigabit is accomplished by a few special signal changes that can take additional advantage of the Cat5 cable, so if you already have this installed then you may be in luck. Here’s the caveat though:

Cat 5 cable is typically unshielded twisted pair and it contains four twisted wire pairs. Fast Ethernet (10Base-T and 100Base-T) use only two of these pairs whereas Gigabit Ethernet (1000Base-T) uses all four pairs. “So use all four pairs in my Cat 5 cable and I’ll be OK?” I hear you ask. Well, caveat number 2 is that you need to keep your run lengths down. For most domestic installations you will be fine if you already have Cat5 installed as the run lengths can have little speed difference if kept around 10 metres max length (quoting from my own experience here). If you have longer cable lengths then you need to consider upgrading to Cat6, although you should do a speed test first. Personally, I’d go for Cat7 (Class F as it’s officially called) and get some future proofing in there, especially if starting from scratch.

Do bear in mind also that the quality of the cable can vary, so try to go with one that has good reviews or one from a reputable supplier if possible.

Is 10Gb/sec possible on twisted pair cables?

The current 1000Base-T specification only supports 100 metre runs of cabling and to get to the IEEE proposed 10Gb/sec we will definitely require fibre. Even the 10Gb comms across fibre have a suprisingly low limit of just 85 metres.

Summary

Cat5e seems to be giving about the most bang for your buck in most countries. I’d estimate that most domestic households won’t come anywhere near the throughput of that for quite a few years to come, but if you have the extra money or want to future-proof as much as possible then Cat7 will be a good alternative.

Hope this helps you to choose your cables!


AVG update crashes PC, how to restart Windows after avgidseh.sys error

Manifesting as an avgidseh.sys error, one of the AVG updates has proven to be a problem for several PC setups recently. It seems more prevalent on Windows 7 64 bit setups but also affects many other Windows systems.  Symptoms are PCs that will not boot after an AVG update, offering a Blue Screen Of Death (BSOD) on restart.
The problem is down to an AVG  system file that is loaded at boot time – most notably Windows\System32\Drivers\avgidseh.sys

The avgidseh.sys hang fix

The technical fix is to rename all files in the \Windows\System32\Drivers folder that begin with “avg” to something else. We do this by running off a boot CD/DVD/USB. Basically, any boot disk that allows file management access can do this.  Note: Safe mode will not help here.

Use a free rescue CD to rename the AVG  files

AVG offer a rescue CD that can do this as it includes Midnight Commander as a file management tool. Download it from here

Here is a video that should help you to fix your PC using AVG’s solution and a spare USB pen drive or recordable CD.  You will need to do this from a working PC initially (eg. a friend’s or a work computer).

Once done, restart the PC and AVG will no longer start. Now you can use your control panel’s Add/Remove programs feature to completely remove AVG and reinstall it. The new updates do not appear to be affected so it should work as normal.

On many PCs, the AVG boot CD will automatically restart, even after the error has been fixed.  This is simply because you have settings that default to booting from a CD in preference to your hard drive.  In this case, you will need to remove the CD from the drive, otherwise you’ll get stuck in a loop of starting up from the CD every time.  The CD is best removed by pressing the button when your PC has shut down, just before it restarts.  If you have used a USB pen drive then remove this just before restart as detailed above.

Next, do yourself a big favour, download, install and run the MalwareBytes’ Antimalware program from here. This is a big one.  This will satisfy yourself that there is nothing malicious on the PC that may cause AVG to misbehave or crash. It runs quite happily alongside AVG and makes your antivirus/antispyware setup much stronger, catching things that AVG misses. I have linked to the paid version of MalwareBytes because it tracks your system in real time, keeping spyware and malicious websites away.  It is singlehandedly the best tool I recommend to run alongside AVG and is very cheap for the performance it has.

UPDATE
Since I wrote this article, there have been faults other than the update fault listed above. Although the method used above remains acceptable, AVG have modified their boot CD. See my revised avgidseh.sys boot error article  for further information and possible cures.


lazy loading images resources html css

Lazy loading libraries for HTML & CSS websites

We have all had to wait for websites to load and the main offenders are often images and video. Loading a whole page makes no sense if you’ll be clicking away before you scroll down to the hidden content. There are quite a few plugins for WordPress that achieve lazy loading, but it’s much harder to find libraries for non-Wordpress sites.

Here are some of the better ones that you may find useful:

Lazysizes

Lazysizes is a fully featured lazy loading library that lazy loads images and iframes quickly. It automatically binds to a lazyload class on elements, and requires you to specify image URLs in data-src and/or data-srcset attributes. The contents of these are swapped into src and/or srcset attributes, respectively. It uses intersection observer (which you can polyfill), and it can be extended with a number of plugins to do things such as lazy load video.

https://github.com/aFarkas/lazysizes

Lozad

Lozad.js is a high performance and SEO friendly lazy loader for images (responsive and normal), iFrames and more, that detects any visibility changes triggered through user interaction, CSS or JavaScript without configuration. It’s extremely fast but needs to be polyfilled before you can use it on older browsers.

https://github.com/ApoorvSaxena/lozad.js

Blazy

This stands for be lazy! bLazy is a lightweight script for lazy loading and multi-serving images, iframes, videos and more (less than 1.4KB minified and gzipped). It’s written in pure JavaScript which is why it doesn’t depend on 3rd-party libraries such as jQuery. It lets you lazy load and multi-serve your images so you can save bandwidth and server requests. The user will have faster load times and save data usage if they don’t browse the whole page. It works in all modern browsers including IE7+ and is pretty damn lightweight. As with lazysizes above, it doesn’t need any third party utilities to load, but doesn’t use intersection observer.

https://github.com/dinbror/blazy

Yall

yall.js (Yet Another Lazy Loader) A fast, flexible, and small SEO-friendly lazy loader that uses IntersectionObserver and falls back to event handlers. It’s compatible with IE11 and major browsers.

https://github.com/malchata/yall.js

React-lazyload

If you need a React-specific lazy loading library then this may fit the bill. . While it doesn’t use intersection observer, it does provide a familiar method of lazy loading images for those accustomed to developing applications with React.
Each of these lazy loading libraries is well documented, with plenty of markup patterns for your various lazy loading endeavors. If you’re not one to tinker, grab a library and go. It will take the least amount of effort.

https://github.com/twobin/react-lazyload


Hopefully you can follow their help to integrate them into your application. Do you have a favorite? Let me know below.


Use linux boot disk to repair a Windows NTFS disk fault

Yes, you can use a Linux boot CD to repair a Windows NTFS disk fault. Linux ships with a utility called badblocks. Badblocks is a Linux command in its own right that has several different modes to be able to detect bad sectors on our hard disk. Once found, it saves the references to these bad sectors in a text file so we can tell the operating system to avoid storing data on them.

For the explanation below though, I’ll be using the fsck command. Why’s that? Well fsck is a really powerful command that actually runs those relatively complicated badblocks commands for you, checking or repairing errors in your filesystem and doing all the leg work for you.

Geek fact – fsck stands for “File System Consistency checK” which you can amaze your friends down the pub with. Or not…

Let’s open a terminal window and fire up this bad boy then. You’ll need superuser/root permission to run each of these commands so I’ll add ‘sudo’ into them all. I like to start by running the parted command to list my drives:

sudo parted /dev/sda 'print'

This should output the installed drives to the screen so you can note down which one you want to work with.

Now let’s run fsck on the disk. Please note that this can take several hours depending on the speed of your system, the size and speed of your disk. If no filesystems are specified on the command line, and the -A option is not specified, fsck will default to checking filesystems in /etc/fstab serially.

IMPORTANT – We must unmount the disk first or data corruption may happen. To do this, open a terminal window and type:

sudo umount /dev/sda1

Replace “sda1” with the disk you need to repair. Now we can run the fsck command safely against the drive:

sudo fsck -mcfv /dev/sda1

This fsck command forces automatic bad block checking and it automatically marks all known bad sectors as bad too.

The switch options I often use are:

-m  I use this for safety because if the drive is mounted you won’t be able to scan (and corrupt) it this way.

-c   Displays completion/progress bars

-f   Force a check even if it is clean

-v  Verbose, because I like to see words!

If you’re booting back into Linux, make sure that smartmontools is installed and enabled:

sudo apt-get install smartmontools

Enable “SMART” in your BIOS if it isn’t already and run an extended offline test with:

sudo smartctl --test=long /dev/sda

To see a nice overall view of system health, type:

sudo smartctl -a /dev/sda

Have a look at the relevant manpages for more info:

man fsck
man smartmontools


In my repair shop I only use HDD Regenerator these days.  It’s a bootable software that can fix errors on all types of disk, formatted in all manner of filesystems as used by Linux, Mac, Windows and more. We have this loaded on our drive test rig and repair hard drives daily with it.

If you want to make it easy and have a USB/CD/DVD bootable tool that will work safely on all the drives it comes up against I’d suggest you look at my hdd regenerator review here or buy it direct from their website here


backup-restore-mac-osx-stickies-sticky-notes

Mac OS X dashboard lost stickies – where is the backup?

Lost your stickies on a Mac OS-X system?  Scenario: You wipe and reload your Mac OS X only to find that the Stickies you had in the dashboard view have disappeared. I have just reinstated these for a client remotely via Team Viewer and this is the procedure I used. We’ll presume you have either a copy of your library folder or a Time Machine backup.

Open Terminal from the Applications folder. The following is case-sensitive….

Type in

sudo -s

and press enter. This will prompt for the administrator password. Type in and press enter.

Now we need to “kill” the Dashboard as we can’t do much while it is live. For this, type in:

defaults write com.apple.dashboard mcx-disabled -boolean YES

Now we finish this with a

killall Dock

Keep the terminal window open.

Open Finder and navigate in your backup (eg Time Machine) to /YourUserFolder/Library/Preferences and find ALL files starting with “widget-com”, “com.apple.dashboard.plist” and “com.apple.dashboard.client.plist”.

Drag these files to /Library/Preferences, making sure you copy and not move. I like to have 2 Finder windows open to do this.

Back in Terminal, we use the ‘Up’ cursor to bring back our previous typed command and modify the first one to:

defaults write com.apple.dashboard mcx-disabled -boolean NO

Finish with a

killall Dock

This starts the dashboard again

Mac sticky notes reinstated from backup!

The dashboard should now be as it was before and your stickies should be reinstated.  You can try this now, it shouldn’t need a restart.

Interestingly, TeamViewer stayed connected all through for me, even when the dock was tampered with in Terminal.  It also was quite impressive that this was cross-operating system.

Lost stickies Mac OSX

Click for full size view

Here, a Windows 7 64-bit box was controlling a dual core iMac running OS X (Mac purists can throw up now), but a necessary evil as both our Mac rigs were occupied.  I had mounted my backup external drive image of the client’s PC using HFS Explorer, a simple, small and free Windows program that reads HFS partitions, in this case MAC extended journaled.  For real nerds, journaling accelerates the recovery time after any unexpected shutdown such as a power outage. A server automatically tracks file system operations and maintains a continuous record of these transactions in a separate file, called a journal.  The o/s can use the journal to return the file system to a known state after any failure.  Compare it to a Windows PC and the lengthy chkdsk /r command and it’s a much better system.

Click here to see how to restore the MAC OS X sticky note data. This is for the standard sticky notes, not the dashboard versions.


2 Terabytes of backup storage for life only $45

zools-lifetime-backup-2tb-offer-cheapest

It’s becoming increasingly difficult to keep up with the ever-changing world of physical information storage. New hard drives and flash drives are constantly hitting the market and obsolescence is inevitable. There has never been a better time to store your data in the cloud, and cloud security has also never been better.

Get 1TB of cloud storage for just $45!

Cloud services, however, can be costly or they just don’t offer enough storage. You need a service that’ll securely back you up for life, and you need a service that won’t cost you thousands a year because you need terabytes of storage. This is especially prudent in a business scenario where you may have to provide cloud storage to multiple employees.

Zoolz Cloud Storage offers an elegant solution. You can get 1TB of cloud storage for data you access regularly PLUS with 1TB of cold storage that lets you store those important files you can’t afford to lose. The Instant Vault is easy to use — just drag and drop files via a web browser. The cold storage will allow you to automatically back up two devices at one time.

Store all of your most important files in a secure cloud

You can get 1TB of highly secure cloud storage data for just $45. Zoolz typically charges $3,600 for a lifetime subscription, but you won’t pay anywhere near that much. Incredible but true, you can save an amazing 98% with this time limited offer and back up all your data now!

Choose your desired package


Accuranker review 2019

accuranker review coupon 2019 2020


Accuranker is a very impressive tool that helps you to accurately monitor keywords for your websites. We were that impressed that we now run this tool daily and wanted to put together a mini Accuranker review.

This tool is aimed at users with single websites, right up to agencies with hundreds of sites. You can see at a quick glance how your keywords are performing daily, and you don’t even need to run a report, you can see live data on the website or get scheduled reports sent through to you by email.

Initial Accuranker setup

Initial setup is simple, just choose Google or Bing (or both) and select desktop or mobile (or both) to see how your keywords perform on these devices. Your package will include a limited number of keywords and this is different for each subscription level. Note that if you have, for example, a site with 10 keywords tracked, then checking results for Google Desktop counts as 10 keywords. If you add Google mobile too, this would then count as 20 keywords. Add Bing desktop and mobile into the mix and you’ll be up to 40 keywords. It’s easy to forget this when ordering a package, so make sure you get the right one for you. Their keyword allowance is quite generous though, especially given that Accuranker check them daily by default.

Google analytics linking

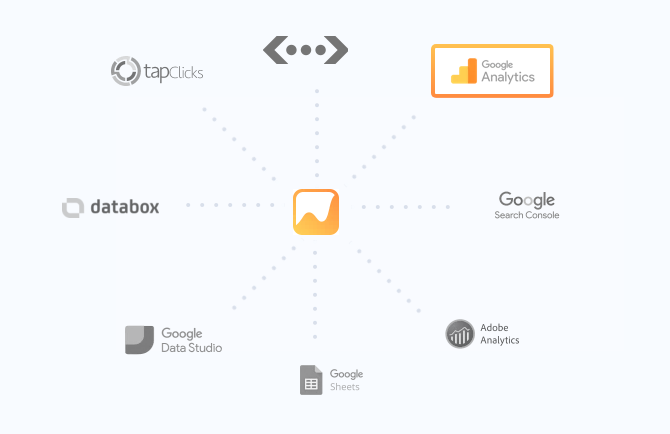
Impressively, this tool links into your Google Analytics account to pull even more data for you. As you can see from their image below, you can integrate with many more services such as DataStudio, Sheets and more:

accuranker review discount

So with this tool you can now see your ranking in the Search Engine Results Pages (SERPs). The graphing software on the site is impressive, allowing you to drill down into each keyword’s ranking history with a few clicks.

Accuranker updates, good or bad?

AccuRanker is maintained by some clever people and updates come through quite regularly adding new functionality. All the updates we have seen have been useful and have added more value to the tool. You can also take advantage of their 14-day free trial to see if it is the right SEO tool for your needs.

An SEO tool for agencies

Agencies will love the automatic monitoring and reporting features. You can even send a scheduled report out to your clients, a great bonus. Different data export formats will suit most agencies (and beginners too). If you’re still using Excel and CSV for your reporting or metrics then this is easily available for export.

Competitor Monitoring

One great SEO trick is checking how your keywords stack up against the same ones for other websites. Accuranker monitors keyword competition and lets you know who ranks higher than you, which is great for beating your competitors. Accuranker also uses “Share of Voice” which is a cool name for their trickest feature. This allows you to view who has more share of the search engine results for given keywords. It’s a great metric to quickly see if you are pushing your competitors further away or if they’re catching you up.

Verdict

All in all, the clear layout, the impressive charting and reporting make this package the best we have seen for SEO reporting. We now use it daily to monitor and track our keywords too.

With a 14-day free trial, clear navigation and simple yet effective reporting, AccuRanker is now the keyword tracking SEO tool to beat.


Test Accuranker now


Beautiful post snippets and auto resized images in WordPress

Beautiful post displays

I’m going to show you how to create a really nice post display page that automatically brings in your posts AND takes the first image, resizes it and pops it at the side of a ‘teaser’ of your article. This is a very neat approach and builds on the work you have already done in creating the post, then automates a slick output of your work. More importantly, you don’t have to create a thumbnail image as resizing is done ‘on the fly’.

First off, we need to add a small function to functions.php. Open it up and at the very end add this:

function pcrmbimagegrab() { //https:www.pcrepairmansblog.com //Grabs the first image from the post global $post, $posts; $first_img = ''; ob_start(); ob_end_clean(); $output = preg_match_all('/<img.+src=[\'"]([^\'"]+)[\'"].*>/i', $post->post_content, $matches); $first_img = $matches [1] [0]; //Get default image instead if(empty($first_img)){ $first_img = "/images/default.png"; }return $first_img;}

Make sure this is within a php call, ie

Now we need to create a category, eg “Articles”

Now go into the WP admin area and open the categories from the WP sidebar menu (under ‘Posts’). Hover your mouse over the new category and you’ll see the category number at the end of the link shown in Firefox/IE etc (at the bottom left of the browser window). This is what we need for our special new php page that we’ll create now.

Create a new page and call it category-15.php (where 15 is the number of your category above – modify accordingly!). Into this copy and paste the following:


<?php get_header(); ?> <div class="post-box"> <h1> <?php single_cat_title(); ?> </h1> <hr>	<?php get_template_part('loop', 'dvccategory'); ?>

Now open up your archive.php file and see where the differences lie. Your header may be different, your div ids will be too, but make this new category file look like archive.php in terms of header, footer, content divs etc. I have added a class of pcrmbcategory. Ensure this is a div class and not a div id as it is repeated for each post.

Go to your template’s stylesheet, normally style.css, and insert our new div class:

/* Fix category view by https://www.pcrepairmansblog.com */ .pcrmbcategory { float: left; width: 590px; margin: 0px; padding: 10px; display: inline; } .pcrmbcategory img { border: none; margin: 0px; height: 130px; }

Note, I have fixed just the height of the image to keep the aspect ratios proportionate. You can set a width but this won’t maintain the aspect ratio and some images may appear stretched. Fixing height and limiting the content maintains a nice even spacing on article posts. I have added a dotted line to separate posts but be creative, sky’s the limit here!

The 590px width is ideal for many single sidebar themes but experiment with this and validate your code. Test it in several browsers too. Don’t forget to create a default image to display when you don’t have one in your post. Drop this into the yourdomain.com/images folder. You can make this any size but ideally make it to the same height that is referenced in the code for quicker page loads. Good luck and give me some feedback if it works for you!