
 It’s difficult for us to write an unbiased HDD Regenerator review because we use it all of the time in our repair shop. It’s the single best tool out there for repairing corrupt hard drives, and we get lots of them in. That said, we’ll try to remain objective and give an honest review.
If I mention that we get on average 10 to 15 corrupt drives a week through our medium sized repair shop alone, then you’ll see why this is such a big problem. For you to decide whether it’s right for you, you first you may need to understand what happens to corrupt a hard drive and why your PC won’t start when there is corruption on the disk.
What is hard drive corruption?
Hard drive corruption happens quite often to laptop and desktop computers. This is generally because of a few things:
- The battery going completely flat (in laptops) or a sudden power cut before the system has had time to write all of its data to the hard disk
- Knocks or bumps to a laptop or desktop PC while in use
- The hard drive is mechanically failing.
The result is a hard drive that has one or more areas on it which are unreadable (known as ‘bad sectors’). These sectors may contain your data, such as documents or images, or a file that your operating system (Windows, Linux, Mac etc.) needs to read information from. If it’s a Windows file, then the whole installation is effectively rendered useless as Windows cannot start. Likewise Mac or Linux will refuse to power up. This can happen to computers, often when the power is suddenly cut or a software crash occurs. The dreaded ‘Blue Screen of Death’ can also result in drive errors.
How do I know if my hard drive has a fault or is corrupted?
Symptoms of this type of error are computers that boot so far into Windows then display a black screen. Many will restart automatically and end up ‘looping’. This is because Windows cannot find the files it requires, throws an error and your PC will restart automatically on seeing that error. Even safe mode will usually do this looping, a sure sign that you need a software tool to repair the hard drive’s bad sector errors.
The majority of hard drives with bad sectors have an incorrectly magnetized disk surface. Fortunately, there are solutions and the clever guys at Abstradrome have developed an algorithm which is used to repair damaged disk surfaces. This technology supports many types of hard disk drives and can repair damage that even low-level disk formatting can’t repair. Because of the way the repair is made, the existing information on the hard drive (e.g. your data and the important Windows files) will not be affected.
For our repair shop where we repair Linux and Mac devices as well as Windows this is simply a brilliant, cross-platform tool.
HDD Regenerator review – the features
Let’s look at the features and benefits of this software
Program features
- It can detect physical bad sectors on a hard disk drive surface.
- It is able to repair bad sectors (magnetic errors) on a hard disk surface.
- The product ignores your file system and scans the disk at physical level.
- It can be used with FAT, NTFS or any other file system
- It can read and repair unformatted or unpartitioned disks.
- Starts within Windows environment (XP/Vista/7/8/10)
- Bootable CD or USB flash drive allows the HDD Regenerator to work on a non-starting PC
This is an impressive feature set. The manufacturer also offers:
- A no-quibble 30 day money back guarantee
- Unlimited license period
- Free 1 year minor upgrades (although the software works on all drives exceptionally well)
- Large discounts on major upgrades
Main benefits
When a hard drive is damaged with bad sectors, the disk not only becomes unfit for use as there are areas which are damaged that you will ultimately write data to. You then also risk losing information you have already stored on it. HDD Regenerator REPAIRS damaged hard disks without affecting or changing existing data so it is one of only a few tools that can actually do this task. Currently we have found no products that outperform this one, so it is worth the investment.
Downloading the disk repair software
Purchase and download a copy and install it to a working Windows computer. You can then create a bootable CD, DVD or flash drive that will run on your problem computer and scan the drive for bad sectors, the most common hard drive error that we see in our workshop.
If you’re a bit confused by this, the term ‘bootable’ means that it starts up from your computer and runs WITHOUT using your hard disk drive that has Windows on it. Clever stuff!
So, the program takes about 1 minute to install and, when started, it immediately scans the disk(s) on the PC it is installed on. This is no problem if it is installed on a friend’s or family member’s PC as it will be simply carry out a very quick scan of the ‘SMART’ data on the drive. What we now need to do is to create a bootable CD to insert on the dead (or dying) PC.
Create a bootable CD, DVD or USB pen drive
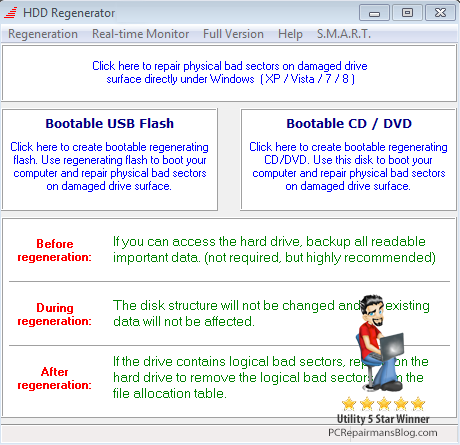
Open the program from the tray icon (bottom right of the screen) or from the Programs menu’. Select the bootable flash drive or CD/DVD option. Follow the on-screen prompts until you have created your bootable medium.
Insert this bootable media into your problem computer and run a full scan and repair. It could a few hours depending on the size of the hard disk and the speed of the computer.
Can HDD Regenerator repair my hard drive?
The vast majority of damaged hard disks can be repaired by regeneration and there is a full money-back guarantee if you’re not satisfied. If the first found bad sector has been successfully regenerated, it is very promising and you can generally regenerate all bad sectors on your hard drive. If the first bad sector has NOT been successfully regenerated, then you will probably need to recover your data and replace your hard disk drive as soon as possible. A few bad sectors is acceptable but more than a few and we suggest replacing the hard drive because it will fail imminently. The latest generation of SSD drives give a significant speed increase to most systems, they are relatively cheap and you can copy over your data once recovered.
Personally we would advise purchasing this tool over any others currently on the market as the success rates are so high. HDD Regenerator is available direct from the vendor here at a price we think is a bargain for the power of the software:
If you wish to add your personal experiences to this hdd regenerator review, please contact me via the site or drop a comment below.
 Since I wrote the original


 Being asked often about where to find the lowest priced Norton Antivirus renewal made me come up with this article. Symantec offer a renewal by credit card that is often too pricey for most people. With Norton Anti-virus being a capable product, it’s a shame to uninstall it so here are a few tips to get a new and fully licensed program at a much reduced price. And there’s nothing illegal about it!
 If you’re looking through WHM’s process manager and you see root@notty mentioned as one of the processes, don’t be alarmed. It’s perfectly normal and it’s definitely not some hacker called ‘Notty’ who has suddenly got root permissions. Be honest, you’re here because you thought that 😉