Outlook emails stay in Outbox after Windows 10 upgrade

email-settings-pop-imap-btconnect-outlookAre you getting your Outlook emails stuck in your Outbox after upgrading to Windows 10? I’ve seen this happen on several machines and it really seems to be a problem where Windows corrupts the Outlook database and/or profile on many versions of Microsoft Office (2007, 2010 and 2013). The easiest fix and one that I’d recommend here is to delete or move the stuck emails then close all programs that are open such as Outlook.

Now we can use the in-built Windows “System File Checker” that will scan your PC and repair any corrupt files that it finds. To do this:

  • Click Start
  • Type cmd in the Search box
  • Right-click Command Prompt and then click ‘Run as administrator’. If you are prompted for an administrator password or for a confirmation then type the password or click ‘Allow’
  • In this black window (the command prompt) that appears, type in sfc /scannow noting the space before the forward slash
  • Press enter and go and grab a delicious cup of coffee because this will take a while

Note: Do not close this Command Prompt window until the verification is 100% complete. The scan results will be shown after this process is finished.

Technical information for nerds
The sfc /scannow command will scan all protected system files, and replace corrupted files with a cached copy that is located in a compressed folder at %WinDir%\System32\dllcache.
The %WinDir% placeholder represents the Windows operating system folder. For example, C:\Windows.

The time taken to complete this scan is different on every PC but usually can range from 20 minutes to an hour or more. If it solves your problem (which it has on over 50 client PCs to date) then please take a minute to drop a comment below or maybe buy something through our shop to say thanks.


Reset Windows Server 2012 Administrator password

server 2012 password resetTo reset the Administrator password on your Windows server 2012 installation, you’ll need to do the following:

Boot from the Microsoft Windows Server 2012 DVD

  1. From the Windows setup menu, click “Next”
  2. Select “Repair your computer”
  3. Click on “Troubleshoot”
  4. Under Advanced options, click “Command Prompt”
  5. Type “diskpart” and hit Enter
  6. Type “list volume” and hit Enter. This will show you your (current) drive letter allocated to the drive where Windows is installed. Note  – if you don’t see any volumes listed and this is the first boot cycle for a new Server 2012 installation, then I have seen this on a few HP servers and you’ll need to go and run the setup again from within the Intelligent Provisioning area.
  7. Make a note of the drive letter and type “exit” then press enter to leave diskpart (but stay in the command prompt window)
  8. Presuming the letter is d, then type “d:” and press enter to change to this drive
  9. Now type  “cd Windows\system32” and press enter which will take you into the system32 folder
  10. Type “ren Utilman.exe Utilman.bak” and press enter
  11. Type “copy cmd.exe Utilman.exe” and press enter
  12. Close the command prompt and then click “Continue”
  13. The server should now reboot to the logon screen. Press the Windows key + u to open a command prompt
  14. At the prompt you can change the password by typing “net user administrator xyz” where xyz is your new super-secure password!
  15. Now, for security we must do one last thing. Once we are back in Windows, open Explorer, navigate to Windows\system32 and rename Utilman.bak to Utilman.exe


Hopefully this gets you out of a sticky situation, leave me a comment if it has helped.


Country codes for mod_security, CSF and htaccess

Her’s a list of useful country codes that we can use in many rule-based filtering situations on servers.

AD Andorra
AE United Arab Emirates
AF Afghanistan
AG Antigua and Barbuda
AI Anguilla
AL Albania
AM Armenia
AN Netherlands Antilles
AO Angola
AQ Antarctica
AR Argentina
AS American Samoa
AT Austria
AU Australia
AW Aruba
AZ Azerbaijan
BA Bosnia and Herzegovina
BB Barbados
BD Bangladesh
BE Belgium
BF Burkina Faso
BG Bulgaria
BH Bahrain
BI Burundi
BJ Benin
BM Bermuda
BN Brunei Darussalam
BO Bolivia
BR Brazil
BS Bahamas
BT Bhutan
BV Bouvet Island
BW Botswana
BY Belarus
BZ Belize
CA Canada
CC Cocos (Keeling) Islands
CF Central African Republic
CG Congo
CH Switzerland
CI Cote D’Ivoire (Ivory Coast)
CK Cook Islands
CL Chile
CM Cameroon
CN China
CO Colombia
CR Costa Rica
CS Czechoslovakia (former Republic)
CU Cuba
CV Cape Verde
CX Christmas Island
CY Cyprus
CZ Czech Republic
DE Germany
DJ Djibouti
DK Denmark
DM Dominica
DO Dominican Republic
DZ Algeria
EC Ecuador
EE Estonia
EG Egypt
EH Western Sahara
ER Eritrea
ES Spain
ET Ethiopia
FI Finland
FJ Fiji
FK Falkland Islands (Malvinas)
FM Micronesia
FO Faroe Islands
FR France
FX France, Metropolitan
GA Gabon
GB Great Britain (UK)
GD Grenada
GE Georgia
GF French Guiana
GH Ghana
GI Gibraltar
GL Greenland
GM Gambia
GN Guinea
GP Guadeloupe
GQ Equatorial Guinea
GR Greece
GS S. Georgia and S. Sandwich Isls.
GT Guatemala
GU Guam
GW Guinea-Bissau
GY Guyana
HK Hong Kong
HM Heard and McDonald Islands
HN Honduras
HR Croatia (Hrvatska)
HT Haiti
HU Hungary
ID Indonesia
IE Ireland
IL Israel
IN India
IO British Indian Ocean Territory
IQ Iraq
IR Iran
IS Iceland
IT Italy
JM Jamaica
JO Jordan
JP Japan
KE Kenya
KG Kyrgyzstan
KH Cambodia
KI Kiribati
KM Comoros
KN Saint Kitts and Nevis
KP Korea (North)
KR Korea (South)
KW Kuwait
KY Cayman Islands
KZ Kazakhstan
LA Laos
LB Lebanon
LC Saint Lucia
LI Liechtenstein
LK Sri Lanka
LR Liberia
LS Lesotho
LT Lithuania
LU Luxembourg
LV Latvia
LY Libya
MA Morocco
MC Monaco
MD Moldova
MG Madagascar
MH Marshall Islands
MK Macedonia
ML Mali
MM Myanmar
MN Mongolia
MO Macau
MP Northern Mariana Islands
MQ Martinique
MR Mauritania
MS Montserrat
MT Malta
MU Mauritius
MV Maldives
MW Malawi
MX Mexico
MY Malaysia
MZ Mozambique
NA Namibia
NC New Caledonia
NE Niger
NF Norfolk Island
NG Nigeria
NI Nicaragua
NL Netherlands
NO Norway
NP Nepal
NR Nauru
NT Neutral Zone
NU Niue
NZ New Zealand (Aotearoa)
OM Oman
PA Panama
PE Peru
PF French Polynesia
PG Papua New Guinea
PH Philippines
PK Pakistan
PL Poland
PM St. Pierre and Miquelon
PN Pitcairn
PR Puerto Rico
PT Portugal
PW Palau
PY Paraguay
QA Qatar
RE Reunion
RO Romania
RU Russian Federation
RW Rwanda
SA Saudi Arabia
Sb Solomon Islands
SC Seychelles
SD Sudan
SE Sweden
SG Singapore
SH St. Helena
SI Slovenia
SJ Svalbard and Jan Mayen Islands
SK Slovak Republic
SL Sierra Leone
SM San Marino
SN Senegal
SO Somalia
SR Suriname
ST Sao Tome and Principe
SU USSR (former)
SV El Salvador
SY Syria
SZ Swaziland
TC Turks and Caicos Islands
TD Chad
TF French Southern Territories
TG Togo
TH Thailand
TJ Tajikistan
TK Tokelau
TM Turkmenistan
TN Tunisia
TO Tonga
TP East Timor
TR Turkey
TT Trinidad and Tobago
TV Tuvalu
TW Taiwan
TZ Tanzania
UA Ukraine
UG Uganda
UK United Kingdom
UM US Minor Outlying Islands
US United States
UY Uruguay
UZ Uzbekistan
VA Vatican City State (Holy See)
VC Saint Vincent and the Grenadines
VE Venezuela
VG Virgin Islands (British)
VI Virgin Islands (U.S.)
VN Viet Nam
VU Vanuatu
WF Wallis and Futuna Islands
WS Samoa
YE Yemen
YT Mayotte
YU Yugoslavia
ZA South Africa
ZM Zambia
ZR Zaire
ZW Zimbabwe

A few lesser-used ones below, but for completeness here they are:

ARPA Arpanet
COM US Commercial
EDU US Educational
GOV US Government
INT International
MIL US Military
NATO Nato field
NET Network
ORG Non-Profit Organization


Crash Plan backup software full review

CrashPlan has been around for a while now and is looking like one of the best solutions out there for business and personal backups.

With no storage size limits, bandwidth caps or file-type restrictions, Crash Plan really has lots going for it. On top of this, there’s enterprise-class hardware and military-grade security with no extra fees payable.

What I particularly like about Crash Plan is that there is free backup to an external drive and any trusted, internet-connected computer. You can also subscribe to their robust cloud-based destination, “CrashPlan Central” and this is certainly worth the extra money. It’s as quick as any cloud-based backup we have tested and the interface is functional and quite slick.

See what Crash Plan can offer here


crashplan online backup


Scan a Linux server for viruses and malware

linux server virus scan


This article tries to explain, using my own experience of server management, how to scan a Linux server for viruses and malware.


You are probably here because you have something on your server already, very often pushing out spam emails to people via php files. Or maybe you have fallen victim to the Hacking Holy Grail – the attacker now has root access to your server. Let’s stop that now, eh?

This tutorial has screenshots from a CentOS server and this is what I used to create this guide. Your server may well be different but the principles I use are the same, you may have some detail changes to make regarding file paths. If you don’t understand anything drop me a comment or use a search engine to find your answer quickly.

Let’s start by running a virus scan with ClamAV, a free and useful antivirus. Presuming that it is not installed we would need to do this (skip to your OS below or jump to updating definitions if it is already installed):

Installing ClamAV on CentOS 5

Install EPEL5 https://fedoraproject.org/wiki/EPEL/FAQ#howtouse

rpm -Uvh https://download.fedoraproject.org/pub/epel/5/i386/epel-release-5-4.noarch.rpm

Now we can install ClamAV using the yum package manager

yum install clamav-db clamav clamd

Now turn on and start the clamd daemon

chkconfig clamd on
/etc/init.d/clamd start

Installing ClamAV on CentOS 6

Install EPEL6 https://fedoraproject.org/wiki/EPEL/FAQ#howtouse

rpm -Uvh https://download.fedoraproject.org/pub/epel/6/i386/epel-release-6-8.noarch.rpm

Install ClamAV using the yum package manager

yum install clamav-db clamav clamd

Now turn on and start the clamd daemon

chkconfig clamd on
service clamd start

Installing ClamAV on Ubuntu/Debian/Mint

Install ClamAV using the apt-get package manager

apt-get install clamav clamav-daemon clamav-freshclam

The latest installer automatically creates default configuration files and launches the freshclam and clamd daemons. You don’t have to do anything else here which is a nice touch.

Righto, now let’s update the virus definitions…

Updating ClamAV virus definitions

For the sake of brevity, I’m presuming CentOS 6 from now on but it will be the same or similar for most Linux derivatives.

In /usr/local/cpanel/3rdparty/bin/ we can run this to get the latest definitions:

/usr/local/cpanel/3rdparty/bin/freshclam

And now we can do a full scan with a full report sent to a log file of our choice:

/usr/local/cpanel/3rdparty/bin/clamscan -ri -l /path/to/log.file -r /path/to/be/scannned

For example:

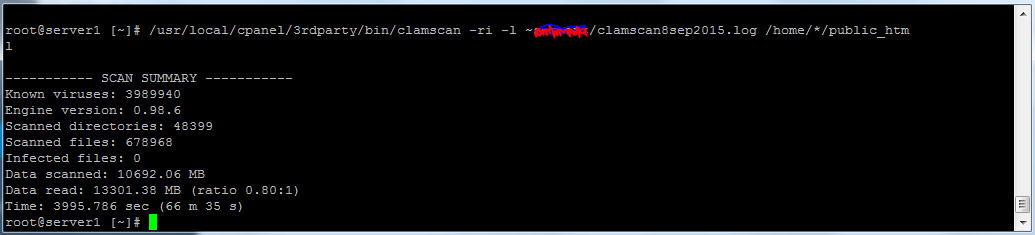
/usr/local/cpanel/3rdparty/bin/clamscan -ri -l ~pcrepairman/scan.log /home/*/public_html

Note: The tilde character denotes the home directory for that user and the wildcard (asterisk) denotes all users in the home directory. If you want to scan a single user’s home directory then simply put their name where the wildcard is.

In the files above we use some switches.

  • -r means that we recurse the subdirectories
  • –i means Clamscan will only list infected files (chained together with recurse above we get -ri)
  • -l means that Clamscan will log to the path you choose after it

For more help, run /usr/local/cpanel/3rdparty/bin/clamscan –help

Now it’s coffee time as your server is scanned over by ClamAV using the latest definitions. When it is finished you will see your bash prompt again. Ideally, you see that Clam reports no infections like this:

Clamscan linux server

While it’s running, try to have a look online for what may have caused the infection and see if it ties up with your Clam results. Very often we see that WordPress plugins have caused the issue. Why them? Well, think about it:

WordPress is the most popular Content Management System out there

  1. It’s used worldwide
  2. It’s often installed at the click of a button using tools such as Softaculous, so it’s dead easy to install
  3. It’s free, ‘Open Source’ software so attackers know the code inside out (well GNU GPL actually)
  4. There are a huge amount of free plugins available from developers around the world, many who have a less-than-basic grasp of how to code securely. Even the good ones get caught out!

Now my third point above is not really fair. It kind of insinuates that Open Source software is more unreliable in the security stakes. Quite the opposite in fact, vulnerabilities get plugged very quickly if there is an active community of developers. However, the sheer ubiquity of WordPress leads to it being a target in much the same way that Microsoft Windows is. The gains for an attack on WordPress are much more than one for Drupal (for example) purely because of the user base.

Even if a vulnerability is plugged with an update pretty fast, it still relies on the user being aware of the problem, downloading the update and applying it BEFORE someone exploits it.  To this end, a daily Clam scan is not a bad idea unless your server has lots of files on it or not many resources available to run the scan in a timely fashion.

Moving on from this virus scan, I would suggest that we look at what email your server is sending out. I detail it in this article here:

Find what emails are being sent from a Linux server


Find what emails are being sent from a Linux server

find-emails-sent-from-linux-serverIn this series of articles I am trying to help server admins and owners of VPS or Dedicated servers to find viruses or malware on their servers. Part of the diagnosis of your system is to see what emails are being sent out and from which accounts. Since spammers like to use compromised servers, I believe that it makes sense to check regularly that the emails being sent out roughly match what you would expect to see.

I have servers that I host client websites on. If a client who usually sends out 20 emails a month suddenly sends out 500 then this is cause for concern and I would immediately investigate the server for malware.

On linux systems, Exim (the mail transfer agent) already logs the working directory of messages sent to the queue by a script. Here’s an example of what you would expect to see in an exim_mainlog file:

2015-08-10 13:52:28 cwd=/home/fredb/public_html 3 args: /usr/sbin/sendmail -t -i
2015-08-10 13:52:28 1ZOmZ2-0004XN-GK <= [email protected] U=fredbloggs P=local S=133267 [email protected] T="Site Database Backup Monday, August 10th, 2015 at 1:52 pm" for [email protected]
2015-08-10 13:52:28 cwd=/var/spool/exim 3 args: /usr/sbin/exim -Mc 1ZEmZ2-0004XE-EK
2015-08-10 13:52:29 1ZEmZ2-0004XE-EK SMTP connection outbound 123459211149 1ZEmZ2-0004XE-GE fredbloggs.co.uk [email protected]

Note: I like to use Notepad++ to analyze these large text files within Windows as other editors aren’t quite up to the task.

So it looks like there’s some function of the ‘fredbloggs’ website that auto-backs up the database, then sends a related email notice to whatever email address the webmaster provides, in this case, [email protected]. The working directory for the generation of that message was “/home/fredbloggs/public_html”. Nothing suspicious here as we have an auto-backup program installed on this WordPress-powered website. Nothing to see here, move along please…

Here’s another example:

2015-08-03 12:00:15 cwd=/home/janedoe/public_html/wp-admin 3 args: /usr/sbin/sendmail -t -i
2015-08-03 12:00:15 1ZQDTb-0005QW-5k <= [email protected] U=janedoe P=local S=989 [email protected] T="[https://janedoe.co.uk] WordPress Login Address Changed" for [email protected]

Again, possibly normal but I’d raise the question whether Jane changed her email address on WordPress. If not, this is cause for concern.  It’s a kind of detective work where you need to step back and look at all of the evidence to compile a big picture.

So, let’s run this beauty of a command against the exim_mainlog to give us an idea from which working directories our server gets messages sent to the mail queue:

zgrep "cwd=" /var/log/exim_mainlog*|awk '{print $3}'|sort|uniq -c|sort -n|sed 's/cwd=//g'

The exim_mainlog records the arrival and delivery of all emails. It explains where the mail came from, to which address it was delivered, the hostname of the server and more. Additional details can be added to this log file by using extended logging in exim. Your output would be something like this on most systems:

8 /home/janedoe/public_html/wp-content/plugins/cforms

So within the last 30 days, the /cforms directory has sent 8 messages to the queue. Cforms is a defunct WordPress plugin and now, as such, unsupported by the developer against exploits. Would you expect that Jane’s website should do that? A result like this isn’t necessarily suspicious as this is normal contact form use. Something like this, however, would be VERY suspicious:

815 /home/janedoe/public_html/images

I can’t think of a valid reason why an ‘images’ directory should be sending mail, so alarm bells would trigger and that’s definitely something I would look into further.

So, presuming we saw strange usage numbers or a bizarre path, let’s dig even deeper and look at what the Subject of Jane’s emails actually were, as this gives us an indication of spam activity. Change directory into /var/log

cd /var/log

Now run this:

zgrep -A 1 "/home/jane" exim_mainlog* |grep T= |awk -F T= '{print $2}' |sort | uniq -c |sort -n |awk -F " for " '{print $1}'

Nice, it returns a list like this which tells us all we want to know:

1 "Akismet: Spam - Jane Doe Books Contact Form: Pay only when you get results"
1 "Jane Doe Books Contact Form: Help with my book club "
1 "Site Database Backup Friday, July 17th, 2015 at 10:02 am"
1 "Site Database Backup Friday, July 27th, 2015 at 1:02 pm"
1 "Site Database Backup Friday, July 31st, 2015 at 10:36 pm"
1 "[Jane Doe Books] Your site has updated to WordPress 4.2.3"
1 "[Jane Doe Books] Your site has updated to WordPress 4.2.4"

Again, no cause for concern and the only spammy one there would be the first one, already marked as such by Akismet.

If you have lots of adverts for cheap meds or blue pills in there then you need to find the offending code that’s pushing spam through your email system. Start with a virus scan on your Linux server

Hope this helps and feel free to drop me a comment below.


Kaspersky Pure replaced by Total Security

Since I am getting a lot of questions on where Kaspersky Pure has gone and how to upgrade, I’ll try to clarify a few things. Yes, the main Kaspersky.com website has now dropped Pure as a product, seemingly without notification. The localized websites (such as .co.uk etc) have followed too. It seems that Kaspersky Pure has been phased out in favour of ‘Total Security’. There are a lot of Pure installation CDs out there so what to do?

OK, so here comes the terminology first:

  • KTS stands for Kaspersky Total Security
  • KIS stands for Kaspersky Internet Security
  • KAV stands for Kaspersky Anti-Virus
  • Changing from one installed product to another is called ‘migrating’

If you have an active or expired Kaspersky PURE 2.0 or 3.0 license, you have special options of migrating to Kaspersky Total Security. You can also migrate to Kaspersky Total Security from Kaspersky Internet Security and Kaspersky Anti-Virus or vice-versa.

Who can’t upgrade to Kaspersky Total Security?

Note that free migration to Kaspersky Total Security is not possible for the oldest versions of Pure. These were the original ‘version 1’ programs but are called:

Kaspersky PURE
Kaspersky PURE R2 (note that this is NOT the same as Kaspersky Pure 2.0)

They can’t be upgraded because their activation codes are incompatible with Kaspersky Total Security.

Now we know what versions can’t be upgraded, let’s upgrade those that can…

Free upgrades to Total Security

Successful upgrading depends on the current status of your license:

  • If you have an active licence for Kaspersky PURE 2.0 or Kaspersky PURE 3.0, you can simply use your current activation code for migration (upgrading) to Kaspersky Total Security.
  • If your license for Kaspersky PURE 2.0 or Kaspersky PURE 3.0 has expired, you can visit my shop here to buy Total Security at a cheaper price than renewal, then install it which migrates the licence for you automatically.

Migrating the Pure licence key to Total security

If you have Kaspersky PURE 2.0 or Kaspersky PURE 3.0 installed on your computer, do the following to upgrade to Kaspersky Total Security:

Download the Total Security package here (opens in a new window for you). This is what you should see:

kaspersky download total security

Grab the top one in my screenshot above, Total Security, and download it. Now we have 2 options, either installing over the top of Pure or removing Pure and installing your downloaded KTS. I have listed both below:

Option 1 – Install Kaspersky Total Security without removing Kaspersky PURE

When you install Kaspersky Total Security on top of Kaspersky PURE 2.0 or Kaspersky PURE 3.0, the following data is preserved:

  • License information
  • Quarantined objects
  • Product settings (config settings including Backup tasks)
  • Encrypted containers (including all data)
  • Password Manager databases for all user accounts. All data that was available when working with Password Manager, such as passwords to programs and accounts, identities, notes, etc.
  • Anti-Spam databases (if the Anti-Spam component was previously used)
  • Backup stores

This makes it the easier option for most users. If you are not experiencing any issues with Pure then do this. If you have slowdown issues, configuration problems or just want a fresh install (which is always nicer) then jump to Option 2 below.

Screenshots of the installation process when installing over Kaspersky Pure:

install-kaspersky-total-security

installing-total-security

finish-restart-total-security

This took about 3 minutes for us to complete including the restart, just accept the defaults.

Option 2 – Install Kaspersky Total Security, removing Kaspersky PURE first

CAVEAT – You must have your licence key available which can be found on the card inside the product case.

CAVEAT 2 – You will lose any saved passwords in the Kaspersky Password Manager. Not everyone uses this and it won’t affect other password managers such as LastPass, Roboform, Keepass etc.

CAVEAT 3 – You will lose any quarantined files, backup stores, encrypted containers and spam databases (if used) which are again specific to Kaspersky Pure

  • Fully uninstall Kaspersky Pure via your control panel.
  • Reboot your PC
  • Install Total Internet Security from the file you downloaded earlier or from a packaged CD

If you have never installed a program before, here is some help how to do it:


I hope that this helps answer your questions on installation, upgrading and compatibility. Kaspersky remains the most effective of all the antivirus and Internet security suites that we have tested in our workshop and Total Security is a worthy replacement for Pure.


Slow Windows 8 update speeds fixed

Slow update speeds in Windows 8 (and slow network speeds in general) are often because of the ‘poisoned’ DNS cache. This is because it can contain invalid or expired DNS records. Symptoms may be difficulty in opening websites or even problems with Windows updates. What we’ll do here to attempt to rectify this is to clear the DNS cache by simply flushing the invalid or expired DNS entries.

How to Flush the DNS Cache to speed up Windows 8

  • Logon to your Windows 8 computer with an administrative account.
  • Click on the desktop tile from the Start screen to go to the desktop window.
  • Hover the mouse over the bottom right corner of the window.
  • From the displayed options, click “Search”.
  • On the opened Search pane at the top right, ensure that the Apps category is selected.
  • Type in “cmd” without the speech marks.
  • From the displayed results on the Apps window, right-click on Command Prompt.
  • From the displayed advanced options at the bottom of the window, left click on “Run as administrator”.
  • When you see the User Account Control box, click “Yes” to provide the administrator approval to open the command prompt with the elevated privileges.
  • At the black command prompt window, type “ipconfig /flushdns” and press enter. This will delete the DNS cache.
  • Close the command prompt window when done.
  • Restart the computer.

After flushing the DNS cache, the IP address of any website or network device is then automatically resolved by the DNS resolver using a DNS server.


Failure configuring windows updates reverting changes do not turn off your computer

This is quite a common fault on systems I have seen on PC systems ranging from XP through to Win 8. There are various ‘fixes’ mentioned out there, some of which are potentially damaging, so I thought I’d share my method of repair here. It has worked on 99% of computers we have had through the repair shop.

The fault often is triggered by a single downloaded update that does not want to apply itself. Subsequently, all the other downloaded updates fail too. If left, these updates will grow in quantity every week until they are difficult to diagnose, so do this sooner rather than later.

  • First off, check you are logged in as an administrator on the system.
  • Make sure that your clock set to the correct time, date, year and timezone. Don’t skip this, double check it!
  • In the following steps, make sure you download the correct version for your operating system, eg Windows 7 64-bit etc. If you are not sure which version you have, look in Control Panel, Select “View by small icons” then click on System. Here, you’ll see your Windows Edition and Sytem Type. While you are in here, check that you can see “Windows is activated”. If not, this is your problem and you need to activate Windows. To do this, click Start, type in “activate” then click on Activate Windows.
  • You can disable your antivirus temporarily but this is not necessary unless you try this method and it fails. Make sure if you do this that you are behind a firewall, either the Windows one or one in your router.
  • Open ‘Computer’ and navigate to C:\Windows\SoftwareDistribution\Download then delete everything you find in this folder.
  • Now, go to Windows update history on the computer (Control Panel, Windows Updates and select View Update History). Look at the ones that failed and note the KB number. You can then go to Microsoft Download Center and download each one individually by searching on the KB number. Use Internet Explorer for this, not Firefox/Chrome etc. After manually downloading and installing each one, restart the computer and repeat the process until each update is applied. Don’t skip the restart, this is necessary to apply many updates.
  • Once the list of downloads is finished you can create a restore point and then try an automatic Windows Update again, it should work now.


You can also give this a try – Windows Update Troubleshooter.  While this is, in theory, an automatic fix to the ‘failure configuing Windows updates’ issue, it doesn’t always work so I prefer to use my method above first which can isolate the problem to a single download. Good luck!


Cannot modify header information – headers already sent

So what exactly is ‘modify header information’ anyway? Well, it’s quite a common problem and one that has no definitive answer because there are many different code reasons why it occurs. That said, if you understand why it’s happening you should be able to diagnose your issue more easily. I’ll give an explanation first and then go on to provide a fix for WordPress template files as these seem to be the most prevalent code examples that get hacked and chopped about.

Headers sent to your browser explained

So, this issue rears its ugly head when someone visits your website and requests a page. Your server duly sends the page but before the visitor’s browser has completed the rendering of that page on the screen, it gets told to redirect to another page. This is unacceptable and the browser doesn’t like this so you see the error “Cannot modify header information – headers already sent”. Take this code example:

<html>
<?php
header('Location: https://www.pcrepairmansblog.com/');
exit;
?>

It’s simple enough php code where the object is to redirect the user’s browser to another website. This will not work though because the <html> line has started to output the code to the browser already. Remember that header() must be called before any actual output is sent and this can be by standard HTML, via PHP or even via the presence of blank lines.

The blank lines header error

The presence of blank lines within PHP in a file can cause errors. Here’s another example:

/*Some file*/

<?php

header('Location: https://www.pcrepairmansblog.com/');

exit;

? >

Spot the mistake? It’s a common one but the extra space after the final question mark is actually output to the browser and can be the difference between the page working or not. Extra whitespace where it shouldn’t be is tricky for coding beginners to spot, so work logically through the code and try to structure it as cleanly as possible. Compare any modifications you have made to the original file and try the original again to see if that triggers the error. Typical problems include whitespace or new lines before the opening <?php or after the closing ?> which works in many cases but often causes this error. Try to code more cleanly and remember this can cause big problems later on.

If your code has more than one PHP block in it and they are directly after each other, remove any spaces in between them. Try to consolidate the PHP into one block if possible here too.


Modify headers error where session_start() is used

Here’s another scenario:

<html>

<?php session_start(); ?>

<head>

<title>What's wrong?</title>

</head>

</html>

So what is going wrong here? Well, the session_start() function attempts to send headers with the session cookie to the client. Unfortunately, PHP already sent headers when it wrote the title element to the ‘output stream’. To resolve this, you would need to move the session_start() code to the top, above the <html> line.

Often, the error indicates exactly where you should be looking in your code so look for php and html output around there.

Script encoding errors, UTF-8 and BOM

The Byte Order Mark (BOM) is a Unicode character used to signal the byte order (aka ‘Endianness’) of a text file or stream. Still with me? If you’re not, don’t worry, all you need to do is to try to make sure you don’t have any Byte Order Marks in your code as this messes up the headers too. There is, in my mind, little place for BOM on a WordPress installation. The Unicode standard permits BOM in UTF-8 but doesn’t recommend it.

Errors caused by the inclusion of BOM are generally because

  • You viewed the source in a bad text editor and saved it (hint use Notepad++ which is free and brilliant)
  • You used a poor FTP client (hint: use WinSCP, also free and brilliant)
  • You had the BOM in there originally (hint: don’t download files from dodgy sites).

The simple solution is to open up all the offending files in Notepad++ (or a similar good text editor) and swap the file format from Windows/Mac to Unix and turn off the BOM.

For advanced users, you can run this nifty ‘find’ code on the server to remove all BOM code. Use with caution as it can modify any file.

find . -type f -exec sed '1s/^\xEF\xBB\xBF//' -i.bak {} \; -exec rm {}.bak \;

If you prefer to tread cautiously, use this code to simply display those BOM files:

grep -rl $'\xEF\xBB\xBF' .

The code above cleverly looks in the first line only which is where we find the BOM byte sequence (the UTF-8 representation of this is 0xEF,0xBB,0xBF). This means it runs pretty quickly.

Code your way out in functions.php

Well, I said I would give you a solution that works for WordPress and here it is. Please note, I would thoroughly recommend attacking the other solutions above first but if you are at your wits end try adding this to your theme’s functions.php file:

add_action('init', 'do_output_buffer');
function do_output_buffer() {
        ob_start();
}

PHP will now not send any input to the browser until the page is fully loaded. This in turn allows your WordPress installation to redirect users as it sees fit.

Summary

Remember, what you are trying to find is basically two lots of output to your browser and this is often via HTML code and PHP code being run at the same time. Track it down and your error should be removed. Don’t underestimate the widespread duff code in 3rd party plugins too, disable these one by one and try again.

Hope this helps you to sort out your ‘headers already sent’ issues, please use the social links to recommend this page to others before they pull their hair out too 🙂