Bot blocking tool Spyder Spanker review

Websites are plagued with bad bots and often come grinding to a halt without the aid of a bot blocking tool. Here, I’ll review the latest kid on the block, Spyder Spanker.

Bot blocking plugin wordpress

First off, Spyder Spanker is a WordPress plugin, so if you don’t have a WordPress powered site then you’re out of luck. If you do however, then read on, it’s pretty impressive. Here’s a video that shows its merits:


Seen enough? Get Spyder Spanker Pro now at the best price or continue reading the review.


Spyder Spanker full review

Initially installing the tool is as simple as uploading your provided zip file to your server via the WordPress plugin page. Once uploaded and activated, Spyder Spanker installs itself as an admin menu item. There, you can add your licence details and you are straight in to the interface, a very neatly styled area where each component is separately presented to you.

Allow trusted bots

Setting up the plugin is very easy because all of the major trusted bots are whitelisted. By trusted, I mean the ones you actually WANT to come to your site such as GoogleBot, BingBot etc. Without these, the search engines wouldn’t know your site content and you would never get listed in the search engine results pages. This is something that is a welcome addition to the software, other packages leave it up to you to select your own trusted bots.

Disallow bad bots

You don’t even need to add any bad bots either because these are also setup when the plugin installs. Bots such as Baidu (Chinese search bot) and Yandex (Russian search bot) are unneccesary on many English language sites as they steal bandwidth to add you to their results pages, regularly returning to your pages to re-crawl them and taking valuable bandwidth.

Allowing individual bots

OK, so we have a good setup straight out of the box, but let’s dig a bit deeper and see what we can modify. Let’s take the scenario where an English language website sells products to China. If this is the case then it would make sense to allow the Baidu bot to index the website.  To do this is a simple 2-click operation, tick the Baidu bot and then click on ‘Remove selected’. Very slick and no messing about with CSF firewall rules or .htaccess country-blocking or IP address blocking rules.

The differences between Spyder Spanker and other tools

I wanted to point out that Spyder Spanker is predominantly a bot blocker and doesn’t do a lot of what tools like WP Better Security does such as secure admin areas, make files ineditable etc. What it does excel at is blocking the bots that use your resources on a daily basis and it can throttle back the good bots when they spider your site aggresively too.

WP Better Security comes with a basic list of bad bots for .htaccess (which I use) but they’re a bit more devious these days and use new names. Here is an example of a logfile entry in Spyder Spanker:

Blacklist agent testing...
---------------------------------
0447705 - 2013-05-03 03:12:52 CDT / IP: 208.115.113.90 / HOSTNAME:
AGENT: Mozilla/5.0 (compatible; Ezooms/1.0; [email protected])
---------------------------------
BLOCK: blacklist agent: mozilla/5.0 (compatible; ezooms/1.0; [email protected])

This is a bot you won’t generally find on many htaccess blacklists but it’s a ‘rule-breaker’ for sure. SS responded by blocking it and will pass the rule to my other sites and the community network.

Let’s be honest, a bot with a gmail address probably shouldn’t be trusted that much anyway!

Spyder spanker review – the verdict

I’d thoroughly recommend you buy this tool, you’ll recoup any outlay back in a short time with reduced bandwidth fees, time saved and more sales if you run any type of ecommerce or affiliate site. One thing though, go with the Pro upgrade that is presented as a “One Time Offer” when you have paid for the basic version because Spyder Spanker Pro integrates beutifully with Project Honeypot. This means that it can be run ‘hands-off’ and will be updated against the raft of ever-increasing spammers and bad bots out there. Add this to the community update facility and you’ll be protected for years to come across ALL of your domains.

Purchase Spyder Spanker at the current best price online


Woo Themes security risk

Heads up to anyone using Woo Themes, there’s a vulnerability in the “shortcode preview generator” within the Woo Framework. This needs patching asap.

https://www.woothemes.com/2012/04/framework-shortcode-exploit-has-been-fixed/

Credit to Woo, they have handled the release of their security update well, despite being in the throes of a DDOS attack themselves.

Expect to see the bots coming looking for that exploit very soon!


Disable Livefyre trackbacks in WordPress

livefyre review

I was quite a big fan of Livefyre for a while. Yes there have been many comments about how Comment Luv or Disqus are better and it seems everyone has their own preference. A while back I noticed that Livefyre had a quirk that meant that even if you turned off trackbacks via WordPress admin, this was only activated for new posts and not existing ones. For reference, in WordPress this is turned off in the Settings > Discussion menu.

This isn’t a fault in Livefyre, more a problem with the lack of easy control of posts that have already been published or are in draft within the WordPress database.

So if your older posts have trackbacks enabled you could see something like this (a screenshot from one of my posts here):

 Livefyre trackback removal

Hmm, not doing the article a great deal of favours is it really? From a search engine point of view this article now has duplicate content and more outgoing links.  So what can we do to get the older posts to not display trackbacks? Well we could go back in and edit all the posts that we are aware of by unticking the ‘Allow trackbacks’ box. Unfortunately, on larger blogs this is not practical. Time to get our hands dirty with some SQL statements.

Disable Livefyre trackbacks in WordPress using phpMyAdmin and SQL

Login to your control panel and fire up phpMyAdmin. Select your WordPress database and back it up. If you’re not sure how to do this, I wrote a detailed article here:

Backup WordPress MySQL database using phpMyAdmin (opens in a new window).

So now we have a working backup, select your database and click on the SQL tab from the top menu bar. Insert this code into the command box and click on ‘Go’:

UPDATE wp_posts SET ping_status='closed' WHERE post_status = 'publish' AND post_type = 'post';
UPDATE wp_posts SET ping_status='closed' WHERE post_status = 'publish' AND post_type = 'page';
UPDATE wp_posts SET ping_status='closed' WHERE post_status = 'draft' AND post_type = 'post';

Note that you need to replace wp_ with your own table prefix if it’s different. You should now have all your old posts that have been published (and any draft posts waiting to be published) disabled for trackbacks.


Backup WordPress database tutorial

wordpress backup

This is a tutorial on how to backup your WordPress database manually using phpMyAdmin and the SQL export method. It may sound difficult for the non-technical but it isn’t really and is something that is essential for the maintenance of any WordPress site. If you have ever lost any data before you’ll know what a huge and time consuming problem this can lead to so let’s get going.

First off, please bookmark this page in your browser, you’ll probably need to refer to it again for the first few backups!

Login to your cPanel. This is where you will see lots of useful tools and the one we shall use is phpMyAdmin shown below.

php myadmin wordpress backup

Click to open it and you will now have to select your database from the left hand side, usually something like mysite_wrdp1. Don’t select the information_schema as this is not the one we want.

Now you look to the right of the screen and you can see tabs relating to functions we can actually run on the database.

phpmyadmin sql wordpress

We want to select ‘Export’ here. Now for the bit everybody gets wrong…. You should select the ‘Custom export method’ which gives you greater control over the final exported database. For ease of reference, I have compiled a screenshot of the best options to select for the majority of users. Make sure you click to select all tables in your database, I have seen so many people just backup one table within the database and the backup is effectively useless. Here are all the settings you need to have in the latest version of  phpMyAdmin:

database backup wordpress phpmyadmin latest

Notice I have removed the prefix from the table names (shown in blue above) as you or a program may have modified this. By default it is wp_ but many security packages rename it. There is nothing to do here, I’m just pointing this out for clarity.

Now you can click on ‘Go’ and you should be able to download a working copy of your database. You can’t really view this file as it requires a database server (although you can connect to it with a few software tools that exist). You can however upload it to a new installation or use it when the poop hits the fan and disaster strikes on your server.

That’s about all you need to do to have a working backup of your database. Remember to FTP into your server and copy all the files over too as many files and folders are necessary to get back up and running as you were. For example, your wp-content/uploads folder is not backed up automatically and this is where most images used on your blog are stored.

Automatic WordPress SQL backups and file copying features

If you want a click-and-forget solution then I would heartily recommend the excellent WP-Twin which you can download here https://wp-twin.com
This neat program not only backs up your database but also ALL of your files on the server, meaning that any special folders outside of WordPress get copied over too. It has an easy reinstall option that takes the pain out of disasters, well worth it if you aren’t too sure how to go about reinstallation.

I hope this helps you to start a decent WordPress backup regime and I’d be happy to know if this helped you, please drop me a comment below or click the social buttons to share with others.


Display RSS feeds easily in your browser

If you’re looking for a way to display RSS feeds easily in your browser then look no further.

First off, if you are using Internet Explorer then please consider changing. At the moment it is not as standards-compliant as most other mainstream browsers (Firefox, Chrome, Opera etc) and it has more security vulnerabilities unless fully patched up-to-date. Even then, most exploits are targeted at IE, making it the least secure in my eyes. To get up-to-date, head on over to https://mozilla.org and download the latest and greatest version of Firefox. If you are installing Firefox and want to import your Internet Explorer bookmarks, it will offer you the choice during installation. Nothing in Internet Explorer is changed and you can always go back to it (if you really must!).

Once installed visit this page:

https://addons.mozilla.org/en-us/firefox/addon/rss-ticker/

and click ‘Add to firefox’ button, then ‘Install now’. Restart Firefox and visit your favourite website (pcrepairmansblog.com of course!). Look for the feed link, it may say ‘Feed’, ‘RSS’, ‘XML feed’ etc or may just have the RSS  icon like this: Display rss feeds easily in your browser

Now you have the ‘feed’ displayed in your browser. A feed is really just some live data that shows the most recent activity, so for a website it may show the latest articles and for a forum the latest posts etc.

At the top of the page, click on the “Subscribe now” button and you’ll now get the latest feed pushed directly to your browser.


Firefox rss ticker


Now you should right click on the ticker bar at the bottom and select ‘Options’. This is where you can remove some of the default feeds and set your preferences.  I like to have these settings:

rss ticker setup options


So you should now have a free feed reader and no need to swap software while you are browsing to keep up-to-date on your favourite sites. Most feeds can easily be brought into the browser and many site owners are oblivious to this fact so they don’t put up an RSS link or icon. Try the following combinations to get to their feed:

https://sitename/feed/rss
https://sitename.com/rss.xml
https://sitename.com/index.php?action=.xml;type=rss

Once you have it, let the site owner know they are missing a trick by not providing a link to it. Mine’s in the footer under ‘News feed’ and I also have a feed just for site comments. Have fun!


WordPress SEO by Yoast – using sitemaps

If you are using the fabulous WordPress SEO plugin by Yoast, you’ll find that it also does the job of creating a sitemap for you.  You need to opt in to this within the plugin’s settings field here:
XML sitemaps” then tick the “Check this box to enable XML sitemap functionality“.

There are a few caveats that this plugin doesn’t make you aware of though and this can affect the whole indexing of your website by the search engines.

1. If you are now making reference to this sitemap elsewhere (such as within W3 Total Cache etc) then you will need to alter the path to your sitemap thus:

https://yourdomain.com/sitemap_index.xml

2.  You will need to remove any other sitemaps from your root folder. Look for:

sitemap.xml
sitemap.xml.gz


3.  Make sure that your robots.txt has this line:

https://www.yourdomain.com/sitemap_index.xml


Your XML sitemap doesn’t actually exist at this location so don’t think it’s not working if you can’t see this file. Yoast’s WordPress SEO plugin places the files in a subfolder of your uploads directory, and using WP Rewrite the URL will resolve to the right sitemap. It also works with Multi Site installs whether domain mapped or not.  To check it is functioning, fire up your browser and navigate to the sitemap (as in step 3 above). You should see the file there.


Hope this helps!


Install Xampp on Windows 7 64 bit

Xampp setup on WIndows 7This is a guide which shows you how to install Xampp on Windows 7 64 bit.

Visit apachefriends.org to get the Xampp distribution for Windows.  I prefer the non-installation zip file so let’s get this one. The zip or 7zip files are the same but you’ll need another zip utility such as 7zip or WinRar to unpack the 7zip archive. If in doubt, get the zip as Windows can extract files from this one.

Unpack the zip file onto your hard drive. My test PC was partitioned into C and D so I unpacked the file to get this structure:

d:\xampp

You can likewise use your C drive, just replace D with C in all my examples. I prefer a separate partition so that a Windows reload would not wipe these files and since it’s a standalone installation, a new Windows install would allow Xampp to work with no configuration.

Next, we should now be able to run the Xampp control panel by navigating to the newly created xampp folder in My Computer, then double clicking this file:

d:\xampp\xampp_control.exe

If this is not visible, there is an icon in the system tray (bottom right of the screen) that will pop the Xampp Control Panel up again. You may need to use the arrow to expand the tray icons and make it visible. At this point I usually make the tray icon always accessible by dragging it to the visible tray area.

Tick the svc boxes under MySQL and Apache and click the Start button on both. You now should have both services report that they are running

Apache runs and then stops again in Xampp

Xampp and Skype – arch enemies

After a lot of testing I came to this conclusion…. they both hate each other! They are fighting for attention on port 80. Now we can either make Skype dump data on another port or, and I believe this to be the better way, close Skype while we are working in the Xampp environment. Given that there is a bug in Skype on Windows 7 where it is always displayed on the taskbar, even when closed or signed out, you will need to completely close Skype in Windows 7.  The solution and quickest way is to right click on the Skype icon on the taskbar and click on Quit. This stops Skype from monitoring port 80.

Other offenders can include TeamViewer, UVNC, Crossloop and LogMeIn if they are set to be resident. Simply quit these applications to avoid conflicts.


OK, let’s push forward and check we now have Apache and MySQL running by firing up Xampp’s information page. In your browser’s address bar, type in:

https://localhost/xampp/

This should give you this Welcome and Information screen:

Xampp configuration Windows 7 64 bit

In this screen there should be a page with a column of options down the left side.  Now depending on your screen size and whether your browser has toolbars installed, you may miss the bottom few lines. On our test laptop with a 15.4″ screen this missed the last few rows.

Xampp configuration screen cannot read lower items


No problem though, we can disable the toolbars temporarily or just type in the browser command we require.  Here you can see the last entry for reference:

Xampp configuration screen fixed

Right, so we can now setup WordPress as all we require is Apache and MySQL to simulate our server.

Setup WordPress in Xampp

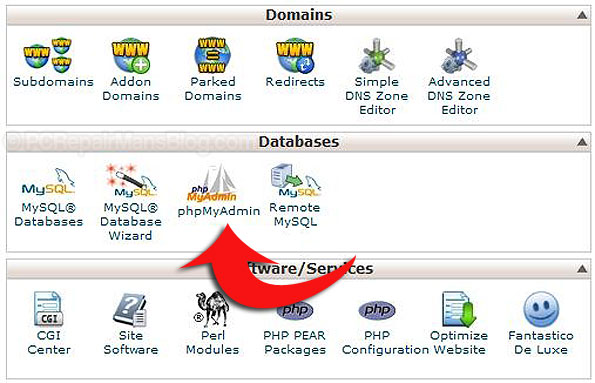
We are going to use phpMyAdmin to create our database that WordPress will run on.  On the Xampp info page, click on the menu item ‘phpMyAdmin’ OR in your browser go to

https://localhost/phpmyadmin/

Note I am using forward slashes here but if you use backslashes it will resolve to the same place. Best to use Unix server syntax though as it’s great practice if you are a Windows user wanting to do things correctly! It will stand you in good stead if you need to get your hands dirty on a real server.

Okey dokey, let’s setup WordPress’s database. Under MySQL Localhost, type in “wordpress” as the database name. Check your options are as shown below:

Xampp phpmyadmin wordpress setup

If you are seeing a slightly different screen to the one above, this is because you’ll be running a later version of phpMyAdmin. No problem, the important thing to make sure you get right is the utf8_general_ci and the name of the database. The name of the database can be anything really, just don’t use special characters. I often use the name of the domain I am developing.

Let’s move on to WordPress now. Download the latest and greatest version from here and unzip it to your desktop. You should now have a folder called wordpress. Open this and look for the file

wp-config-sample.php
Look for the following lines

/** The name of the database for WordPress */
define('DB_NAME', 'database_name_here');

/** MySQL database username */
define('DB_USER', 'username_here');

/** MySQL database password */
define('DB_PASSWORD', 'password_here');

/** MySQL hostname */
define('DB_HOST', 'localhost');

/** Database Charset to use in creating database tables. */
define('DB_CHARSET', 'utf8');

Carefully edit the lines to read this:

/** The name of the database for WordPress */
define('DB_NAME', 'wordpress');

/** MySQL database username */
define('DB_USER', 'root');

/** MySQL database password */
define('DB_PASSWORD', '');

/** MySQL hostname */
define('DB_HOST', 'localhost');

/** Database Charset to use in creating database tables. */
define('DB_CHARSET', 'utf8');

I’d advise you stick to this because in Xampp, ‘root’ is the default user and there is no password. Note that I only modded 3 lines, I just left the last 2 in for info as some people change these unnecessarily. Now save this file as wp-config.php in the same wordpress directory (it will not work if you just save it as wp-config-sample.php!)

Copy the whole wordpress folder over to the xampp htdocs directory so you now have

d:\xampp\htdocs\wordpress

Developer tip:

If you are setting up Xampp as a test environment for building client websites, use the name of the client or their domain instead of ‘wordpress’ as a folder name. At this point, you can copy the folder to another within htdocs and rename it to something else, ready for your next project,eg:

htdocs\domain1

htdocs\domain2

Navigate in your browser to

https://localhost/wordpress/wp-admin/install.php

and you should see the WordPress installation routine. Choose the following:

Site name: TESTSITE

Username: abc

Password: abc

Untick the “Allow my site to appear in search engines…” box

Add any email address

Click “Install WordPress”

At the ‘Success’ screen, login with username: abc and password: abc

You can now login at any time that xampp is running Apache and MySQL by going to this url in your browser:

https://localhost/wordpress/wp-login.php


Congratulations! You can now modify your WordPress theme files directly in the WordPress themes folder (wp-content/themes/theme-name) and refresh your browser page for quick and easy theme or template development with no FTP! Once you have modded your files then you can save them elsewhere as a backup and upload them to your server. I recommend installing Mozy (see review) or Livedrive (see review) for a secure and easy online backup.


If you want to check out some more useful and interesting stuff you can do with Xampp and php, take a look at this book


Firefox has detected that the server is redirecting the request (WordPress)

Seems many people are getting the WordPress error “Firefox has detected that the server is redirecting the request for this address in a way that will never complete”

This is an error that is often difficult to track down so I’ve created this article to offer some suggestions.


Server redirecting request via htaccess

First off, this happens mostly when you are altering the way that the domain resolves.  By this I mean, if you want your domain to be

www.pcrepairmansblog.com

and people type in

pcrepairmansblog.com

then you need a redirect to the www version.  In actual fact, this is a good SEO technique but I’ll not go into detail here.

How do you redirect them to the www version? Well, I do this by creating an htaccess rule but the problem is that WordPress can often install using the non www link, especially with Fantastico’s defaults.

To check what you have, go to your WordPress admin back-end and look in the Settings -> General page.  Check that both the WordPress address and Site address are set to the same as your htaccess rules. If not, htaccess tells the visitor to go to the www version and WordPress says ‘No, go back to the non-www version’. This causes a loop and the Firefox error above.

I recently saw a client who did a fresh WordPress install and then he added the ‘Custom coming soon page’ plugin. Immediately afterwards he got the dreaded “Firefox has detected that the server is redirecting the request for this address in a way that will never complete” error.  He couldn’t get into the admin back-end and called me out to resolve it.  I fired up the ftp, renamed the plugin directory thus:

/wp-content/plugins/custom-coming-soon-pagexxx

and managed to login to the wp-admin with a shift-refresh of the browser. This rename effectively disabled the ‘coming soon’ plugin and allowed access again.

If this works for you, please leave a comment.


Akismet charges for access to its anti-spam API

Well, many people will be surprised to hear that Akismet is now charging for accessing its anti-spam database. Lots of users will disagree with the way Akismet handled this too. Bundled with WordPress, all you had to do was create a free account to get your API key. This worked across multiple sites and was pretty seamless.
Now a charge (currently $50) is levied for businesses and affiliate sites. Furthermore the free accounts are throttled with traffic priority going to paid-up subscribers. This from their website:

Free account

If your site is for a business, or if it promotes a product or service, you should pick from one of our paid account options.

Hmm, create a free tool, get subscribers then levy a charge. Whatever way you look at this, it’s going to be big business for Akismet with hundreds of thousands of people ready to subscribe.


NextGen gallery thumbnail spacing problem resolved

The NextGen Gallery WordPress Plugin is a pretty amazing tool but it suffers a pretty ugly thumbnail alignment issue when used straight out of the box.  That said, it’s an easy fix and only requires a few clicks, no code.

Here’s a ‘before and after’ shot:

Before

Before

Before you can see that the gallery really looks messy.  This is a real screenshot taken from a client’s website prior to this modification being implemented.
This misalignment is often a problem with css styling on ‘stacked’ images which have different sizes.

After

After

Here the images are dropped into 3 invisible columns, great for aligning multiple images. There is still some background that shows through but this is unavoidable given the image dimensions.

To do this simple modification, first, go to the WordPress admin back end
Select Gallery
Options
Gallery tab (on top)
Select the number of columns based on your template post width.  I’d start with 3 for post widths around 590px and vary this to suit.
Hit the ‘Save changes’ button and you’re done!