Bootmgr is missing

Windows 7 BootMGR fix

If you get the error BootMGR is missing when trying to load a Windows based PC then you need to follow some logical steps to find the solution.

First and foremost, I would try a startup repair using the Windows installation CD/DVD.

How to Boot to the System Recovery Options in Windows 7

Insert the Windows 7 installation DVD or System Repair Disc into the DVD drive and restart the computer

Check to make sure that you set the BIOS to have the DVD drive listed first in the boot sequence

If prompted, press any key to boot from the Windows 7 installation DVD

Select your language preferences and click on Next. (See screeshot below).

Click on Repair your computer

Select which operating system you want to restore (your own Windows 7 should be listed) and then click on Next

NOTE: If Windows 7 is not listed here or it is blank, then it is ok to proceed. In this case, still click on “Next”

Select the system recovery option you want to do. Those listed are:

  • Startup Repair
  • System Restore
  • System Image Recovery
  • Windows Memory Diagnostic
  • Command Prompt

We want “Startup Repair”. Allow Windows to find the issue and restart the PC.


Do the above without a disk, using the manufacturer’s system recovery partition

If your computer has a system recovery partition then follow these instructions.

Start the PC and tap the F8 key on your keyboard about every half a second. You should see a boot menu, if not try to do this again.

Select the Advanced Boot Options screen (if you dual-boot) otherwise ignore this line.

Using the cursor keys (arrows), select “Repair your computer” then press Enter

Select your keyboard and language preferences then click on “Next”

Select your user name and type in your password, and then click on OK.

Select “Startup Repair”

Allow Windows to find the issue and restart the PC.


If you want to find out more about the system recovery options in Windows 7, take a look at this Microsoft article:
https://windows.microsoft.com/en-us/windows7/What-are-the-system-recovery-options-in-Windows-7

If this helped you to fix your PC then please click on one of the social buttons below to help others too.


Syncback blank account password not accepted

Syncback scheduled backup softwareSyncback is an excellent backup tool which we use here to control client backups. There’s a free version and a more powerful paid version. They both suffer the same problem as other backup tools which is the inability to schedule a backup for a user profile that has a blank password.

Usually the error is something like this:

“An error has occurred while attempting to set task account information. The specific error is: 0x8007007: Access is denied. You do not have permission to perform the requested operation”

No problem because we can head over to the trusty Windows Registry Editor to force Windows to accept blank passwords.
Now first off I want to say that any account without a password is running the risk of being compromised, especially those that are Administrator accounts. However, if you need to have your passwords blank for any reason, here’s my fix:

  • Start
  • Run and type in “regedit” without the quotes
  • Press enter
  • Navigate to HKEY_LOCAL_MACHINE\SYSTEM\CurrentControlSet\Control\Lsa
  • Double click it the subkey “LimitBlankPasswordUse”.  If it’s set to 1 it will not allow blank passwords so change this to 0 (zero).
  • Exit the registry editor and you should now have the ability to schedule without passwords.

Hope that helps!


Cannot open Word document, get jibberish on screen

Microsoft Office problem gibberishWhy can’t I open a Word or Excel document sent to me?  It comes up as loads of jibberish on the screen.

A very common problem this one and I’m asked about it very often. The usual scenario is that “Person A” sends “Person B” a document and they are unable to view it. This leads to countless lost hours and backwards and forwards with documents, when all that is required is a simple update on Person B’s computer.

For the terminology here, remember “Word” and “Excel” are part of the Microsoft Office package.

You may be suffering a common problem where you cannot open an Office 2007 document because you have Office 2003 installed.  To identify this, look at the 3 letters at the end of the file.  For example:

report.doc = Word 2003 format
report.docx = Word 2007 format
sales.xls = Excel 2003 format
sales.xlsx = Excel 2007 format

Some people will have the file extension (those last 3 letters) viewing turned off.  To rectify this look at my article here, then come back:

How to show file extensions in Windows

So what is the solution to this Microsoft Office jibberish problem?

Opening report.docx with Word 2003 will not work unless you have the “Microsoft Office Compatibility Pack for 2007 Office Word, Excel and PowerPoint File Formats”  – a downloadable installation program which Microsoft offer to resolve this issue.  This program is free of charge and can be downloaded here:

https://www.microsoft.com/downloads/details.aspx?FamilyId=941B3470-3AE9-4AEE-8F43-C6BB74CD1466&displaylang=en

The rtf format is opened by most word processors such as Wordpad, Word, OpenOffice Writer etc so is a good format to ensure maximum compatibility if you are not sure what program the document’s recipient has.  To avoid problems I generally save in .doc format rather than .docx, even when using the Office 2007 suite, if I am sending a document to an unknown recipient. Better still, sending as a PDF allows your document to show as you intended because often the recipient will have different margins, paper size etc.

Please drop me a quick comment below if this helped to resolve your problem!


Remove Adobe Flash Player from Windows and reinstall

Removing Adobe Flash Player from Windows is required generally because it will not install correctly.  In all cases here is the logical method I use to remove and reinstall corrupted installations.
  • Backup current registry settings
  • Uninstall all previously installed versions of Adobe Flash Player
  • Verify that Internet Explorer has the correct ActiveX and security settings
  • Reboot and clean the Windows registry
  • Download the latest Adobe Flash Player from the official website


First off a few checks for the obvious stuff:

  • Make sure you are logged in as an administrator (not a “Standard or Limited user”)
  • You have no Pop-up or Ad Blocking software, notorious for killing Flash installations
  • You have accepted any ActiveX or Add-on warnings that popped up
  • JavaScript is enabled

All OK so far? Let’s go a bit further then…..  Perhaps print this off or bookmark the page in your favorites folder so you can return to it as we’ll be restarting the PC and closing the browser window.


Backup the current registry settings.

Close all open programs. Create a Windows System Restore point. This will help us to get back to this point in time if anything untoward happens.


Attempt to remove Flash Player via Control Panel

Close all programs INCLUDING ANY MESSENGER PROGRAMS LIKE WINDOWS LIVE MESSENGER. “File”, “Exit” or “Quit” usually does the trick for messenger programs.

Drop into Control Panel and open Add/Remove Programs (Windows XP, 2003) or Programs and Features (Windows Vista and 7).  Remove any entries for Adobe Flash Player and Adobe ActiveX.

Restart your PC


Modify any ActiveX and Security settings within Internet Explorer

Make sure that Internet Explorer security is set to the Medium: Default level, which allows viewing ActiveX controls.

  1. Open Internet Explorer
  2. Choose Tools, Internet Options
  3. Select the Security tab
  4. Select Medium: Default level

Alternatively, and a better way to do it for this purpose, is to configure the Custom level to view ActiveX controls with the next steps.

Select the Custom Level instead of the Default Level and do the following.

  1. Navigate to the section marked “ActiveX controls and plug-ins.”
  2. Set “Download Signed ActiveX Controls” to “Prompt”.
  3. Set “Run ActiveX Controls And Plug-ins” to “Prompt”.

OK your way out and close Internet Explorer


Clean out the registry

Download the free CCleaner program from here.  Install it and opt out of the free Google toolbar install by unticking the selection (it’s your choice but I don’t like the toolbar).  Run it and click on “Run Cleaner”.  This will remove all your temporary Internet files and Cookies along with your Internet history and lots of other clutter.  Now select “Registry” from the left side, “Scan for Issues” and when finished, “Fix selected issues”.  Save a backup if prompted.

Now restart your spring-cleaned computer!


Download and install Adobe Flash Player

Download and run this  ‘Standalone Executable Installer’ for Flash Player (Internet Explorer only) Basically, if you run Internet Explorer you will need this.

Download and run this Flash Player standalone plugin if you use another browser such as Firefox, Safari etc If you don’t run another type of browser and just use Internet Explorer then you don’t need this.


If you are still struggling, then it may be a problem within Internet Explorer. Taking it back to ‘factory settings’ sometimes helps.  If you don’t already have it, install Firefox and run the Flash Player Standalone Plugin, then restart Firefox.  Visit youtube.com and if you can see the videos you have Flash installed (and I would definitely recommend using Firefox over IE any day)!

Leave me a comment (or buy me a coffee) if this has solved your problem!


How to turn on or off Windows automatic updates

1. Click “Start”, and then click “Control Panel”.

2. Depending on which Control Panel view you use (Classic or Category) do one of the following:

*Classic view*- Click “System”, and then click the “Automatic Updates” tab.

*Category view* – Click “Performance and Maintenance”, click “System”, and then click the “Automatic Updates” tab.

3. Click the option that you want, either turn it on, off or have it prompt when updates are ready for download and installation.


Windows XP loses logon screen – goes straight into user account

Problem: Windows XP computer goes straight into the user account and bypasses the standard logon screen.  Even worse, it is compounded by the fact it goes into a Limited User account and this freezes on logout.  Here’s what I did to fix this:

  • Booted up in Safe Mode
  • Logged off (this time it worked as there were no freezing issues in Safe Mode)
  • Logged on as Admin
  • Start, Run and type in “control userpasswords2” then hit Enter.
  • Tick the box “Users must enter a user name and password”
  • OK and restart the computer

You should now see the login screen back again.  One last thing you can try (if this doesn’t work for you) is the following command:

Start, Run and type in “rundll32 netplwiz.dll,ClearAutoLogon” (without the quotes) then hit Enter. Note the spacing and comma!

Let me know if this works for you.


PCRepairMan Top Tips

With Win XP Home you can only access the built in Administrator account when booting into safe mode. By default, on XP Home only, this Administrator account has no password.

With Win XP Pro the Administrator account is only shown on the Welcome Screen if no other account is part of the “Administrator” Group. You can still login using the account if holding down CTRL & ALT and pressing DEL twice.

A WinXP account is only shown on the Welcome Screen, if it belongs to either the “Administrators”, “Power Users”, or “Users” groups.


Printer keeps printing pages when pc starts

If your printer keeps printing pages when your pc starts, then follow these steps to clear the print queue.

These instructions are for Windows 7 or Vista, and won’t do any harm to your PC. I usually advise this and 99.9% of clients will cure their printer problems this way.


  1. Click Start.
  2. In the box above, type cmd
  3. Right-click on cmd.exe (the command prompt shortcut) and select Run as administrator
  4. In the black box that appears, type net stop spooler then press Enter
  5. Type in del %systemroot%\System32\spool\printers\*   /Q then press Enter. (Note there is a space before the /Q)
  6. Type net start spooler then press Enter


The print queue on your Windows 7 or Vista PC will now be cleared out. Close the black command window using the cross at the top and restart your PC.


Has my fix for Printer keeps printing pages when pc starts worked? Then please use the icons below to tweet, like or share this article if you found it useful, it really helps this site to help others!


Format external drive FAT32 using Windows 7, XP or Vista

Sounds simple right, format an external hard drive using FAT32? Well yes if the drive is a smaller Pen Drive, but as we get towards the larger drives of 32GB or more, then Windows 7, Vista and XP all refuse to touch it unless it’s formatted NTFS.  There are plenty of good reasons why we’d want FAT32 and one of them is probably why you’re reading this.  Projects suitable for this method include sharing a large drive with a Mac, creating a compatible drive for some TVs to read and record to and making a multi-boot external diagnostics disk.

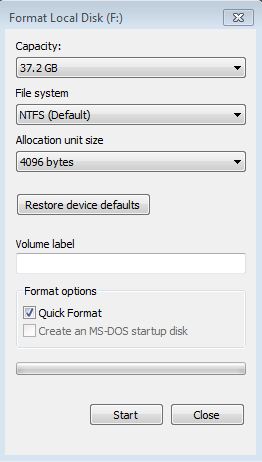
Here’s a screenshot of the standard format tool in Windows 7:

Format large drive FAT32


The only other choice offered is exFAT which is not the same. I have noticed that other websites will offer different complex solutions and link to deprecated or paid tools, but by far and away the easiest and simplest way is to use a graphical tool called FAT32 format. You can download it here. It’s free , small and simple.

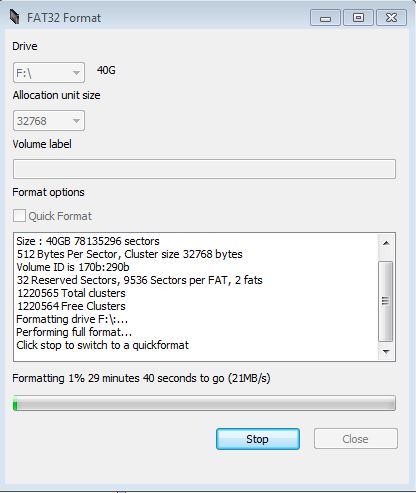
Running the tool gives this box:

Format external hard drive FAT32


Here you can see I’m running it on a 40GB external drive. Make sure you select the correct drive to format! If in doubt, go to My Computer or Windows Explorer to verify you have selected the correct one.

If you are formatting the drive, it’s always best to deselect (uncheck) “Quick format”. It will take longer but the result will be better. Just bear in mind that FAT32 does not support individual files above 4GB but this should not be a problem for most people unless trying to copy larger BluRay DVD images etc.

Hope this works for you and your project, please let me know below!


PC freezes at chkdsk.sys

Fault: PC freezes at chkdsk.sys

This is a common fault that we see in our workshop. It can occur in safe mode and normal mode but with normal mode the PC often fails to load windows and just keeps restarting itself. This happens on desktop PCs and very often on laptops as they suffer knocks and bumps to the hard drive and battery failure.

The problem is the disk itself in 99 percent of cases.  Whether it can be fixed is down to a number of factors but, in short, here’s how we go about testing it and repairing the fault. I’ll presume that you wish to recover data (documents, images, emails etc) from the disk as most of our clients do. We have a great success rate in recovering data and getting Windows running again with this method.

First, we set the host PC’s bios to start from CD.  If you don’t know how to do this then take a look at my article How to change the boot order of a PC.

Next, we’ll pop over and get a copy of the excellent HDD Regenerator, downloadable here (link opens in a new window). This is the single most useful disk checking tool out there at the moment. It’s not free but it will give you the best chance of data retrieval. Also it’s a tool that is very useful to have in your repair arsenal and you can fix other PCs with it too. I’ve written a full review of HDD regen here. You’ll need to use another PC to create the bootable CD or DVD with but as you’re reading this I’ll presume you have access to one. HDD regenerator can also create a bootable flash drive but for maximum compatibility use the CD.

Next we boot the dead PC with our CD (or Flash drive) and enter the HDD regenerator interface. Tell it to scan the correct hard drive (often there’s only one anyway) and let the program do its stuff, all automatically. Allow an hour or more to scan a drive of about 160GB on a typical Windows XP machine. Newer PCs have better, faster processors and more RAM but they often have bigger drives so a typical scan can take a few hours.

Remember, what the program is doing is a sector-by-sector analysis of your hard drive and moving data from bad areas of the drive to good. This takes time, often we see scans running for several hours, but it will ultimately help you to be able to recover your data and in most cases get Windows restarted. You can also leave the scan running overnight, you don’t need to sit and watch it!

After the chkdsk.sys error repair

With the drive finally scanned, the program reports how many bad sectors it found and you simply press ‘Esc’ to quit the program.

Restart your PC, removing the CD on the initial restart, and make it your first job to backup those files you thought you had lost!


Reference: chkdsk.sys fault when computer starts causes PC to hang or freeze


How to change boot order to start from CD or USB

Often, we need to change a PC or laptop’s boot order to start from CD, DVD, USB, external hard drive or floppy disk.  It’s not difficult to do this but timing is important.

Turn on or restart your computer and watch for a message during the startup screen about which key to press.  It’s usually Del, F10 or F2 and you need to press this key as soon as you see the message on screen. The window of opportunity is really quite small – about 2 seconds – before the computer loads the operating system (eg Windows).

Now, if you have done this correctly you will see another screen loaded.  If you have gone on to the Windows load screen, you will need to wait, shutdown and try again. Don’t be tempted to turn the computer off on the button or at the wall socket as this will cause even worse problems.

The new screen you see is called the BIOS screen. It will look like this, although not exactly as many manufacturers will have different setups.

phoenix-bios-boot-order

This allows control over the hardware in your PC such as CD/DVD, USB, memory, processor, hard disk drives etc. It is generally a blue background and navigation is done using the keyboard cursor keys (the arrows) and not the mouse. Navigate to the ‘boot’ area and change the order of the boot sequence so that your CD boots first. In the example above, the hard disk boots before the CD ROM so this would need changing. Save and exit the bios screen. This restarts the computer. Make sure you have a CD in the drive that you wish to boot from. Do likewise if you wish to boot from USB (some older BIOS systems do not support USB booting).

PCRepairMan’s top tip:

Note that many BIOS systems look confusing at first but they usually have helpful prompts for how to navigate and change values stored in them. In the screenshot above, you can see the bottom of the page shows Arrows to move, Enter to select, Page Up/Down to change values, F10 to save etc.

With a new boot order set, your computer will look to that device to start every time. This can be a problem after the fix, when the PC is set to boot to usb and you plug in a non-bootable USB, for example a printer. The BIOS can look at the printer and hang, waiting for it to do something.  If this happens, simply change the boot sequence back to your hard drive first and this will resolve it.