Slow Windows 8 update speeds fixed

Slow update speeds in Windows 8 (and slow network speeds in general) are often because of the ‘poisoned’ DNS cache. This is because it can contain invalid or expired DNS records. Symptoms may be difficulty in opening websites or even problems with Windows updates. What we’ll do here to attempt to rectify this is to clear the DNS cache by simply flushing the invalid or expired DNS entries.

How to Flush the DNS Cache to speed up Windows 8

  • Logon to your Windows 8 computer with an administrative account.
  • Click on the desktop tile from the Start screen to go to the desktop window.
  • Hover the mouse over the bottom right corner of the window.
  • From the displayed options, click “Search”.
  • On the opened Search pane at the top right, ensure that the Apps category is selected.
  • Type in “cmd” without the speech marks.
  • From the displayed results on the Apps window, right-click on Command Prompt.
  • From the displayed advanced options at the bottom of the window, left click on “Run as administrator”.
  • When you see the User Account Control box, click “Yes” to provide the administrator approval to open the command prompt with the elevated privileges.
  • At the black command prompt window, type “ipconfig /flushdns” and press enter. This will delete the DNS cache.
  • Close the command prompt window when done.
  • Restart the computer.

After flushing the DNS cache, the IP address of any website or network device is then automatically resolved by the DNS resolver using a DNS server.


Cheap Norton Internet Security anyone?

Norton Internet Security

When Norton’s internet Security product is about to expire, people often renew automatically. Norton offers a ‘nag’ screen to pester the user into submission. Well there is a cheaper way. A MUCH cheaper way that is totally legitimate. Read on….

Norton Internet Security has a well kept secret. If you are running the 2006, 2007, 2008, 2009, 2010, 2011, 2012, 2013, 2014 or 2015 versions you qualify for a free upgrade to the latest product.

The old product can be upgraded or uninstalled and the new version installed. We would always recommend a clean uninstall, a reboot and then a fresh install of the new product, although installing a later version of Norton usually detects and removes older ones for you.

There are some incredible deals for Norton Internet Security at the moment, you can pay a price that is up to 90% cheaper than the renewal – and you get the latest version thrown in! My method is to buy a cheap 2009 or later version and use the product key from that.   Don’t install this though, instead simply install the latest trial version from Norton’s website, Cnet or Softpedia. Use your 2009 (or later) product key to register the current version when prompted, no need to install the earlier product!

Just remember, if you need more than one licence then make sure you get a “3-user” copy. They are often as cheap as the single user licence.

Before you do this though, please note that I do sell discounted antivirus packages in my software store so you might get the latest version much cheaper anyway. Worth checking as they are currently very good value:

Check prices in the software store

Don’t want to keep Norton Internet Security? Then click here for the cheapest Norton 360 renewalcheapest Norton Antivirus renewal cheapest McAfee renewal cheapest Kaspersky Internet Security renewal Cheapest Kaspersky Pure renewal

Of these I would say that Kaspersky Pure is currently my favourite and best performing package.

Don’t forget to ‘Tweet’ or Facebook ‘like’ this article if it saved you some cash! Here are some more great deals on Norton:


Online backup and coupon code for 20% off Mozy

Mozy online backup discount coupon codeOnline backup just got a whole lot cheaper with the latest coupon code from Mozy.   Click the link below and type in the coupon code ENCRYPTION for 20% discount:

Mozy online backup coupon code

Note: Enter the code into the promotional code box at signup to get the full discount.


Other recent contenders for our recommended backup software:

Crash Plan


GoDaddy 99 cent domains are back!

Godaddy cheap domain trickYes, GoDaddy 99 cent domains are back with this simple method and coupon code for December! It’s limited to 3 per account but does include existing GoDaddy account holders to purchase. I’ll show you below how to mix it up and get 6 domains for as low as $4.

At time of writing, 4USD = about 2.50GBP or 3.8AUD or 4.7 NZD or 3Euro

Start off by opening GoDaddy using this link (opens in a new window).

Sign up or login if you are already a customer.

First off, if you are from any country other than the US, set your primary currency to dollars. I’m outside the US but I keep it in this currency as it’s often where the better deals are.

Search for your 3 .com domains and add them to your basket.

Set all domains to 1 year duration using the dropdown menu.

Below each domain you see this:
YOURDOMAINNAME.INFO FREE with .COM or .CO^ – Add

Click the little ‘Add’ link for each one, this will add the free .info to your basket.

Verify your domains and that the corresponding .infos are all there, you should have 6 domains in total.

Now go to your Order Summary box on the right side of the page and add this special GoDaddy promotional coupon code:

LKSRTL99X

You should see that all 3 of your .coms have dropped to $0.99 (plus $0.18 tax) and that the .infos are completely free (with $0.18 sales tax). Something like this:

Godaddy 99 cent domain coupon code


Godaddy free info domain


At their current non-discounted prices (and GoDaddy are reasonable for their full-price domains) the basket would cost $82 for those 6 domains. Using this trick it comes down to a shade over $4.

That’s a $78 dollar saving, or 95% if you prefer!

Here’s what I have just ordered:

Godaddy 99 cent domains coupon deal

Yes that really is just over $4 for 6 domain names!!


Update: Working GoDaddy coupon codes for January 2013:

Enter code cjc295j1 for any domain at $2.95

Enter code gd3115c for any .info at $1.49

Enter code UNLOCKED for any .com at $1.17

Bookmark this page and check back for new codes before purchasing any domain!


Go straight to GoDaddy and register your domains now (link opens in new window).


Web hosting with ServInt – setting up a VPS account

Here’s how to Setup a VPS on Servint, a quick review and some discount coupon codes.  I have also provided information to help you avoid any pitfalls. All links open in a new window so you can compare them.

First off, decide which account is right for you.  If you’re likely to run several websites then a VPS account makes sense.  I have outgrown so many hosting accounts, I wish someone had guided me in the right direction from the start.  It seems like a lot of money at first but when you consider most people don’t want to hang around to wait for your website to load it makes sense.  If you sell anything through your website (including promoting affiliate goods) you will probably recoup the extra cost through the visitors you keep.

ServInt run 3 VPS accounts,click on “Enterprise VPS” from their homepage to see the options.

At time of writing they are called Essential, Signature and Ultimate.  Essential will give most people good speed running on a very useful 768MB of RAM.  This will also allow up to 1.5GB burst RAM, good for those with sudden heavy loads.

A generous 50GB storage is allowed and 1TeraByte of monthly transfer should be ample for all but the heaviest sites.

Here’s the spec as we reviewed their service:

  • 50 GB Storage
  • 1 TB Monthly Transfer
  • 768 MB Guaranteed (1.5 GB Burst RAM)
  • Hardware RAID 10
  • CentOS 5 Operating System
  • 4 IP Addresses
  • Fastest drives in the industry
  • Unlimited Domains and User Accounts
  • FREE cPanel, Plesk, or Parallels SBP
  • FREE Virtuozzo Power Panel
  • FREE Daily Off-Server Backups
  • No Setup Fee
  • $49 Monthly

Now we used a Servint discount coupon code [ 50×3 ] to drop 50% off the first 3 months hosting and also opted for paying 12 months up front.  This resulted in a large $124.95 discount, making this one of the most affordable VPS solutions out there.  Even without the discount it is very competitive.

Support

ServInt are pretty well known for excellent support.  It’s something to consider carefully and for each hosting account I have ever used I have always done my research.  What’s the point of having a great server that doesn’t work more than 99% of the time?  With ServInt’s 24/7 support and their very good knowledge of real-world issues you shouldn’t ever have serious problems.  Some of my previous hosts didn’t get involved in database issues for example where ServInt do.

Backup

All sites require a backup plan.  ServInt’s free backup is not to be sniffed at as many hosts levy a charge for this which increases with the number of site backups you do.

Migration

If you already run a server then ServInt can help you to migrate your websites over.  It makes it easier if you run similar control panels, eg CPanel to CPanel is easier than Plesk to CPanel.

Cancellation

I like the fact that you are billed monthly and can cancel the contract with 30 days notice, beware others who tie you in for long periods as there’s nothing worse than a bad host that you can’t change from.

“What you put on the server is your responsibility and if it doesn’t work it’s up to you to put it right”.  Yeah, right.

There is a degree of responsibility, sure, but what I want is a host that works with me to resolve any issues.  Migration, bespoke scripts not working, installing extras on the server…. these are all part and parcel of running a modern website now.

Anyway, my experience with ServInt has been nothing less than pleasurable and I’d recommend them without a shadow of a doubt.  Here’s my final bill for the VPS package signup:

Your Order Total
Base Package Amount: $588.00
Immediate Discount: – $73.50
Sub Total: $514.50
12 Months Prepay Discount: – $51.45
Sub Total: $463.05
Monthly Options: $0.00
Yearly Options: $12.00
Setup Fees: $0.00
Total Due: $475.05
You Saved: $124.95

Speed tests

We tested against similar VPS hosting on 1and1, GoDaddy, 34SP and Hostcolor.  Our pretty exhaustive site speed stats showed significant speed improvement over all hosts.  The nearest competitor was Hostcolor at around 12% slower on average page loading speed.

Summary

All in all, ServInt are a very respectable hosting service provider that delivers its promise of good, fast hosting and excellent 24/7 support.  We’d recommend them highly to anyone who has more than one website, developers, resellers and owners of larger/more resource-hungry sites.

Other discount codes we are proud to be able to offer are:

Servint Dedicated Server discount coupon code – Click the link and type in 50×2 to get 2 months at 50% off.

Servint Super VPS discount coupon code – Click the link and type in 50×3 to get 3 months at 50% off. [Update – if this doesn’t work, use WHTFALL to get 50% off month 1]

Here’s a link to their current packages: ServInt VPS hosting

Update – 13 months on and we have had not a single outage or slowdown on this server. It is as robust as they come and the tech support for adding modules and recompiling etc has been brilliant with most tickets answered in an average of under 2.5 minutes.


Bot blocking tool Spyder Spanker review

Websites are plagued with bad bots and often come grinding to a halt without the aid of a bot blocking tool. Here, I’ll review the latest kid on the block, Spyder Spanker.

Bot blocking plugin wordpress

First off, Spyder Spanker is a WordPress plugin, so if you don’t have a WordPress powered site then you’re out of luck. If you do however, then read on, it’s pretty impressive. Here’s a video that shows its merits:


Seen enough? Get Spyder Spanker Pro now at the best price or continue reading the review.


Spyder Spanker full review

Initially installing the tool is as simple as uploading your provided zip file to your server via the WordPress plugin page. Once uploaded and activated, Spyder Spanker installs itself as an admin menu item. There, you can add your licence details and you are straight in to the interface, a very neatly styled area where each component is separately presented to you.

Allow trusted bots

Setting up the plugin is very easy because all of the major trusted bots are whitelisted. By trusted, I mean the ones you actually WANT to come to your site such as GoogleBot, BingBot etc. Without these, the search engines wouldn’t know your site content and you would never get listed in the search engine results pages. This is something that is a welcome addition to the software, other packages leave it up to you to select your own trusted bots.

Disallow bad bots

You don’t even need to add any bad bots either because these are also setup when the plugin installs. Bots such as Baidu (Chinese search bot) and Yandex (Russian search bot) are unneccesary on many English language sites as they steal bandwidth to add you to their results pages, regularly returning to your pages to re-crawl them and taking valuable bandwidth.

Allowing individual bots

OK, so we have a good setup straight out of the box, but let’s dig a bit deeper and see what we can modify. Let’s take the scenario where an English language website sells products to China. If this is the case then it would make sense to allow the Baidu bot to index the website.  To do this is a simple 2-click operation, tick the Baidu bot and then click on ‘Remove selected’. Very slick and no messing about with CSF firewall rules or .htaccess country-blocking or IP address blocking rules.

The differences between Spyder Spanker and other tools

I wanted to point out that Spyder Spanker is predominantly a bot blocker and doesn’t do a lot of what tools like WP Better Security does such as secure admin areas, make files ineditable etc. What it does excel at is blocking the bots that use your resources on a daily basis and it can throttle back the good bots when they spider your site aggresively too.

WP Better Security comes with a basic list of bad bots for .htaccess (which I use) but they’re a bit more devious these days and use new names. Here is an example of a logfile entry in Spyder Spanker:

Blacklist agent testing...
---------------------------------
0447705 - 2013-05-03 03:12:52 CDT / IP: 208.115.113.90 / HOSTNAME:
AGENT: Mozilla/5.0 (compatible; Ezooms/1.0; [email protected])
---------------------------------
BLOCK: blacklist agent: mozilla/5.0 (compatible; ezooms/1.0; [email protected])

This is a bot you won’t generally find on many htaccess blacklists but it’s a ‘rule-breaker’ for sure. SS responded by blocking it and will pass the rule to my other sites and the community network.

Let’s be honest, a bot with a gmail address probably shouldn’t be trusted that much anyway!

Spyder spanker review – the verdict

I’d thoroughly recommend you buy this tool, you’ll recoup any outlay back in a short time with reduced bandwidth fees, time saved and more sales if you run any type of ecommerce or affiliate site. One thing though, go with the Pro upgrade that is presented as a “One Time Offer” when you have paid for the basic version because Spyder Spanker Pro integrates beutifully with Project Honeypot. This means that it can be run ‘hands-off’ and will be updated against the raft of ever-increasing spammers and bad bots out there. Add this to the community update facility and you’ll be protected for years to come across ALL of your domains.

Purchase Spyder Spanker at the current best price online


Vista wireless connection drops out after system update

vista-logo-smallIf your wireless network adapter was working fine then suddenly dropped or became unreliable there is a chance that it may have been a software driver update that made it stop working reliably.  You may even have opted to download this driver yourself thinking that if it’s from Microsoft then it must be good, right?.

I seem to be seeing this more frequently on Vista than any other operating system. For this, I’ll presume that your problem is the new driver so you need to get back to the original driver and then disable any hardware driver updates within Windows Update so you don’t see this problem again.

To reinstall the old wireless network adapter software driver

Go to Device Manager then under network adapters right click the adapter and go to properties. Click the driver tab then click “Roll back driver”.  When finished, restart the computer and you will hopefully get a stable wireless connection.

Note: If the “Roll back driver” box is greyed out then you do have another option.  Open system restore and roll back your system to a day or so before you installed the driver.  Bear in mind that this will make any program that you have installed since unusable until reinstalled.  It’s also worth backing up your documents too as system restore is quite a critical task.

Driver updates are generally “opt-in” so you shouldn’t get this again.  Make sure that you have only ‘Recommended updates’ turned on.


Backup WordPress database tutorial

wordpress backup

This is a tutorial on how to backup your WordPress database manually using phpMyAdmin and the SQL export method. It may sound difficult for the non-technical but it isn’t really and is something that is essential for the maintenance of any WordPress site. If you have ever lost any data before you’ll know what a huge and time consuming problem this can lead to so let’s get going.

First off, please bookmark this page in your browser, you’ll probably need to refer to it again for the first few backups!

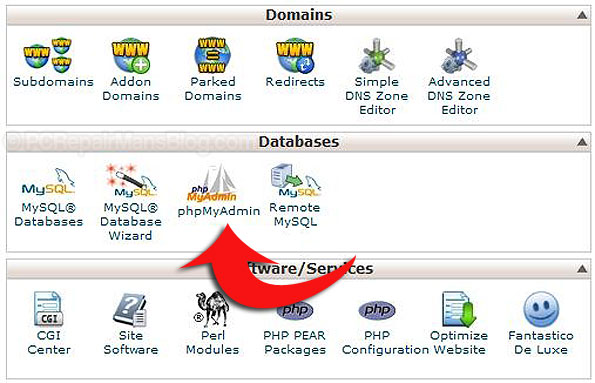
Login to your cPanel. This is where you will see lots of useful tools and the one we shall use is phpMyAdmin shown below.

php myadmin wordpress backup

Click to open it and you will now have to select your database from the left hand side, usually something like mysite_wrdp1. Don’t select the information_schema as this is not the one we want.

Now you look to the right of the screen and you can see tabs relating to functions we can actually run on the database.

phpmyadmin sql wordpress

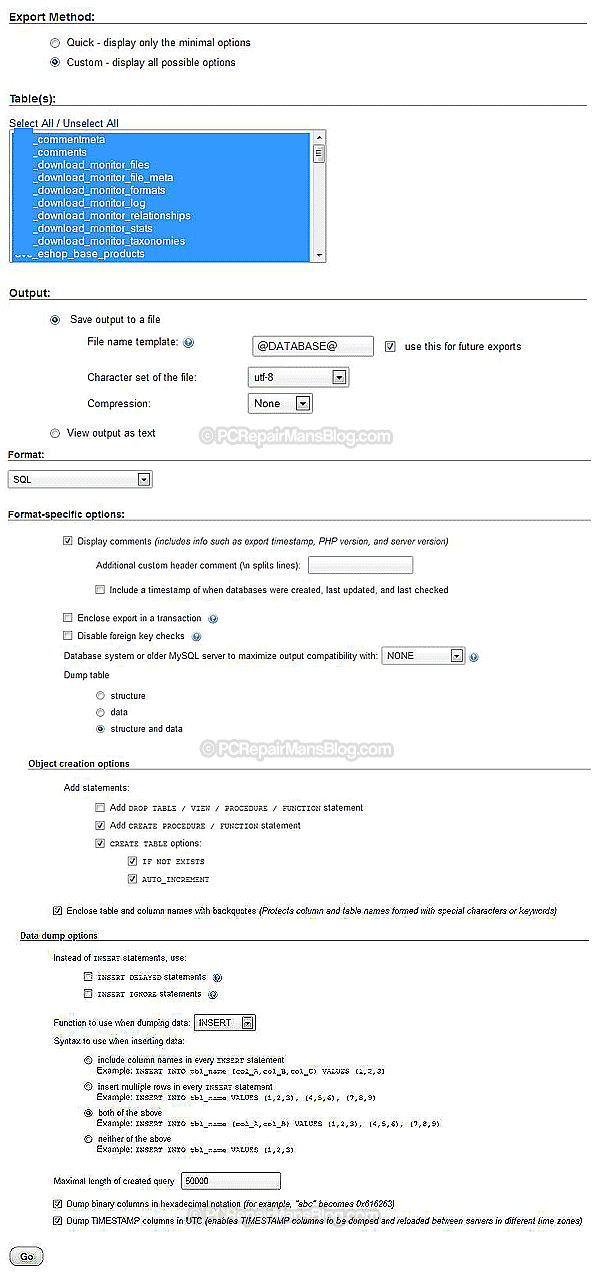
We want to select ‘Export’ here. Now for the bit everybody gets wrong…. You should select the ‘Custom export method’ which gives you greater control over the final exported database. For ease of reference, I have compiled a screenshot of the best options to select for the majority of users. Make sure you click to select all tables in your database, I have seen so many people just backup one table within the database and the backup is effectively useless. Here are all the settings you need to have in the latest version of  phpMyAdmin:

database backup wordpress phpmyadmin latest

Notice I have removed the prefix from the table names (shown in blue above) as you or a program may have modified this. By default it is wp_ but many security packages rename it. There is nothing to do here, I’m just pointing this out for clarity.

Now you can click on ‘Go’ and you should be able to download a working copy of your database. You can’t really view this file as it requires a database server (although you can connect to it with a few software tools that exist). You can however upload it to a new installation or use it when the poop hits the fan and disaster strikes on your server.

That’s about all you need to do to have a working backup of your database. Remember to FTP into your server and copy all the files over too as many files and folders are necessary to get back up and running as you were. For example, your wp-content/uploads folder is not backed up automatically and this is where most images used on your blog are stored.

Automatic WordPress SQL backups and file copying features

If you want a click-and-forget solution then I would heartily recommend the excellent WP-Twin which you can download here https://wp-twin.com
This neat program not only backs up your database but also ALL of your files on the server, meaning that any special folders outside of WordPress get copied over too. It has an easy reinstall option that takes the pain out of disasters, well worth it if you aren’t too sure how to go about reinstallation.

I hope this helps you to start a decent WordPress backup regime and I’d be happy to know if this helped you, please drop me a comment below or click the social buttons to share with others.


How to show file extensions in Windows XP, Vista and 7

File extensions are those 3 or 4 little letters after the dot which tell Windows what type of file it is.  For example:

  • report.xls is an Excel spreadsheet (.xls)
  • report.doc is a Word document (.doc)
  • report.exe is a program (.exe)

By default, file extensions for known file types are hidden in Windows operating systems.  In my view this is both stupid and dangerous.  Stupid because we need to see what type of file we have in front of us.  Dangerous because double clicking report.exe doesn’t open Word, it opens the file as a program which could potentially be a virus.  You can however change this setting so that file extensions are shown for files in a certain folder or for all files on your hard disk.

To show file extensions in Windows XP

Open “My Computer”, select “Tools” then “Folder Options…”

In Advanced Settings, untick “Hide extensions for known file types.”

To show file extensions in Windows Vista or Windows 7

Open Computer from the Start menu

Click the Layout button (to the left of the Views button)

Click Folder Options
Click the View tab
Untick Hide extensions for known file types
Click OK

This setting will make file extensions appear in all folders in both XP , Vista and Windows 7.

If you want to hide file extensions at a later time, you can tick the box again then click OK.  I’d recommend that you leave it like this as it is far safer and easier to show them.


Cheapest Kaspersky Internet Security renewal

Many people are looking for the cheapest renewal price for Kaspersky Internet Security. This product is their flagship one along with “Kaspersky Pure“, having antivirus, firewall, antispyware, parental control, anti-spam, safe run and much more.

The PCRepairMan rates this as the best protection security package currently available, with fantastic detection rates and top stability.  Performance is very good and Windows 7 compatibility is seamless.

kaspersky internet security discountBecause it is a fully fledged Internet Security package, Kaspersky charge quite a premium for purchase and renewal. My little-known method is to purchase an older Kaspersky software version that is fully licensed (look at the selection below) but download and install the latest version from here. It’s a trial version but becomes full on activation.  Then, simply use the purchased licence key (from the old version) to activate the latest version when prompted – no need to install the old version at all!

I have written full instructions for what to do at renewal time too (12 months later) which you can read here:

How to register Kaspersy Internet Security with a new product key

Kaspersky free upgrade registration method

Because Kaspersky offers a free upgrade to this version from all previous ones from 2009 onwards, this is a completely legitimate method.  Importantly, you will save LOTS of money without needing any underhanded pirate serial codes that only last for a few weeks.  With Kaspersky prices being anything up to 85% cheaper in the deals below, it makes serious sense and you get the best security suite currently available.

CAVEAT – Check that you purchase the correct licence for the number of computers you are installing on, ie the 3-user licence is for up to 3 separate PCs where the 1-user licence will only allow use on 1 PC. Also check that the product you download is the same as the product you have purchased the older version of, eg “Kaspersky Internet Security” not “Kaspersky Pure” or “Kaspersky Antivirus”

Personally, I’d go for the internet security package rather than just the antivirus as there will be a very small difference in cost but there’s a huge amount of extra functionality.

If you do use my method, please either drop a little donation in the tin, ‘Tweet’ or Facebook ‘like’ this article or just give me a link back to help others save some cash!

I sell hugely discounted antivirus packages in my software store that can be used with this method:

Buy discounted packages now


Click here for similar deals on Kaspersky Pure

Got Norton products instead? Checkout these:

Cheapest Norton Internet Security renewal or Cheapest Norton Antivirus renewal or Cheapest Norton 360 renewal