How to open an ISO file using free Windows software

I’m often asked by customers how to burn ISO images onto DVDs. Seems lots of people are downloading them and are then unable to write them onto discs.

The answer is quite simple, download free software that will do it for you.  It’s called VirtualCloneDrive and it comes from Slysoft the manufacturers of Clone CD,  a great utility I was using way back in 2003!  Things have changed now and their website boasts some of the finest burning, cloning and image writing software going.

Here’s the link to the freeware, it works on all Windows version from 2000 up to Win7:

VirtualCloneDrive

If you like this, check out their other products:

  • AnyDVD – A utility for copy protection removal
  • CloneDVD – Clone any type of DVD, great for backing up movies
  • CloneDVD Mobile – Clone movies into formats for mobile media players like iPod, Zen etc. Also makes and converts to XviD, mp4, DivX, avi
  • CloneCD – Copy CDs and DVDs perfectly
  • GameJackal – Copy your game CD to hard drive for ultra-fast loading and playing

Remove Adobe Flash Player from Windows and reinstall

Removing Adobe Flash Player from Windows is required generally because it will not install correctly.  In all cases here is the logical method I use to remove and reinstall corrupted installations.

  • Backup current registry settings
  • Uninstall all previously installed versions of Adobe Flash Player
  • Verify that Internet Explorer has the correct ActiveX and security settings
  • Reboot and clean the Windows registry
  • Download the latest Adobe Flash Player from the official website


First off a few checks for the obvious stuff:

  • Make sure you are logged in as an administrator (not a “Standard or Limited user”)
  • You have no Pop-up or Ad Blocking software, notorious for killing Flash installations
  • You have accepted any ActiveX or Add-on warnings that popped up
  • JavaScript is enabled

All OK so far? Let’s go a bit further then…..  Perhaps print this off or bookmark the page in your favorites folder so you can return to it as we’ll be restarting the PC and closing the browser window.


Backup the current registry settings.

Close all open programs. Create a Windows System Restore point. This will help us to get back to this point in time if anything untoward happens.


Attempt to remove Flash Player via Control Panel

Close all programs INCLUDING ANY MESSENGER PROGRAMS LIKE WINDOWS LIVE MESSENGER. “File”, “Exit” or “Quit” usually does the trick for messenger programs.

Drop into Control Panel and open Add/Remove Programs (Windows XP, 2003) or Programs and Features (Windows Vista and 7).  Remove any entries for Adobe Flash Player and Adobe ActiveX.

Restart your PC


Modify any ActiveX and Security settings within Internet Explorer

Make sure that Internet Explorer security is set to the Medium: Default level, which allows viewing ActiveX controls.

  1. Open Internet Explorer
  2. Choose Tools, Internet Options
  3. Select the Security tab
  4. Select Medium: Default level

Alternatively, and a better way to do it for this purpose, is to configure the Custom level to view ActiveX controls with the next steps.

Select the Custom Level instead of the Default Level and do the following.

  1. Navigate to the section marked “ActiveX controls and plug-ins.”
  2. Set “Download Signed ActiveX Controls” to “Prompt”.
  3. Set “Run ActiveX Controls And Plug-ins” to “Prompt”.

OK your way out and close Internet Explorer


Clean out the registry

Download the free CCleaner program from here.  Install it and opt out of the free Google toolbar install by unticking the selection (it’s your choice but I don’t like the toolbar).  Run it and click on “Run Cleaner”.  This will remove all your temporary Internet files and Cookies along with your Internet history and lots of other clutter.  Now select “Registry” from the left side, “Scan for Issues” and when finished, “Fix selected issues”.  Save a backup if prompted.

Now restart your spring-cleaned computer!


Download and install Adobe Flash Player

Download and run this  ‘Standalone Executable Installer’ for Flash Player (Internet Explorer only) Basically, if you run Internet Explorer you will need this.

Download and run this Flash Player standalone plugin if you use another browser such as Firefox, Safari etc If you don’t run another type of browser and just use Internet Explorer then you don’t need this.


If you are still struggling, then it may be a problem within Internet Explorer. Taking it back to ‘factory settings’ sometimes helps.  If you don’t already have it, install Firefox and run the Flash Player Standalone Plugin, then restart Firefox.  Visit youtube.com and if you can see the videos you have Flash installed (and I would definitely recommend using Firefox over IE any day)!

Leave me a comment (or buy me a coffee) if this has solved your problem!


How to turn on or off Windows automatic updates

1. Click “Start”, and then click “Control Panel”.

2. Depending on which Control Panel view you use (Classic or Category) do one of the following:

*Classic view*- Click “System”, and then click the “Automatic Updates” tab.

*Category view* – Click “Performance and Maintenance”, click “System”, and then click the “Automatic Updates” tab.

3. Click the option that you want, either turn it on, off or have it prompt when updates are ready for download and installation.


Windows XP loses logon screen – goes straight into user account

Problem: Windows XP computer goes straight into the user account and bypasses the standard logon screen.  Even worse, it is compounded by the fact it goes into a Limited User account and this freezes on logout.  Here’s what I did to fix this:
  • Booted up in Safe Mode
  • Logged off (this time it worked as there were no freezing issues in Safe Mode)
  • Logged on as Admin
  • Start, Run and type in “control userpasswords2” then hit Enter.
  • Tick the box “Users must enter a user name and password”
  • OK and restart the computer

You should now see the login screen back again.  One last thing you can try (if this doesn’t work for you) is the following command:

Start, Run and type in “rundll32 netplwiz.dll,ClearAutoLogon” (without the quotes) then hit Enter. Note the spacing and comma!

Let me know if this works for you.


PCRepairMan Top Tips

With Win XP Home you can only access the built in Administrator account when booting into safe mode. By default, on XP Home only, this Administrator account has no password.

With Win XP Pro the Administrator account is only shown on the Welcome Screen if no other account is part of the “Administrator” Group. You can still login using the account if holding down CTRL & ALT and pressing DEL twice.

A WinXP account is only shown on the Welcome Screen, if it belongs to either the “Administrators”, “Power Users”, or “Users” groups.


Panda Cloud Antivirus review

Panda cloud antivirus reviewThis article is primarily a Panda Cloud Antivirus review, but let’s start by examining the need for a lightweight antivirus.

Well, the ubiquitous market leader AVG Antivirus has gained some weight in its 2012 incarnation. So much so that it now brings many lower-specced PCs to their knees.  Running AVG on our test rig (a Dell 3.0GHz Pentium 4 with 512MB of RAM) we saw an unusable PC with pretty dire start-up times. Removing AVG shaved nearly 3 minutes from the startup time! Not good. The older version had been a step in the wrong direction too in my eyes, with added bloat and heavily foisted registry cleaners.

So many loyal AVG users should look to a newer antivirus, with a lighter framework.  Enter the ‘cloud’ antivirus offering from Panda Security. There have been other manufacturers of antivirus products that utilised the cloud but, to date, none as capable as this.

Installation is a breeze with the install program weighing in at less than 700kB. It took just 50 seconds to install on our Dell Windows XP test PC.

It was nice to see that the right click functionality is there – you can scan a folder or file for viruses ‘on demand’ rather than do a full scan every time. On opening the main program window via a double click on the panda icon in the system tray – you can immediately see whether you have any issues with the industry-standard big red or big green indicator. Panda’s interface offers a built-in reporting feature that will show you what threats were found and dealt with on your PC. A discreet ‘gear’ icon allows you to further explore the Panda Cloud Antivirus options.

You can select both Quick and Custom Scans, as is the norm these days.  If Panda incorrectly marks a file as infected (a “false positive”) then you can recover it from the Panda Recyce Bin. For network scenarios Panda provide a useful proxy option.

For the privacy concerned, you should know that you pass your scanned file and setup data, albeit anonymously, to ‘the cloud’. This approach means that other users benefit from your detection of malware as do you benefit from theirs. You can opt-out of this but that really does defeat the object, as by doing this you are also opted-out of any cloud based advanced threat management.

I was disappointed to see that it doesn’t scan in archives (zip, rar, 7z etc) by default so you will need to turn this feature on immediately from the settings menu. This is a major fault in my eyes and I suspect this was done because of Panda’s eagerness to have the lightest-weight AV client around and improve the scanning speed.  The inclusion of a Internet Explorer/Firefox Panda toolbar that we didn’t get the option to install is annoying. Hilariously, it incorporates the “Toolbar remover” icon that allows uninstallation of – you guessed it – all other toolbars except the Panda one.

PC Repair Man’s Verdict

A useful and lightweight antivirus that operates cleverly in the cloud to achieve low resource usage. Has a huge amount of work to do to be able to compete with our current pick of the AV crop Kaspersky Pure, but it’s a sensible free solution for older PCs and those with low RAM , eg XP with 512MB or less.


Yoast WordPress SEO double title fix

If you are getting a double title appear in the tab of your browser as you hover over it, there is a good chance that it’s because you have WordPress SEO by Yoast installed. Often just ticking the box ‘Force overwrite titles’ (from the Titles and Metas section on the General tab) will suffice, but I have seen this on many customer themes where it doesn’t work and usually gives the address as a simple URL. Not great for SEO!

Here’s the fix. Look in your WordPress theme files for header.php and then open it in Notepad or ideally Notepad++. Now look for this line or similar (it differs from theme to theme):

<?php wp_title('|',true,'right'); ?>
<?php bloginfo('name'); ?>

Now replace it with:

<?php wp_title(''); ?>

Upload this file to your WordPress theme, overwriting the existing header.php.

Make sure the ‘force overwite titles’ is still unticked. Save your changes and empty any caches you have, eg W3 Total Cache. Check your category titles and post/page titles and they should be fixed!


Free Adobe Photoshop, Illustrator, Premiere, InDesign, Acrobat, Audition, GoLive

adobe-photoshop-free-cs2Do you want a free licensed version of Adobe Photoshop, Illustrator, Premiere, InDesign, Acrobat, Audition, GoLive, Acrobat, InCopy, or Elements? Well Adobe have done a very strange thing and put direct download links to the CS2 versions of this excellent software online WITH the activation serial key. Why would they do that I hear you ask? Well apparently Adobe have problems with their licensing server and older software is not validating correctly. To combat this and in a gesture of goodwill (or long-term customer baiting) they are making older versions like CS2 run, without requiring validation, on these keys.
Windows and Mac versions can be downloaded free from the Adobe website here

So why give away Adobe CS2 for free?

Supposedly, these licences are for existing customers, although the software is now coming up to 8 years old so it would be understandable if it was given away to tempt people to upgrade to later versions. Because of the high prices that Adobe has previously charged for this software, my guess is that it would possibly be perceived as putting a finger up to previous customers who bought this suite if they released it free of charge. Hence some mystery surrounds this ultra discreet release of serials and downloads.

I’m not sure all programs are Windows 7 or 8 compatible. There are Mac OSX downloads in there too, again I’m not sure what version of the OS it will go up to. What I do know is that the original minimum spec for CS2 was

  • Mac OS X v.10.2.8–v.10.3.8. PowerPC® G4 or G5 processor
  • Microsoft® Windows® 2000/Windows XP. Intel® Pentium® III or 4 processor

I’d recommend that you go for the complete CS2 download listed at the start as it contains all the individual software programs. If you manage to get a copy and install it, please let me and others know what operating system you’re running it on by dropping a quick comment below.


Printer keeps printing pages when pc starts

If your printer keeps printing pages when your pc starts, then follow these steps to clear the print queue.

These instructions are for Windows 7 or Vista, and won’t do any harm to your PC. I usually advise this and 99.9% of clients will cure their printer problems this way.


  1. Click Start.
  2. In the box above, type cmd
  3. Right-click on cmd.exe (the command prompt shortcut) and select Run as administrator
  4. In the black box that appears, type net stop spooler then press Enter
  5. Type in del %systemroot%\System32\spool\printers\*   /Q then press Enter. (Note there is a space before the /Q)
  6. Type net start spooler then press Enter


The print queue on your Windows 7 or Vista PC will now be cleared out. Close the black command window using the cross at the top and restart your PC.


Has my fix for Printer keeps printing pages when pc starts worked? Then please use the icons below to tweet, like or share this article if you found it useful, it really helps this site to help others!


Manage multiple WordPress sites with WPRemote

Looking for an easy way to manage updates on multiple WordPress websites? Well there’s a new tool in town and it’s called WP Remote. Here’s a brief review.

This nifty tool installs on WP sites via a small plugin and gives you a single console from which to monitor your sites for plugin updates, theme updates and WordPress updates. You can apply the updates from the console so no need to login to any site after the initial plugin install. Not only that but it allows manual backups of files and MySQL databases in one click. Fiddly and incomplete WordPress backups are a thing of the past, you can expect to add the site to the console, update all plugins and themes and do a complete backup within a few minutes. Stunning.

It’s free, easy to setup, minimalist, stable and incredibly useful. And no, I don’t own the company, just thought you might like it as much as I do. Look out for this company over the next few months as I think this is going to be very popular!

https://wpremote.com


Norton subscription has expired – but it hasn’t!

A fairly common fault is for a Norton product such as Antivirus, Internet Security or 360 to report that your subscription has expired when it hasn’t. This can be due to a number of issues and often occurs after some major Windows updates or when there are problems with the Symantec (Norton) subscription servers.

The best methods to address this I have found are to do these in steps in order. If any one works then you have resolved the problem and need to go no further. Before trying these you will need to be connected to the internet.

1. Try a manual update – Open the main program window (double click on the tray icon or open it from the desktop icon) and do a ‘check for updates’.
2. Restart the computer – This ensures you have nothing that is pending a restart and affecting the definition updates.
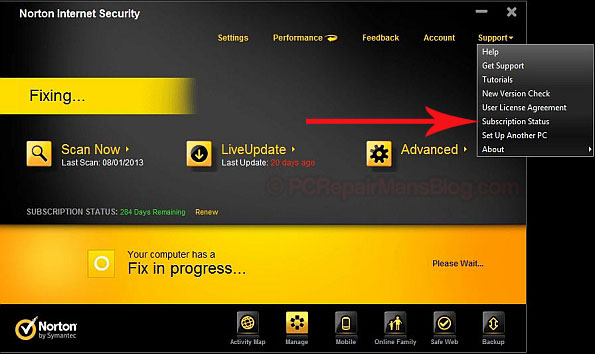
3. Force a subscription check – In the main Norton window, click “Support” then click on “Subscription Status”. After the “Subscription Status Check” is complete, click “Finish”. This updates the subscription information of your installed product to the status that is stored on the Symantec (Norton) servers.

Norton internet security subscription expired
4. If you still have an issue beyond this then you will need to login to your Norton Account and check your subscription status then raise any issue you have with Symantec support. Use the menu “Support” then “Get Support”. If you didn’t create a Norton Account then you can still talk to support, just try to have your serial number handy from the original installation.

Hope this helps you, please drop me a comment below if it does.  If you want to save a lot of money on renewal then check out my articles on The cheapest way to renew Norton 360 or The cheapest way to renew Norton Internet Security