This is a tutorial on how to backup your WordPress database manually using phpMyAdmin and the SQL export method. It may sound difficult for the non-technical but it isn’t really and is something that is essential for the maintenance of any WordPress site. If you have ever lost any data before you’ll know what a huge and time consuming problem this can lead to so let’s get going.
First off, please bookmark this page in your browser, you’ll probably need to refer to it again for the first few backups!
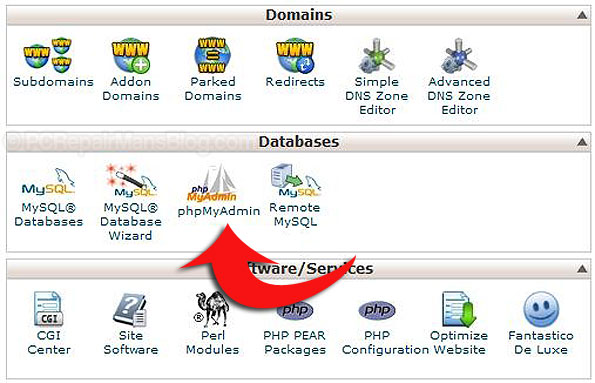
Login to your cPanel. This is where you will see lots of useful tools and the one we shall use is phpMyAdmin shown below.
Click to open it and you will now have to select your database from the left hand side, usually something like mysite_wrdp1. Don’t select the information_schema as this is not the one we want.
Now you look to the right of the screen and you can see tabs relating to functions we can actually run on the database.
We want to select ‘Export’ here. Now for the bit everybody gets wrong…. You should select the ‘Custom export method’ which gives you greater control over the final exported database. For ease of reference, I have compiled a screenshot of the best options to select for the majority of users. Make sure you click to select all tables in your database, I have seen so many people just backup one table within the database and the backup is effectively useless. Here are all the settings you need to have in the latest version of phpMyAdmin:
Notice I have removed the prefix from the table names (shown in blue above) as you or a program may have modified this. By default it is wp_ but many security packages rename it. There is nothing to do here, I’m just pointing this out for clarity.
Now you can click on ‘Go’ and you should be able to download a working copy of your database. You can’t really view this file as it requires a database server (although you can connect to it with a few software tools that exist). You can however upload it to a new installation or use it when the poop hits the fan and disaster strikes on your server.
That’s about all you need to do to have a working backup of your database. Remember to FTP into your server and copy all the files over too as many files and folders are necessary to get back up and running as you were. For example, your wp-content/uploads folder is not backed up automatically and this is where most images used on your blog are stored.
Automatic WordPress SQL backups and file copying features
If you want a click-and-forget solution then I would heartily recommend the excellent Updraft Plus which you can download here https://wordpress.org/plugins/updraftplus/
This neat program not only backs up your database but also ALL of your files on the server, meaning that any special folders outside of WordPress get copied over too. It has an easy reinstall option that takes the pain out of disasters, well worth it if you aren’t too sure how to go about reinstallation. It’s free too!
I hope this helps you to start a decent WordPress backup regime and I’d be happy to know if this helped you, please drop me a comment below or click the social buttons to share with others.


 Backup your web site! If you are using a database driven website such as WordPress, Joomla, Drupal etc you probably know how to FTP files but when it comes to the database many people are baffled. FTP does not grab the database files (unless Access format) and this is where your backup regime may fail.
 We have a Mozy discount code for those of you who want to take advantage of this clever online backup service. Mozy is one of the foremost online backup providers with a very stable, simple and accessible platform.
 You know in all those futuristic films where computers speak to their owners? Ever wondered if you can actually get yours to welcome you in this way? Well let’s have a go at doing this and see what we can use it for.