Disable Livefyre trackbacks in WordPress

livefyre review

I was quite a big fan of Livefyre for a while. Yes there have been many comments about how Comment Luv or Disqus are better and it seems everyone has their own preference. A while back I noticed that Livefyre had a quirk that meant that even if you turned off trackbacks via WordPress admin, this was only activated for new posts and not existing ones. For reference, in WordPress this is turned off in the Settings > Discussion menu.

This isn’t a fault in Livefyre, more a problem with the lack of easy control of posts that have already been published or are in draft within the WordPress database.

So if your older posts have trackbacks enabled you could see something like this (a screenshot from one of my posts here):

 Livefyre trackback removal

Hmm, not doing the article a great deal of favours is it really? From a search engine point of view this article now has duplicate content and more outgoing links.  So what can we do to get the older posts to not display trackbacks? Well we could go back in and edit all the posts that we are aware of by unticking the ‘Allow trackbacks’ box. Unfortunately, on larger blogs this is not practical. Time to get our hands dirty with some SQL statements.

Disable Livefyre trackbacks in WordPress using phpMyAdmin and SQL

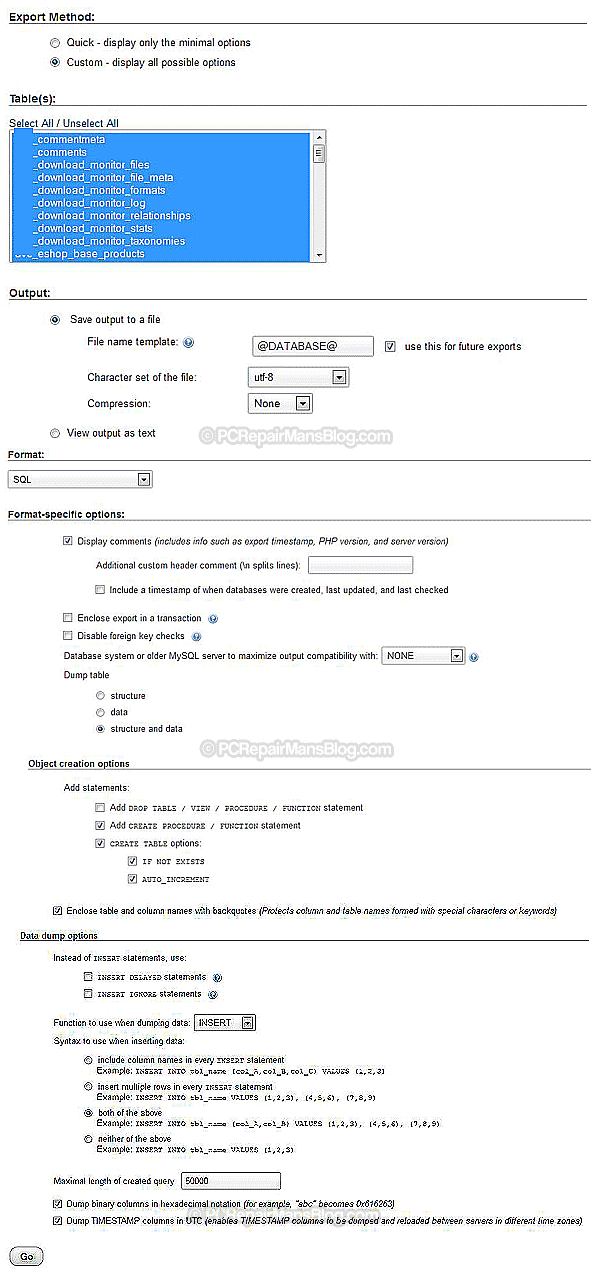
Login to your control panel and fire up phpMyAdmin. Select your WordPress database and back it up. If you’re not sure how to do this, I wrote a detailed article here:

Backup WordPress MySQL database using phpMyAdmin (opens in a new window).

So now we have a working backup, select your database and click on the SQL tab from the top menu bar. Insert this code into the command box and click on ‘Go’:

UPDATE wp_posts SET ping_status='closed' WHERE post_status = 'publish' AND post_type = 'post';
UPDATE wp_posts SET ping_status='closed' WHERE post_status = 'publish' AND post_type = 'page';
UPDATE wp_posts SET ping_status='closed' WHERE post_status = 'draft' AND post_type = 'post';

Note that you need to replace wp_ with your own table prefix if it’s different. You should now have all your old posts that have been published (and any draft posts waiting to be published) disabled for trackbacks.


Backup WordPress database tutorial

wordpress backup

This is a tutorial on how to backup your WordPress database manually using phpMyAdmin and the SQL export method. It may sound difficult for the non-technical but it isn’t really and is something that is essential for the maintenance of any WordPress site. If you have ever lost any data before you’ll know what a huge and time consuming problem this can lead to so let’s get going.

First off, please bookmark this page in your browser, you’ll probably need to refer to it again for the first few backups!

Login to your cPanel. This is where you will see lots of useful tools and the one we shall use is phpMyAdmin shown below.

php myadmin wordpress backup

Click to open it and you will now have to select your database from the left hand side, usually something like mysite_wrdp1. Don’t select the information_schema as this is not the one we want.

Now you look to the right of the screen and you can see tabs relating to functions we can actually run on the database.

phpmyadmin sql wordpress

We want to select ‘Export’ here. Now for the bit everybody gets wrong…. You should select the ‘Custom export method’ which gives you greater control over the final exported database. For ease of reference, I have compiled a screenshot of the best options to select for the majority of users. Make sure you click to select all tables in your database, I have seen so many people just backup one table within the database and the backup is effectively useless. Here are all the settings you need to have in the latest version of  phpMyAdmin:

database backup wordpress phpmyadmin latest

Notice I have removed the prefix from the table names (shown in blue above) as you or a program may have modified this. By default it is wp_ but many security packages rename it. There is nothing to do here, I’m just pointing this out for clarity.

Now you can click on ‘Go’ and you should be able to download a working copy of your database. You can’t really view this file as it requires a database server (although you can connect to it with a few software tools that exist). You can however upload it to a new installation or use it when the poop hits the fan and disaster strikes on your server.

That’s about all you need to do to have a working backup of your database. Remember to FTP into your server and copy all the files over too as many files and folders are necessary to get back up and running as you were. For example, your wp-content/uploads folder is not backed up automatically and this is where most images used on your blog are stored.

Automatic WordPress SQL backups and file copying features

If you want a click-and-forget solution then I would heartily recommend the excellent WP-Twin which you can download here https://wp-twin.com
This neat program not only backs up your database but also ALL of your files on the server, meaning that any special folders outside of WordPress get copied over too. It has an easy reinstall option that takes the pain out of disasters, well worth it if you aren’t too sure how to go about reinstallation.

I hope this helps you to start a decent WordPress backup regime and I’d be happy to know if this helped you, please drop me a comment below or click the social buttons to share with others.


Can I install OEM software on Mac Boot Camp or Virtual Machine?

Well, it seems there are lots of people asking about this installing OEM Windows software on Mac desktops and laptops. This is a grey area that I’d like to clear up (or make slightly off-white). I’ll present the facts and you can make your own decision.

OEM versions are, in theory, to be used by system builders. It is generally accepted now, although unwritten, that people can readily purchase these and install them. Just look at the plentiful supplies on major ecommerce sites and you’ll see that the OEM software is not just for system builders. Effectively, someone who installs an operating system on a PC is doing the job of a system builder, it’s just the component assembly part they are missing, and many system builders actually buy whole machines now anyway.

The thing to note with OEM software, is that if your computer dials out for licence verification then it needs to be installed on just one piece of hardware to be classed as genuine. That’s the only check. Since Retail versions are much more expensive than OEM, people are naturally drawn to them.

There are a few things to be aware of for OEM installation which I’ll clarify here:

1)  Retail versions come with both 32-bit and 64-bit installations as an option. OEM versions are one or the other, so you will want to make sure you’re ordering the right version. For your Mac, check that it is a 64 bit machine and go for this if it is. If you do have 64 bit then choose a product like Windows 7 as it’s stable, well rounded and I have seen Windows 8 splutter and complain a few times. Something like this would be perfect:

Cheap Windows 7 OEM (opens in a new tab)

The differences in 32 and 64 bit operating system software can often be marginal unless you are really pushing the computer hard, but for a small price difference 64 is a better operating system when on full load. Many software programs are 32 bit so they don’t take advantage of the extra ‘word architecture’ but when you run something like Adobe Photoshop 64 bit that is resource-hungry, it can be noticeable.

2)  OEM versions are tied to the hardware they are installed on and cannot be moved. This will only be an issue if you are planning on using virtualization software as well as your bootcamp (dual boot) installation, since the virtual machine “hardware” looks different to the real hardware.

3)  OEM versions do not come with telephone support from MS, although if you try to talk to a Microsoft representative about issues you are getting on a Mac then you may be fighting a losing battle as they are known to pass them back to you.

To summarise, I would go with an OEM dual-boot installation (64 bit if possible) OR run a virtual machine. You may even be able to run a cheaper XP licence as a virtual machine and this may suffice. If it is to run an older program such as MS Money this could work well as it may run more happily too.

64 bit architecture explained on Wikipedia

Drop me a comment below if this helped you or please click the social buttons to help others save a bit of money too.


Display RSS feeds easily in your browser

If you’re looking for a way to display RSS feeds easily in your browser then look no further.

First off, if you are using Internet Explorer then please consider changing. At the moment it is not as standards-compliant as most other mainstream browsers (Firefox, Chrome, Opera etc) and it has more security vulnerabilities unless fully patched up-to-date. Even then, most exploits are targeted at IE, making it the least secure in my eyes. To get up-to-date, head on over to https://mozilla.org and download the latest and greatest version of Firefox. If you are installing Firefox and want to import your Internet Explorer bookmarks, it will offer you the choice during installation. Nothing in Internet Explorer is changed and you can always go back to it (if you really must!).

Once installed visit this page:

https://addons.mozilla.org/en-us/firefox/addon/rss-ticker/

and click ‘Add to firefox’ button, then ‘Install now’. Restart Firefox and visit your favourite website (pcrepairmansblog.com of course!). Look for the feed link, it may say ‘Feed’, ‘RSS’, ‘XML feed’ etc or may just have the RSS  icon like this: Display rss feeds easily in your browser

Now you have the ‘feed’ displayed in your browser. A feed is really just some live data that shows the most recent activity, so for a website it may show the latest articles and for a forum the latest posts etc.

At the top of the page, click on the “Subscribe now” button and you’ll now get the latest feed pushed directly to your browser.


Firefox rss ticker


Now you should right click on the ticker bar at the bottom and select ‘Options’. This is where you can remove some of the default feeds and set your preferences.  I like to have these settings:

rss ticker setup options


So you should now have a free feed reader and no need to swap software while you are browsing to keep up-to-date on your favourite sites. Most feeds can easily be brought into the browser and many site owners are oblivious to this fact so they don’t put up an RSS link or icon. Try the following combinations to get to their feed:

https://sitename/feed/rss
https://sitename.com/rss.xml
https://sitename.com/index.php?action=.xml;type=rss

Once you have it, let the site owner know they are missing a trick by not providing a link to it. Mine’s in the footer under ‘News feed’ and I also have a feed just for site comments. Have fun!


Check you have the latest Norton product version

norton-internet-security-2017-cheapest-renewal-price-serial-keyHere’s a well kept secret….Symantec offer a way to check you have the latest Norton product on your system and they actually give you a free upgrade if not.

If you are running a Norton product such as Internet Security, Antivirus or 360, click here to check for a free upgrade to other versions of Norton.

Save the file to your desktop and run it, it will prompt for action if you can get a free upgrade.

For cheap prices on Norton renewals, take a look at my software store which currently has huge discounts on Norton products


How to show file extensions in Windows XP, Vista and 7

File extensions are those 3 or 4 little letters after the dot which tell Windows what type of file it is.  For example:

  • report.xls is an Excel spreadsheet (.xls)
  • report.doc is a Word document (.doc)
  • report.exe is a program (.exe)

By default, file extensions for known file types are hidden in Windows operating systems.  In my view this is both stupid and dangerous.  Stupid because we need to see what type of file we have in front of us.  Dangerous because double clicking report.exe doesn’t open Word, it opens the file as a program which could potentially be a virus.  You can however change this setting so that file extensions are shown for files in a certain folder or for all files on your hard disk.

To show file extensions in Windows XP

Open “My Computer”, select “Tools” then “Folder Options…”

In Advanced Settings, untick “Hide extensions for known file types.”

To show file extensions in Windows Vista or Windows 7

Open Computer from the Start menu

Click the Layout button (to the left of the Views button)

Click Folder Options
Click the View tab
Untick Hide extensions for known file types
Click OK

This setting will make file extensions appear in all folders in both XP , Vista and Windows 7.

If you want to hide file extensions at a later time, you can tick the box again then click OK.  I’d recommend that you leave it like this as it is far safer and easier to show them.


Notepad++ compare icons explained

Notepad++ compare iconsHere’s a brief explanation of the Notepad++ compare icons which are surprisingly undocumented:


  • Green plus symbol = line added
  • Red minus symbol = line deleted
  • Yellow exclamation mark symbol = line changed
  • Blue arrow symbol = line moved


You can access the compare menu from Plugins, Compare, Compare or by simply selecting Alt-D. You need to load the 2 files to compare first and have them as the last 2 on your tabbed list.


Google Refine data cleaning tool

Many of us find the need to do serious data refining, so I’m always happy to find a new tool to have a play with.  This time it’s Google who have released code free of charge that will help polish, refine and tidy your data.

You can split data, export in a multitude of formats, reconcile errors, change formats all within the one program. It’s particularly powerful when it comes to dividing CSV files and making new columnar data.  Google’s Refine program allows export to the Freebase Open Data Store which can pull all sorts of data in to your project and cleverly append it.

Have a peek, there’s a few useful videos to get you started:

https://code.google.com/p/google-refine/

It runs nicely in your browser from a single executable, and the extracted files are only 48MB in size.


TalkTalk router shows red internet light

Fault: TalkTalk router shows red internet light or no light at all

Symptoms: Intermittent loss of connection

If your router was previously working and you haven’t added any new phones or moved the phone equipment or router to another telephone socket, then this is a matter that only TalkTalk can resolve. There’s a long shot that it could be your phone wiring but if it was working reliably before then it probably isn’t that.

TalkTalk tech support is on 0870 087 8777. This number is free from a TalkTalk landline. Explain your fault and ask them to do a line test. They will be able to see dropped connections from their end.


PC freezes at chkdsk.sys

Fault: PC freezes at chkdsk.sys

This is a common fault that we see in our workshop. It can occur in safe mode and normal mode but with normal mode the PC often fails to load windows and just keeps restarting itself. This happens on desktop PCs and very often on laptops as they suffer knocks and bumps to the hard drive and battery failure.

The problem is the disk itself in 99 percent of cases.  Whether it can be fixed is down to a number of factors but, in short, here’s how we go about testing it and repairing the fault. I’ll presume that you wish to recover data (documents, images, emails etc) from the disk as most of our clients do. We have a great success rate in recovering data and getting Windows running again with this method.

First, we set the host PC’s bios to start from CD.  If you don’t know how to do this then take a look at my article How to change the boot order of a PC.

Next, we’ll pop over and get a copy of the excellent HDD Regenerator, downloadable here (link opens in a new window). This is the single most useful disk checking tool out there at the moment. It’s not free but it will give you the best chance of data retrieval. Also it’s a tool that is very useful to have in your repair arsenal and you can fix other PCs with it too. I’ve written a full review of HDD regen here. You’ll need to use another PC to create the bootable CD or DVD with but as you’re reading this I’ll presume you have access to one. HDD regenerator can also create a bootable flash drive but for maximum compatibility use the CD.

Next we boot the dead PC with our CD (or Flash drive) and enter the HDD regenerator interface. Tell it to scan the correct hard drive (often there’s only one anyway) and let the program do its stuff, all automatically. Allow an hour or more to scan a drive of about 160GB on a typical Windows XP machine. Newer PCs have better, faster processors and more RAM but they often have bigger drives so a typical scan can take a few hours.

Remember, what the program is doing is a sector-by-sector analysis of your hard drive and moving data from bad areas of the drive to good. This takes time, often we see scans running for several hours, but it will ultimately help you to be able to recover your data and in most cases get Windows restarted. You can also leave the scan running overnight, you don’t need to sit and watch it!

After the chkdsk.sys error repair

With the drive finally scanned, the program reports how many bad sectors it found and you simply press ‘Esc’ to quit the program.

Restart your PC, removing the CD on the initial restart, and make it your first job to backup those files you thought you had lost!


Reference: chkdsk.sys fault when computer starts causes PC to hang or freeze