Install Xampp on Windows 7 64 bit

Xampp setup on WIndows 7This is a guide which shows you how to install Xampp on Windows 7 64 bit.

Visit apachefriends.org to get the Xampp distribution for Windows.  I prefer the non-installation zip file so let’s get this one. The zip or 7zip files are the same but you’ll need another zip utility such as 7zip or WinRar to unpack the 7zip archive. If in doubt, get the zip as Windows can extract files from this one.

Unpack the zip file onto your hard drive. My test PC was partitioned into C and D so I unpacked the file to get this structure:

d:\xampp

You can likewise use your C drive, just replace D with C in all my examples. I prefer a separate partition so that a Windows reload would not wipe these files and since it’s a standalone installation, a new Windows install would allow Xampp to work with no configuration.

Next, we should now be able to run the Xampp control panel by navigating to the newly created xampp folder in My Computer, then double clicking this file:

d:\xampp\xampp_control.exe

If this is not visible, there is an icon in the system tray (bottom right of the screen) that will pop the Xampp Control Panel up again. You may need to use the arrow to expand the tray icons and make it visible. At this point I usually make the tray icon always accessible by dragging it to the visible tray area.

Tick the svc boxes under MySQL and Apache and click the Start button on both. You now should have both services report that they are running

Apache runs and then stops again in Xampp

Xampp and Skype – arch enemies

After a lot of testing I came to this conclusion…. they both hate each other! They are fighting for attention on port 80. Now we can either make Skype dump data on another port or, and I believe this to be the better way, close Skype while we are working in the Xampp environment. Given that there is a bug in Skype on Windows 7 where it is always displayed on the taskbar, even when closed or signed out, you will need to completely close Skype in Windows 7.  The solution and quickest way is to right click on the Skype icon on the taskbar and click on Quit. This stops Skype from monitoring port 80.

Other offenders can include TeamViewer, UVNC, Crossloop and LogMeIn if they are set to be resident. Simply quit these applications to avoid conflicts.


OK, let’s push forward and check we now have Apache and MySQL running by firing up Xampp’s information page. In your browser’s address bar, type in:

https://localhost/xampp/

This should give you this Welcome and Information screen:
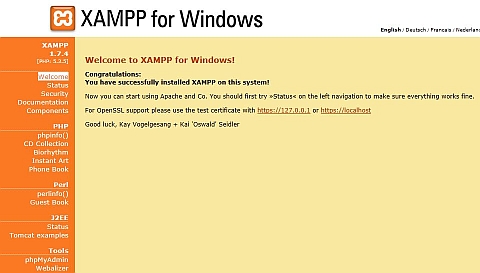
Xampp configuration Windows 7 64 bit

In this screen there should be a page with a column of options down the left side.  Now depending on your screen size and whether your browser has toolbars installed, you may miss the bottom few lines. On our test laptop with a 15.4″ screen this missed the last few rows.

Xampp configuration screen cannot read lower items


No problem though, we can disable the toolbars temporarily or just type in the browser command we require.  Here you can see the last entry for reference:
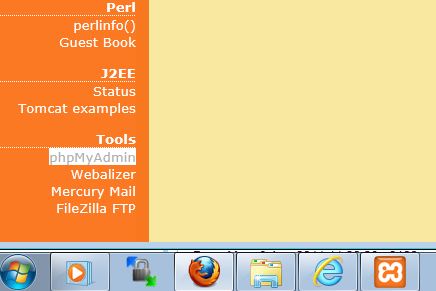
Xampp configuration screen fixed

Right, so we can now setup WordPress as all we require is Apache and MySQL to simulate our server.

Setup WordPress in Xampp

We are going to use phpMyAdmin to create our database that WordPress will run on.  On the Xampp info page, click on the menu item ‘phpMyAdmin’ OR in your browser go to

https://localhost/phpmyadmin/

Note I am using forward slashes here but if you use backslashes it will resolve to the same place. Best to use Unix server syntax though as it’s great practice if you are a Windows user wanting to do things correctly! It will stand you in good stead if you need to get your hands dirty on a real server.

Okey dokey, let’s setup WordPress’s database. Under MySQL Localhost, type in “wordpress” as the database name. Check your options are as shown below:
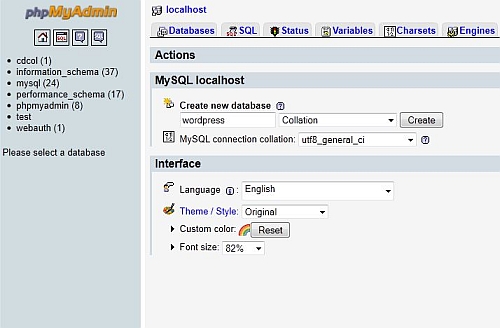
Xampp phpmyadmin wordpress setup

If you are seeing a slightly different screen to the one above, this is because you’ll be running a later version of phpMyAdmin. No problem, the important thing to make sure you get right is the utf8_general_ci and the name of the database. The name of the database can be anything really, just don’t use special characters. I often use the name of the domain I am developing.

Let’s move on to WordPress now. Download the latest and greatest version from here and unzip it to your desktop. You should now have a folder called wordpress. Open this and look for the file

wp-config-sample.php
Look for the following lines

/** The name of the database for WordPress */
define('DB_NAME', 'database_name_here');

/** MySQL database username */
define('DB_USER', 'username_here');

/** MySQL database password */
define('DB_PASSWORD', 'password_here');

/** MySQL hostname */
define('DB_HOST', 'localhost');

/** Database Charset to use in creating database tables. */
define('DB_CHARSET', 'utf8');

Carefully edit the lines to read this:

/** The name of the database for WordPress */
define('DB_NAME', 'wordpress');

/** MySQL database username */
define('DB_USER', 'root');

/** MySQL database password */
define('DB_PASSWORD', '');

/** MySQL hostname */
define('DB_HOST', 'localhost');

/** Database Charset to use in creating database tables. */
define('DB_CHARSET', 'utf8');

I’d advise you stick to this because in Xampp, ‘root’ is the default user and there is no password. Note that I only modded 3 lines, I just left the last 2 in for info as some people change these unnecessarily. Now save this file as wp-config.php in the same wordpress directory (it will not work if you just save it as wp-config-sample.php!)

Copy the whole wordpress folder over to the xampp htdocs directory so you now have

d:\xampp\htdocs\wordpress

Developer tip:

If you are setting up Xampp as a test environment for building client websites, use the name of the client or their domain instead of ‘wordpress’ as a folder name. At this point, you can copy the folder to another within htdocs and rename it to something else, ready for your next project,eg:

htdocs\domain1

htdocs\domain2

Navigate in your browser to

https://localhost/wordpress/wp-admin/install.php

and you should see the WordPress installation routine. Choose the following:

Site name: TESTSITE

Username: abc

Password: abc

Untick the “Allow my site to appear in search engines…” box

Add any email address

Click “Install WordPress”

At the ‘Success’ screen, login with username: abc and password: abc

You can now login at any time that xampp is running Apache and MySQL by going to this url in your browser:

https://localhost/wordpress/wp-login.php


Congratulations! You can now modify your WordPress theme files directly in the WordPress themes folder (wp-content/themes/theme-name) and refresh your browser page for quick and easy theme or template development with no FTP! Once you have modded your files then you can save them elsewhere as a backup and upload them to your server. I recommend installing Mozy (see review) or Livedrive (see review) for a secure and easy online backup.


If you want to check out some more useful and interesting stuff you can do with Xampp and php, take a look at this book


Email settings for Tiscali UK

email-settings-pop-imap-tiscali-orange-talk-bt-02-plusnetHere are the current email settings for Tiscali users.  Tiscali has been taken over by TalkTalk but users are still advised to use the old ‘legacy’ settings listed below.

Please bear in mind that there are 2 main types of email client setup, one which uses Pop3 and the other which uses IMAP. In short, IMAP “synchronises” your PC or phone with the Tiscali server and keeps emails on both while POP3 downloads all emails to your PC or phone. If you are setting this up on an iPhone, I’d recommend using the IMAP service. You can even use your PC on IMAP as well as your phone so everything syncs nicely.

Tiscali email settings for Outlook, Outlook Express, Thunderbird, iPhone and iPad

Anyway, here are the current Tiscali email settings. I’ve included FTP and Webspace to make it a definitive list, but these aren’t needed to setup your email:


Login [email protected]
Incoming email (POP3) pop.tiscali.co.uk
Incoming email (IMAP) imap.tiscali.co.uk
Outgoing email (SMTP) smtp.tiscali.co.uk
FTP server ftp.myweb.tiscali.co.uk
Webspace address https://myweb.tiscali.co.uk/directoryname

Firefox has detected that the server is redirecting the request (WordPress)

Seems many people are getting the WordPress error “Firefox has detected that the server is redirecting the request for this address in a way that will never complete”

This is an error that is often difficult to track down so I’ve created this article to offer some suggestions.


Server redirecting request via htaccess

First off, this happens mostly when you are altering the way that the domain resolves.  By this I mean, if you want your domain to be

www.pcrepairmansblog.com

and people type in

pcrepairmansblog.com

then you need a redirect to the www version.  In actual fact, this is a good SEO technique but I’ll not go into detail here.

How do you redirect them to the www version? Well, I do this by creating an htaccess rule but the problem is that WordPress can often install using the non www link, especially with Fantastico’s defaults.

To check what you have, go to your WordPress admin back-end and look in the Settings -> General page.  Check that both the WordPress address and Site address are set to the same as your htaccess rules. If not, htaccess tells the visitor to go to the www version and WordPress says ‘No, go back to the non-www version’. This causes a loop and the Firefox error above.

I recently saw a client who did a fresh WordPress install and then he added the ‘Custom coming soon page’ plugin. Immediately afterwards he got the dreaded “Firefox has detected that the server is redirecting the request for this address in a way that will never complete” error.  He couldn’t get into the admin back-end and called me out to resolve it.  I fired up the ftp, renamed the plugin directory thus:

/wp-content/plugins/custom-coming-soon-pagexxx

and managed to login to the wp-admin with a shift-refresh of the browser. This rename effectively disabled the ‘coming soon’ plugin and allowed access again.

If this works for you, please leave a comment.


Cheapest Kaspersky Pure and registration renewal

kaspersky-pure-2011-2012-cheapest-renewal-priceKaspersky Pure is a super-solid internet security package. Introduced in 2009, it has rapidly become the de-facto standard that all other packages are judged by. Detection rates are second to none and there is a built in antivirus, antispyware, parental control, firewall, anti-spam, safe run option and many more features.

My little-known method is to purchase an older Kaspersky software version that is fully licensed (from the offers below) but then  download and install the latest Kaspersky Pure Trial from here. It will be a trial version but turns into the full version on activation. To activate, you can simply use the purchased licence key (from an older version) to activate the latest version when you are  prompted. There is absolutely no need to install the older version at all (if you did it would just upgrade to the latest anyway). See here for some live deals on older versions and discounts on new ones too.

I highly recommend this security package over all others, with excellent detection rates and easy installation. PC performance is good post-install, and it runs happily on XP, Vista, Windows 7 and Windows 8.

When the licence expires, take a look at this article to see a clever way you can renew for less money:

How to register Kaspersy Pure with a new product key


Kaspersky registration upgrade method

Because Kaspersky offers a free upgrade to this version from all previous ones from 2009 onwards, this is a completely legitimate method. Importantly, you will save LOTS of money without needing any underhanded pirate serial codes that only last for a few weeks. With Kaspersky prices being anything up to 85% cheaper in the deals below, it makes serious sense and you get the best security suite currently available.

Note: Please make sure that you purchase the correct licence for the number of computers you are installing Kaspersky on, ie the 3-user licence is for up to 3 separate PCs where the 1-user licence will only allow use on 1 PC. Also check that the product you download and install is the same as the product you have purchased the older version of, eg “Kaspersky Pure” not “Kaspersky Internet Security” or “Kaspersky Antivirus”

Personally, I’d go for the Kaspersky Pure package rather than just the antivirus as there will be a very small difference in cost but there’s a huge amount of extra functionality.

If you do use my method, please either drop a little donation in the tin, ‘Tweet’ or Facebook ‘like’ this article or just give me a link back to help others save some cash!

It’s worth checking out prices in my shop too as we often have great deals on Kasperky Pure in our antivirus store:

Buy discounted antivirus packages now

Do you have Norton products installed instead? If you wish to carry on with those, then be sure to checkout these:

Cheapest Norton Internet Security renewal Cheapest Norton Antivirus renewal Cheapest Norton 360 renewal


Run a disk check from Recovery Console – Windows XP chkdsk

Instructions how to run check disk from Windows recovery console (Windows xp).

  • If your PC is a laptop, ensure that your charger remains plugged in for the duration of this process
  • With your PC powered up, insert the Windows XP installation or recovery CD-ROM into the drive, and then restart the computer.
    Note: Cancel any messages or boxes that come up in Windows when the CD is inserted.
  • When you see “Welcome to Setup”, press R to start the Recovery Console.
  • Type in your administrator password and press Enter when prompted. If the administrator password is blank (many are) then just press ENTER.
  • At the recovery console command prompt type in:
    chkdsk /r
  • Press Enter
  • Do not interrupt this process and allow up to 2 hours for it to complete (although most PCs will be quicker than this)


Windows XP Recovery Console chkdsk command explained

So what does chkdsk actually do?  Well it checks your internal hard drive for errors.  These errors can stop your operating system (Windows) from starting or allow it to start but then crash shortly afterwards when it hits a bad area of the drive.

Here are a few of the ‘switches’ that can be used with chkdsk

   /F         Automatically fixes file system errors

   /X         Fixes file system errors on the disk but dismounts the volume first

   /R         Looks for and attempts to recover bad sectors

   /V         Displays the name and path every file on the disk 

   /L:size    FOR NTFS ONLY - Changes the log file size to a specified number of kb

   /C         Skips directory corruption checks 

   /I         Skips any corruption checks which compare directory entries to the
              FRS (file record segment) in the volume's MFT (master file table)

This is a verbose explanation but generally, in my experience, it is sufficient for most PC drive problems to run a chkdsk /r and this can be easily done from the recovery console if you have the XP CD ROM.


Dell Inspiron and Dimension – access the recovery partition

Many emails about how to access the recovery partition on Dell Inspiron and Dimension PCs.  I have noticed that Dell don’t give this information unless you pay for their premium tech support so here we go, hope this helps a few people…..

Most PCs I have tested can do this method providing the hard drive has not been changed and the original recovery image – hidden by default – is intact. I have used this method on PCs as old as 2003 but older ones may work too.

Note: This process is destructive to your data. Ensure you have all you need backed up like serial numbers for software (Office etc), address books, emails, photos and documents.

  • Power the computer on
  • When the Dell logo appears, press and hold the left <Ctrl> key then press the <F11> key
  • Release them both at the same time
  • The Dell Restore by Symantec window should now appear. If you get a keyboard error then restart the PC and try again. Note, if the PC is in the process of booting it is important that you wait for the boot to finish before shutting down or you risk adding corruption onto the hard disk drive.
  • Click the Restore button or use the <Tab> key to highlight the button and press the enter key.
  • A caution message appears advising that all data will be lost. It will be!
  • Click the Confirm button or press the <Tab> key to highlight the button and press the enter key.
  • The Progress window appears.  This can take up to 40 minutes to complete.
  • After a successful restore,  a message stating The system recovery process was successful appears.
  • Click on the Finish button or press the <Tab> key to highlight the button, then press the <Enter> key.

The computer restarts and your software should be as it was when you first received your computer.  Spend a bit of time uninstalling all of the 30-day trial rubbish and uninstall any security suite that was offered at the time as it will be old and superceded. Make sure you update the system to the latest service packs and security updates using Windows Update.  Install a decent antivirus and the best antispyware and your system will be as good as new. Or better!


Restore Acer laptops and desktops from the recovery partition

acer-laptop-discount-prices-onlineThe following is my procedure for restoring Acer laptops and desktops to factory settings. You will need to ensure that laptops are plugged in at the mains charger as this is critical.

  1. First off, locate the Alt key to the left of the space bar, and the F10 key on the top row of keys.
  2. Power the computer on and wait for the Acer logo to appear (the splash screen).
  3. Hold the  Alt and F10 keys down together when you see the logo.
    It should load the Windows logo then state “Please wait a moment…..” with the Acer logo showing.
  4. At the “eRecovery Management” menu it will ask you how you wish to restore.
  5. Click on the restore option you would like to use, bearing in mind that restoring the C partition means you will lose all files not backed up.
  6. When prompted for the password use one you created. If you didn’t create one then use 1234
  7. Allow the recovery to finish and it will automatically restart the computer

How to Recover your Acer system from within Windows

  1. Click on Start, All Programs, Acer Empowering Technology.
  2. Click on Acer eRecovery Management.
  3. If prompted to create a password, create the password and set your password hint
    Don’t lose this password!
  4. When the Acer eRecovery Management loads click the button labeled “Restore”.
  5. Click on “Restore system to factory default”.
  6. The unit will restart and start the restore.
    It should state “Please wait a moment…” with the Acer logo in the upper left hand corner.
  7. At the eRecovery Management menu it will ask you how you wish to restore.
    Click on the restore option you would like to use.

How to Make Recovery DVDs

These are really useful if ever your hard drive dies. The reason is that the recovery image is stored on the hard drive itself and as such will “die” with it. Replacing your hard drive means that you will need to get an image from somewhere if you don’t have these discs, eg reinstall using a fresh copy of Windows and then install and update all the drivers on your pc, not easy for beginners

  1. Click on Start, All Programs, Acer Empowering Technology.
  2. Click on Acer eRecovery Management.
  3. If prompted, create a password and password hint.
    Don’t lose this password!.
  4. When the Acer eRecovery Management loads, click the button labeled “Burn Disc”.
  5. Click “Create Factory default disc”.
  6. Follow the instructions and put in the required Blank DVD or Blank CD media to make a set of Recovery Media Discs. Bear in mind that you will need about 3 DVDs but more like 17 CDs!

Register Kaspersky Pure or Internet Security with a new key

kaspersky-pure-2011-2012-cheapest-renewal-priceHere’s my method for registering a new product key within Kaspersky Pure, Internet Security or Antivirus. Using this method you can legitimately use a licence that you own to add extra licence time onto an already installed Kaspersky product. This is great when it comes to renewal time and you want to use a licence that you purchased at a rock bottom price (see my Cheapest Kaspersky Internet Security Licence article)

  • First off, check you are using the correct licence for the number of computers, ie the 3-user licence is for up to 3 separate PCs where the 1-user licence literally allows use on 1 PC only
  • Double click the Kaspersky icon in the system tray (bottom right of screen).  If this is not visible use the arrow to the left of the icons to expand the menu and select it.
  • In the main Kaspersky Window, click on “Licence expired” (NOT “Renew licence”). If you are renewing before expiry then you should click on “Licence X days remaining” in the bottom right corner
  • Click “Activate the application with a new licence”
  • Type in your code that came with the product you bought. On CD versions this is either on the CD itself or printed on the inside paper sleeve.  Click on Next
  • Fill in the email address and country (optional, we don’t do this) and click Next
  • The Kaspersky software will connect to the activation servers and you are now registered for another 12 months!

Register Kaspersky Pure or Internet Security with the cheapest licence key?

Want to know where to get the cheapest licence keys and renewals? No worries, read how to get the cheapest Kaspersky Internet Security or Kaspersky Pure and use my method to register the latest full product absolutely free!


Cheapest Kaspersky Internet Security renewal

Many people are looking for the cheapest renewal price for Kaspersky Internet Security. This product is their flagship one along with “Kaspersky Pure“, having antivirus, firewall, antispyware, parental control, anti-spam, safe run and much more.

The PCRepairMan rates this as the best protection security package currently available, with fantastic detection rates and top stability.  Performance is very good and Windows 7 compatibility is seamless.

kaspersky internet security discountBecause it is a fully fledged Internet Security package, Kaspersky charge quite a premium for purchase and renewal. My little-known method is to purchase an older Kaspersky software version that is fully licensed (look at the selection below) but download and install the latest version from here. It’s a trial version but becomes full on activation.  Then, simply use the purchased licence key (from the old version) to activate the latest version when prompted – no need to install the old version at all!

I have written full instructions for what to do at renewal time too (12 months later) which you can read here:

How to register Kaspersy Internet Security with a new product key

Kaspersky free upgrade registration method

Because Kaspersky offers a free upgrade to this version from all previous ones from 2009 onwards, this is a completely legitimate method.  Importantly, you will save LOTS of money without needing any underhanded pirate serial codes that only last for a few weeks.  With Kaspersky prices being anything up to 85% cheaper in the deals below, it makes serious sense and you get the best security suite currently available.

CAVEAT – Check that you purchase the correct licence for the number of computers you are installing on, ie the 3-user licence is for up to 3 separate PCs where the 1-user licence will only allow use on 1 PC. Also check that the product you download is the same as the product you have purchased the older version of, eg “Kaspersky Internet Security” not “Kaspersky Pure” or “Kaspersky Antivirus”

Personally, I’d go for the internet security package rather than just the antivirus as there will be a very small difference in cost but there’s a huge amount of extra functionality.

If you do use my method, please either drop a little donation in the tin, ‘Tweet’ or Facebook ‘like’ this article or just give me a link back to help others save some cash!

I sell hugely discounted antivirus packages in my software store that can be used with this method:

Buy discounted packages now


Click here for similar deals on Kaspersky Pure

Got Norton products instead? Checkout these:

Cheapest Norton Internet Security renewal or Cheapest Norton Antivirus renewal or Cheapest Norton 360 renewal


AVG upgrade to 2011 gives a frozen desktop with no icons

avg-discount-coupon-code-renewal-2017I have seen a frozen desktop and menu immediately after an AVG upgrade to 2011 version on MANY customer PCs and, though it can be relatively straight forward to sort out, you will need to carefully follow my method below to avoid any issues.

First off, if the PC is frozen, make sure there are no lights flashing on the tower denoting that there is hard drive activity.  If you switch off and the drive is being written to you WILL compound the problem by adding bad sectors to the hard drive.

When you are happy the PC is not ‘active’, you can power it off.

PCRepairMan’s top tip

You can power off most PCs and laptops by holding in the ‘Power on’ button for 5 seconds

Right, now we need to restart the computer in Safe Mode. If you are not sure how to do this, check out my article on Starting a Windows PC in Safe Mode

Note: If you are having a blue screen on startup after attempting to install AVG read my article here, this is a different fix required:

AVG blue screen of death on startup after installing 2011 version

Onto the fix for the frozen desktop…..

Once in Safe Mode, we login using an Administrator’s account. This may be yours or another one with Administrator permissions.  We can see a message stating that you can use the PC in Safe Mode or perform a System Restore.  The System Restore is what we need so select this.  Now we’ll restore it to a date before the AVG installation. No matter if you have deleted the old AVG version 8 or 9 install, we can deal with that later. Let the computer restart and your icons should reappear.

There is also an issue where the frozen desktop and missing icons are caused by a hard drive with errors on the surface. These can generally be fixed bya good quality drive scanning and repairing tool such as the one I reviewed here:

HDD Regenerator review

Hope this helps and you should now have a proper desktop with icons again!