Manage multiple WordPress sites with WPRemote

Looking for an easy way to manage updates on multiple WordPress websites? Well there’s a new tool in town and it’s called WP Remote. Here’s a brief review.

This nifty tool installs on WP sites via a small plugin and gives you a single console from which to monitor your sites for plugin updates, theme updates and WordPress updates. You can apply the updates from the console so no need to login to any site after the initial plugin install. Not only that but it allows manual backups of files and MySQL databases in one click. Fiddly and incomplete WordPress backups are a thing of the past, you can expect to add the site to the console, update all plugins and themes and do a complete backup within a few minutes. Stunning.

It’s free, easy to setup, minimalist, stable and incredibly useful. And no, I don’t own the company, just thought you might like it as much as I do. Look out for this company over the next few months as I think this is going to be very popular!

https://wpremote.com


Norton subscription has expired – but it hasn’t!

A fairly common fault is for a Norton product such as Antivirus, Internet Security or 360 to report that your subscription has expired when it hasn’t. This can be due to a number of issues and often occurs after some major Windows updates or when there are problems with the Symantec (Norton) subscription servers.

The best methods to address this I have found are to do these in steps in order. If any one works then you have resolved the problem and need to go no further. Before trying these you will need to be connected to the internet.

1. Try a manual update – Open the main program window (double click on the tray icon or open it from the desktop icon) and do a ‘check for updates’.
2. Restart the computer – This ensures you have nothing that is pending a restart and affecting the definition updates.
3. Force a subscription check – In the main Norton window, click “Support” then click on “Subscription Status”. After the “Subscription Status Check” is complete, click “Finish”. This updates the subscription information of your installed product to the status that is stored on the Symantec (Norton) servers.

Norton internet security subscription expired
4. If you still have an issue beyond this then you will need to login to your Norton Account and check your subscription status then raise any issue you have with Symantec support. Use the menu “Support” then “Get Support”. If you didn’t create a Norton Account then you can still talk to support, just try to have your serial number handy from the original installation.

Hope this helps you, please drop me a comment below if it does.  If you want to save a lot of money on renewal then check out my articles on The cheapest way to renew Norton 360 or The cheapest way to renew Norton Internet Security


Bot blocking tool Spyder Spanker review

Websites are plagued with bad bots and often come grinding to a halt without the aid of a bot blocking tool. Here, I’ll review the latest kid on the block, Spyder Spanker.

Bot blocking plugin wordpress

First off, Spyder Spanker is a WordPress plugin, so if you don’t have a WordPress powered site then you’re out of luck. If you do however, then read on, it’s pretty impressive. Here’s a video that shows its merits:


Seen enough? Get Spyder Spanker Pro now at the best price or continue reading the review.


Spyder Spanker full review

Initially installing the tool is as simple as uploading your provided zip file to your server via the WordPress plugin page. Once uploaded and activated, Spyder Spanker installs itself as an admin menu item. There, you can add your licence details and you are straight in to the interface, a very neatly styled area where each component is separately presented to you.

Allow trusted bots

Setting up the plugin is very easy because all of the major trusted bots are whitelisted. By trusted, I mean the ones you actually WANT to come to your site such as GoogleBot, BingBot etc. Without these, the search engines wouldn’t know your site content and you would never get listed in the search engine results pages. This is something that is a welcome addition to the software, other packages leave it up to you to select your own trusted bots.

Disallow bad bots

You don’t even need to add any bad bots either because these are also setup when the plugin installs. Bots such as Baidu (Chinese search bot) and Yandex (Russian search bot) are unneccesary on many English language sites as they steal bandwidth to add you to their results pages, regularly returning to your pages to re-crawl them and taking valuable bandwidth.

Allowing individual bots

OK, so we have a good setup straight out of the box, but let’s dig a bit deeper and see what we can modify. Let’s take the scenario where an English language website sells products to China. If this is the case then it would make sense to allow the Baidu bot to index the website.  To do this is a simple 2-click operation, tick the Baidu bot and then click on ‘Remove selected’. Very slick and no messing about with CSF firewall rules or .htaccess country-blocking or IP address blocking rules.

The differences between Spyder Spanker and other tools

I wanted to point out that Spyder Spanker is predominantly a bot blocker and doesn’t do a lot of what tools like WP Better Security does such as secure admin areas, make files ineditable etc. What it does excel at is blocking the bots that use your resources on a daily basis and it can throttle back the good bots when they spider your site aggresively too.

WP Better Security comes with a basic list of bad bots for .htaccess (which I use) but they’re a bit more devious these days and use new names. Here is an example of a logfile entry in Spyder Spanker:

Blacklist agent testing...
---------------------------------
0447705 - 2013-05-03 03:12:52 CDT / IP: 208.115.113.90 / HOSTNAME:
AGENT: Mozilla/5.0 (compatible; Ezooms/1.0; [email protected])
---------------------------------
BLOCK: blacklist agent: mozilla/5.0 (compatible; ezooms/1.0; [email protected])

This is a bot you won’t generally find on many htaccess blacklists but it’s a ‘rule-breaker’ for sure. SS responded by blocking it and will pass the rule to my other sites and the community network.

Let’s be honest, a bot with a gmail address probably shouldn’t be trusted that much anyway!

Spyder spanker review – the verdict

I’d thoroughly recommend you buy this tool, you’ll recoup any outlay back in a short time with reduced bandwidth fees, time saved and more sales if you run any type of ecommerce or affiliate site. One thing though, go with the Pro upgrade that is presented as a “One Time Offer” when you have paid for the basic version because Spyder Spanker Pro integrates beutifully with Project Honeypot. This means that it can be run ‘hands-off’ and will be updated against the raft of ever-increasing spammers and bad bots out there. Add this to the community update facility and you’ll be protected for years to come across ALL of your domains.

Purchase Spyder Spanker at the current best price online


Different types of graphics card slots

Here I’ll try to explain briefly the graphics card slots used on most PCs.

Video or graphics cards come with three different connector types – PCI, PCI Express and AGP. The slots in your PC’s main board (motherboard) will dictate which one you need.

  • PCI are often white slots and have been around since the early 90s
  • PCI Express also known as PCIe  are often black slots but manufacturers can choose the colour. Useful eh?
  • AGP slots are mostly brown and they have different speeds. The newer versions for sale are predominantly designed for AGP 2.0 and 3.0 standards but check first
  • ISA cards are very old and it’s unlikely you have one of these as they were predominantly an 80s technology

You’ll also need to think what you will be using the graphics card for. Heavy graphics use (eg gaming, 3d rendering etc) will mean you need a more expensive card whereas a cheaper one will suffice for the odd Internet surfing and Word document. Gamers tend to look at FPS (Frames Per Second) as a benchmark to performance but there are a number of factors that contribute.

Hope this helps explain the graphics card slots minefield a bit more! Take a look at my deals on ATI graphics cards and Nvidia graphics cards.


Change Windows startup sound to a voice

Change windows startup soundYou know in all those futuristic films where computers speak to their owners? Ever wondered if you can actually get yours to welcome you in this way? Well let’s have a go at doing this and see what we can use it for.

This should work on Windows from XP upwards. If you have security settings a bit high then running scripts may be an issue but it won’t hurt to try this.

Click on Start > All Programs > Accessories > Notepad

In the notepad window, paste the exact code below:

Dim speaks, speech
speaks="Welcome PC Repair Man, what can I do for you today"
Set speech=CreateObject(“sapi.spvoice”)
speech.Speak speaks

Obviously once you have this working, you’ll replace the text with your own!

Save as startmessage.vbs. You can rename this file to anything you like but keep the .vbs on the end. If you can’t see the .vbs then you really should turn on file extensions, it helps you to identify files. Turn on your speakers then double click this file to see if it works.

Copy the saved file and paste it into the following folders (I’m presuming that C is your Windows drive, most are):

  • For XP users: C:\Documents and Settings\All Users\Start Menu\Programs\Startup (in Windows XP)
  • For Windows 7 and Windows Vista: C:\Users\ User-Name\AppData\Roaming\Microsoft\Windows\Start Menu\Programs\Startup

When you next start your computer, it will welcome you!

NOTE: I’d suggest you don’t turn off the Windows startup sound, it’s best to keep the rest of the system as-is.

To remove, simply delete or move the startmessage.vbs out of your startup folder.

Want to trick a friend? Create a personal message and drop it into their startup folder. Watch as their computer reminds them of something they’d rather not be reminded of like “Hey John, bad luck on the driving test” or “Is that a pimple on your nose, Lucy”.

Don’t be evil, or if you do, don’t tell them it was me that told you how to do it….


Disable Livefyre trackbacks in WordPress

livefyre review

I was quite a big fan of Livefyre for a while. Yes there have been many comments about how Comment Luv or Disqus are better and it seems everyone has their own preference. A while back I noticed that Livefyre had a quirk that meant that even if you turned off trackbacks via WordPress admin, this was only activated for new posts and not existing ones. For reference, in WordPress this is turned off in the Settings > Discussion menu.

This isn’t a fault in Livefyre, more a problem with the lack of easy control of posts that have already been published or are in draft within the WordPress database.

So if your older posts have trackbacks enabled you could see something like this (a screenshot from one of my posts here):

 Livefyre trackback removal

Hmm, not doing the article a great deal of favours is it really? From a search engine point of view this article now has duplicate content and more outgoing links.  So what can we do to get the older posts to not display trackbacks? Well we could go back in and edit all the posts that we are aware of by unticking the ‘Allow trackbacks’ box. Unfortunately, on larger blogs this is not practical. Time to get our hands dirty with some SQL statements.

Disable Livefyre trackbacks in WordPress using phpMyAdmin and SQL

Login to your control panel and fire up phpMyAdmin. Select your WordPress database and back it up. If you’re not sure how to do this, I wrote a detailed article here:

Backup WordPress MySQL database using phpMyAdmin (opens in a new window).

So now we have a working backup, select your database and click on the SQL tab from the top menu bar. Insert this code into the command box and click on ‘Go’:

UPDATE wp_posts SET ping_status='closed' WHERE post_status = 'publish' AND post_type = 'post';
UPDATE wp_posts SET ping_status='closed' WHERE post_status = 'publish' AND post_type = 'page';
UPDATE wp_posts SET ping_status='closed' WHERE post_status = 'draft' AND post_type = 'post';

Note that you need to replace wp_ with your own table prefix if it’s different. You should now have all your old posts that have been published (and any draft posts waiting to be published) disabled for trackbacks.


Backup WordPress database tutorial

wordpress backup

This is a tutorial on how to backup your WordPress database manually using phpMyAdmin and the SQL export method. It may sound difficult for the non-technical but it isn’t really and is something that is essential for the maintenance of any WordPress site. If you have ever lost any data before you’ll know what a huge and time consuming problem this can lead to so let’s get going.

First off, please bookmark this page in your browser, you’ll probably need to refer to it again for the first few backups!

Login to your cPanel. This is where you will see lots of useful tools and the one we shall use is phpMyAdmin shown below.

php myadmin wordpress backup

Click to open it and you will now have to select your database from the left hand side, usually something like mysite_wrdp1. Don’t select the information_schema as this is not the one we want.

Now you look to the right of the screen and you can see tabs relating to functions we can actually run on the database.

phpmyadmin sql wordpress

We want to select ‘Export’ here. Now for the bit everybody gets wrong…. You should select the ‘Custom export method’ which gives you greater control over the final exported database. For ease of reference, I have compiled a screenshot of the best options to select for the majority of users. Make sure you click to select all tables in your database, I have seen so many people just backup one table within the database and the backup is effectively useless. Here are all the settings you need to have in the latest version of  phpMyAdmin:

database backup wordpress phpmyadmin latest

Notice I have removed the prefix from the table names (shown in blue above) as you or a program may have modified this. By default it is wp_ but many security packages rename it. There is nothing to do here, I’m just pointing this out for clarity.

Now you can click on ‘Go’ and you should be able to download a working copy of your database. You can’t really view this file as it requires a database server (although you can connect to it with a few software tools that exist). You can however upload it to a new installation or use it when the poop hits the fan and disaster strikes on your server.

That’s about all you need to do to have a working backup of your database. Remember to FTP into your server and copy all the files over too as many files and folders are necessary to get back up and running as you were. For example, your wp-content/uploads folder is not backed up automatically and this is where most images used on your blog are stored.

Automatic WordPress SQL backups and file copying features

If you want a click-and-forget solution then I would heartily recommend the excellent WP-Twin which you can download here https://wp-twin.com
This neat program not only backs up your database but also ALL of your files on the server, meaning that any special folders outside of WordPress get copied over too. It has an easy reinstall option that takes the pain out of disasters, well worth it if you aren’t too sure how to go about reinstallation.

I hope this helps you to start a decent WordPress backup regime and I’d be happy to know if this helped you, please drop me a comment below or click the social buttons to share with others.


Can I install OEM software on Mac Boot Camp or Virtual Machine?

Well, it seems there are lots of people asking about this installing OEM Windows software on Mac desktops and laptops. This is a grey area that I’d like to clear up (or make slightly off-white). I’ll present the facts and you can make your own decision.

OEM versions are, in theory, to be used by system builders. It is generally accepted now, although unwritten, that people can readily purchase these and install them. Just look at the plentiful supplies on major ecommerce sites and you’ll see that the OEM software is not just for system builders. Effectively, someone who installs an operating system on a PC is doing the job of a system builder, it’s just the component assembly part they are missing, and many system builders actually buy whole machines now anyway.

The thing to note with OEM software, is that if your computer dials out for licence verification then it needs to be installed on just one piece of hardware to be classed as genuine. That’s the only check. Since Retail versions are much more expensive than OEM, people are naturally drawn to them.

There are a few things to be aware of for OEM installation which I’ll clarify here:

1)  Retail versions come with both 32-bit and 64-bit installations as an option. OEM versions are one or the other, so you will want to make sure you’re ordering the right version. For your Mac, check that it is a 64 bit machine and go for this if it is. If you do have 64 bit then choose a product like Windows 7 as it’s stable, well rounded and I have seen Windows 8 splutter and complain a few times. Something like this would be perfect:

Cheap Windows 7 OEM (opens in a new tab)

The differences in 32 and 64 bit operating system software can often be marginal unless you are really pushing the computer hard, but for a small price difference 64 is a better operating system when on full load. Many software programs are 32 bit so they don’t take advantage of the extra ‘word architecture’ but when you run something like Adobe Photoshop 64 bit that is resource-hungry, it can be noticeable.

2)  OEM versions are tied to the hardware they are installed on and cannot be moved. This will only be an issue if you are planning on using virtualization software as well as your bootcamp (dual boot) installation, since the virtual machine “hardware” looks different to the real hardware.

3)  OEM versions do not come with telephone support from MS, although if you try to talk to a Microsoft representative about issues you are getting on a Mac then you may be fighting a losing battle as they are known to pass them back to you.

To summarise, I would go with an OEM dual-boot installation (64 bit if possible) OR run a virtual machine. You may even be able to run a cheaper XP licence as a virtual machine and this may suffice. If it is to run an older program such as MS Money this could work well as it may run more happily too.

64 bit architecture explained on Wikipedia

Drop me a comment below if this helped you or please click the social buttons to help others save a bit of money too.


WordPress SEO by Yoast – using sitemaps

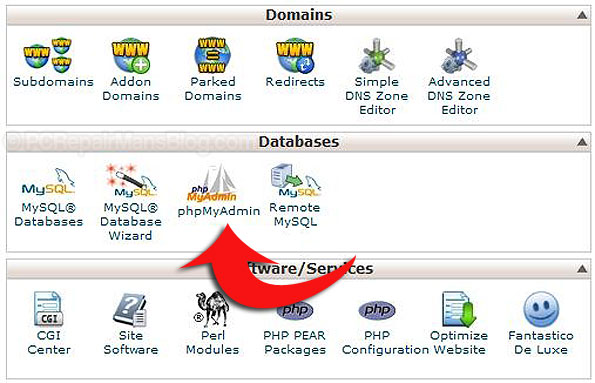
If you are using the fabulous WordPress SEO plugin by Yoast, you’ll find that it also does the job of creating a sitemap for you.  You need to opt in to this within the plugin’s settings field here:
XML sitemaps” then tick the “Check this box to enable XML sitemap functionality“.

There are a few caveats that this plugin doesn’t make you aware of though and this can affect the whole indexing of your website by the search engines.

1. If you are now making reference to this sitemap elsewhere (such as within W3 Total Cache etc) then you will need to alter the path to your sitemap thus:

https://yourdomain.com/sitemap_index.xml

2.  You will need to remove any other sitemaps from your root folder. Look for:

sitemap.xml
sitemap.xml.gz


3.  Make sure that your robots.txt has this line:

https://www.yourdomain.com/sitemap_index.xml


Your XML sitemap doesn’t actually exist at this location so don’t think it’s not working if you can’t see this file. Yoast’s WordPress SEO plugin places the files in a subfolder of your uploads directory, and using WP Rewrite the URL will resolve to the right sitemap. It also works with Multi Site installs whether domain mapped or not.  To check it is functioning, fire up your browser and navigate to the sitemap (as in step 3 above). You should see the file there.


Hope this helps!


Check you have the latest Norton product version

norton-internet-security-2017-cheapest-renewal-price-serial-keyHere’s a well kept secret….Symantec offer a way to check you have the latest Norton product on your system and they actually give you a free upgrade if not.

If you are running a Norton product such as Internet Security, Antivirus or 360, click here to check for a free upgrade to other versions of Norton.

Save the file to your desktop and run it, it will prompt for action if you can get a free upgrade.

For cheap prices on Norton renewals, take a look at my software store which currently has huge discounts on Norton products