GoDaddy 99 cent domains are back!

Godaddy cheap domain trickYes, GoDaddy 99 cent domains are back with this simple method and coupon code for December! It’s limited to 3 per account but does include existing GoDaddy account holders to purchase. I’ll show you below how to mix it up and get 6 domains for as low as $4.

At time of writing, 4USD = about 2.50GBP or 3.8AUD or 4.7 NZD or 3Euro

Start off by opening GoDaddy using this link (opens in a new window).

Sign up or login if you are already a customer.

First off, if you are from any country other than the US, set your primary currency to dollars. I’m outside the US but I keep it in this currency as it’s often where the better deals are.

Search for your 3 .com domains and add them to your basket.

Set all domains to 1 year duration using the dropdown menu.

Below each domain you see this:
YOURDOMAINNAME.INFO FREE with .COM or .CO^ – Add

Click the little ‘Add’ link for each one, this will add the free .info to your basket.

Verify your domains and that the corresponding .infos are all there, you should have 6 domains in total.

Now go to your Order Summary box on the right side of the page and add this special GoDaddy promotional coupon code:

LKSRTL99X

You should see that all 3 of your .coms have dropped to $0.99 (plus $0.18 tax) and that the .infos are completely free (with $0.18 sales tax). Something like this:

Godaddy 99 cent domain coupon code


Godaddy free info domain


At their current non-discounted prices (and GoDaddy are reasonable for their full-price domains) the basket would cost $82 for those 6 domains. Using this trick it comes down to a shade over $4.

That’s a $78 dollar saving, or 95% if you prefer!

Here’s what I have just ordered:

Godaddy 99 cent domains coupon deal

Yes that really is just over $4 for 6 domain names!!


Update: Working GoDaddy coupon codes for January 2013:

Enter code cjc295j1 for any domain at $2.95

Enter code gd3115c for any .info at $1.49

Enter code UNLOCKED for any .com at $1.17

Bookmark this page and check back for new codes before purchasing any domain!


Go straight to GoDaddy and register your domains now (link opens in new window).


Web hosting with ServInt – setting up a VPS account

Here’s how to Setup a VPS on Servint, a quick review and some discount coupon codes.  I have also provided information to help you avoid any pitfalls. All links open in a new window so you can compare them.

First off, decide which account is right for you.  If you’re likely to run several websites then a VPS account makes sense.  I have outgrown so many hosting accounts, I wish someone had guided me in the right direction from the start.  It seems like a lot of money at first but when you consider most people don’t want to hang around to wait for your website to load it makes sense.  If you sell anything through your website (including promoting affiliate goods) you will probably recoup the extra cost through the visitors you keep.

ServInt run 3 VPS accounts,click on “Enterprise VPS” from their homepage to see the options.

At time of writing they are called Essential, Signature and Ultimate.  Essential will give most people good speed running on a very useful 768MB of RAM.  This will also allow up to 1.5GB burst RAM, good for those with sudden heavy loads.

A generous 50GB storage is allowed and 1TeraByte of monthly transfer should be ample for all but the heaviest sites.

Here’s the spec as we reviewed their service:

  • 50 GB Storage
  • 1 TB Monthly Transfer
  • 768 MB Guaranteed (1.5 GB Burst RAM)
  • Hardware RAID 10
  • CentOS 5 Operating System
  • 4 IP Addresses
  • Fastest drives in the industry
  • Unlimited Domains and User Accounts
  • FREE cPanel, Plesk, or Parallels SBP
  • FREE Virtuozzo Power Panel
  • FREE Daily Off-Server Backups
  • No Setup Fee
  • $49 Monthly

Now we used a Servint discount coupon code [ 50×3 ] to drop 50% off the first 3 months hosting and also opted for paying 12 months up front.  This resulted in a large $124.95 discount, making this one of the most affordable VPS solutions out there.  Even without the discount it is very competitive.

Support

ServInt are pretty well known for excellent support.  It’s something to consider carefully and for each hosting account I have ever used I have always done my research.  What’s the point of having a great server that doesn’t work more than 99% of the time?  With ServInt’s 24/7 support and their very good knowledge of real-world issues you shouldn’t ever have serious problems.  Some of my previous hosts didn’t get involved in database issues for example where ServInt do.

Backup

All sites require a backup plan.  ServInt’s free backup is not to be sniffed at as many hosts levy a charge for this which increases with the number of site backups you do.

Migration

If you already run a server then ServInt can help you to migrate your websites over.  It makes it easier if you run similar control panels, eg CPanel to CPanel is easier than Plesk to CPanel.

Cancellation

I like the fact that you are billed monthly and can cancel the contract with 30 days notice, beware others who tie you in for long periods as there’s nothing worse than a bad host that you can’t change from.

“What you put on the server is your responsibility and if it doesn’t work it’s up to you to put it right”.  Yeah, right.

There is a degree of responsibility, sure, but what I want is a host that works with me to resolve any issues.  Migration, bespoke scripts not working, installing extras on the server…. these are all part and parcel of running a modern website now.

Anyway, my experience with ServInt has been nothing less than pleasurable and I’d recommend them without a shadow of a doubt.  Here’s my final bill for the VPS package signup:

Your Order Total
Base Package Amount: $588.00
Immediate Discount: – $73.50
Sub Total: $514.50
12 Months Prepay Discount: – $51.45
Sub Total: $463.05
Monthly Options: $0.00
Yearly Options: $12.00
Setup Fees: $0.00
Total Due: $475.05
You Saved: $124.95

Speed tests

We tested against similar VPS hosting on 1and1, GoDaddy, 34SP and Hostcolor.  Our pretty exhaustive site speed stats showed significant speed improvement over all hosts.  The nearest competitor was Hostcolor at around 12% slower on average page loading speed.

Summary

All in all, ServInt are a very respectable hosting service provider that delivers its promise of good, fast hosting and excellent 24/7 support.  We’d recommend them highly to anyone who has more than one website, developers, resellers and owners of larger/more resource-hungry sites.

Other discount codes we are proud to be able to offer are:

Servint Dedicated Server discount coupon code – Click the link and type in 50×2 to get 2 months at 50% off.

Servint Super VPS discount coupon code – Click the link and type in 50×3 to get 3 months at 50% off. [Update – if this doesn’t work, use WHTFALL to get 50% off month 1]

Here’s a link to their current packages: ServInt VPS hosting

Update – 13 months on and we have had not a single outage or slowdown on this server. It is as robust as they come and the tech support for adding modules and recompiling etc has been brilliant with most tickets answered in an average of under 2.5 minutes.


XXX domain owners to launch search engine for porn

xxx-domainsICM Registry, the guys behind the new .xxx porn domains have revealed they are to create a search engine exclusively for porn. It is due to launch tomorrow.

This could be a step towards isolating pornographic content from the casual surfer, although the cynic in me thinks it may be more likely to be an act to promote XXX domain registrations.

I wonder if they’ll copy Google and have an “I’m feeling lucky” button? 🙂


What is the difference between parked, addon and sub domains?

Lots of people have asked me to explain the difference between parked, addon and sub-domains so I’ll try to keep it simple. Let’s start with a Parked domain.

Parked Domain explanation

A parked domain is not a unique or standalone website. Instead, it is simply a ‘forward’ to the primary domain name of your cPanel account. Parked domains are commonly used to redirect a domain that you do not have a website for OR for when you have more than one domain that should lead to your primary domain. Scenarios may include owning multiple Top Level Domains (TLDs) such as:

mywebsite.co.uk

mywebsite.info

and needing to point them to your main mywebsite.com domain.  You can use this too for directing any common misspellings of your domain name (obviously those that you have registered first!). Consider using Dynadot.com as registrars, their prices seem lower than the rest.


Add-on domain explanation

An addon domain is a website, with its own unique content. For shared hosting such as the excellent cut-price Hostgator, you just point your new domain to your main account you registered. This will be accessible through CPanel and we simply need to visit the ‘Add-on domain’ section to make it work.


Sub-domain explanation

A subdomain is a second website with unique content, but you have no new domain name. Instead, you use an existing domain name and change the first part of the address to another name.

For example, you have mywebsite.com and you add a subdomain to make it forum.mywebsite.com or sales.mywebsite.com


Godaddy Domain coupon codes 2013

Godaddy cheap domains 2013

GoDaddy cheap domains are unstoppable with these hard-to-find coupon codes.

Latest codes for July and August 2013

cjc32np – 32% off new products
cjc25nc – 25% off new customers and renewals
cjc299c $2.99 .coms
cjc4fp – $4 .coms inc free private registration
cjc500v – $5.99 .com
cjc798dom – $8.49 .com renewals
cjc50hh – 50% off Godaddy hosting plans
cjcchp20 – save 20% off all hosting plans

These great offers allow existing GoDaddy account holders to purchase as well as new accounts.

Just copy the codes above and be sure to click the blue link which takes you to the purchase page.

Go straight to GoDaddy and register your domains now before the offer expires (link opens in new window).


Bookmark this page and check back for new codes before purchasing any domain!


Bot blocking tool Spyder Spanker review

Websites are plagued with bad bots and often come grinding to a halt without the aid of a bot blocking tool. Here, I’ll review the latest kid on the block, Spyder Spanker.

Bot blocking plugin wordpress

First off, Spyder Spanker is a WordPress plugin, so if you don’t have a WordPress powered site then you’re out of luck. If you do however, then read on, it’s pretty impressive. Here’s a video that shows its merits:


Seen enough? Get Spyder Spanker Pro now at the best price or continue reading the review.


Spyder Spanker full review

Initially installing the tool is as simple as uploading your provided zip file to your server via the WordPress plugin page. Once uploaded and activated, Spyder Spanker installs itself as an admin menu item. There, you can add your licence details and you are straight in to the interface, a very neatly styled area where each component is separately presented to you.

Allow trusted bots

Setting up the plugin is very easy because all of the major trusted bots are whitelisted. By trusted, I mean the ones you actually WANT to come to your site such as GoogleBot, BingBot etc. Without these, the search engines wouldn’t know your site content and you would never get listed in the search engine results pages. This is something that is a welcome addition to the software, other packages leave it up to you to select your own trusted bots.

Disallow bad bots

You don’t even need to add any bad bots either because these are also setup when the plugin installs. Bots such as Baidu (Chinese search bot) and Yandex (Russian search bot) are unneccesary on many English language sites as they steal bandwidth to add you to their results pages, regularly returning to your pages to re-crawl them and taking valuable bandwidth.

Allowing individual bots

OK, so we have a good setup straight out of the box, but let’s dig a bit deeper and see what we can modify. Let’s take the scenario where an English language website sells products to China. If this is the case then it would make sense to allow the Baidu bot to index the website.  To do this is a simple 2-click operation, tick the Baidu bot and then click on ‘Remove selected’. Very slick and no messing about with CSF firewall rules or .htaccess country-blocking or IP address blocking rules.

The differences between Spyder Spanker and other tools

I wanted to point out that Spyder Spanker is predominantly a bot blocker and doesn’t do a lot of what tools like WP Better Security does such as secure admin areas, make files ineditable etc. What it does excel at is blocking the bots that use your resources on a daily basis and it can throttle back the good bots when they spider your site aggresively too.

WP Better Security comes with a basic list of bad bots for .htaccess (which I use) but they’re a bit more devious these days and use new names. Here is an example of a logfile entry in Spyder Spanker:

Blacklist agent testing...
---------------------------------
0447705 - 2013-05-03 03:12:52 CDT / IP: 208.115.113.90 / HOSTNAME:
AGENT: Mozilla/5.0 (compatible; Ezooms/1.0; [email protected])
---------------------------------
BLOCK: blacklist agent: mozilla/5.0 (compatible; ezooms/1.0; [email protected])

This is a bot you won’t generally find on many htaccess blacklists but it’s a ‘rule-breaker’ for sure. SS responded by blocking it and will pass the rule to my other sites and the community network.

Let’s be honest, a bot with a gmail address probably shouldn’t be trusted that much anyway!

Spyder spanker review – the verdict

I’d thoroughly recommend you buy this tool, you’ll recoup any outlay back in a short time with reduced bandwidth fees, time saved and more sales if you run any type of ecommerce or affiliate site. One thing though, go with the Pro upgrade that is presented as a “One Time Offer” when you have paid for the basic version because Spyder Spanker Pro integrates beutifully with Project Honeypot. This means that it can be run ‘hands-off’ and will be updated against the raft of ever-increasing spammers and bad bots out there. Add this to the community update facility and you’ll be protected for years to come across ALL of your domains.

Purchase Spyder Spanker at the current best price online


Install Xampp on Windows 7 64 bit

Xampp setup on WIndows 7This is a guide which shows you how to install Xampp on Windows 7 64 bit.

Visit apachefriends.org to get the Xampp distribution for Windows.  I prefer the non-installation zip file so let’s get this one. The zip or 7zip files are the same but you’ll need another zip utility such as 7zip or WinRar to unpack the 7zip archive. If in doubt, get the zip as Windows can extract files from this one.

Unpack the zip file onto your hard drive. My test PC was partitioned into C and D so I unpacked the file to get this structure:

d:\xampp

You can likewise use your C drive, just replace D with C in all my examples. I prefer a separate partition so that a Windows reload would not wipe these files and since it’s a standalone installation, a new Windows install would allow Xampp to work with no configuration.

Next, we should now be able to run the Xampp control panel by navigating to the newly created xampp folder in My Computer, then double clicking this file:

d:\xampp\xampp_control.exe

If this is not visible, there is an icon in the system tray (bottom right of the screen) that will pop the Xampp Control Panel up again. You may need to use the arrow to expand the tray icons and make it visible. At this point I usually make the tray icon always accessible by dragging it to the visible tray area.

Tick the svc boxes under MySQL and Apache and click the Start button on both. You now should have both services report that they are running

Apache runs and then stops again in Xampp

Xampp and Skype – arch enemies

After a lot of testing I came to this conclusion…. they both hate each other! They are fighting for attention on port 80. Now we can either make Skype dump data on another port or, and I believe this to be the better way, close Skype while we are working in the Xampp environment. Given that there is a bug in Skype on Windows 7 where it is always displayed on the taskbar, even when closed or signed out, you will need to completely close Skype in Windows 7.  The solution and quickest way is to right click on the Skype icon on the taskbar and click on Quit. This stops Skype from monitoring port 80.

Other offenders can include TeamViewer, UVNC, Crossloop and LogMeIn if they are set to be resident. Simply quit these applications to avoid conflicts.


OK, let’s push forward and check we now have Apache and MySQL running by firing up Xampp’s information page. In your browser’s address bar, type in:

https://localhost/xampp/

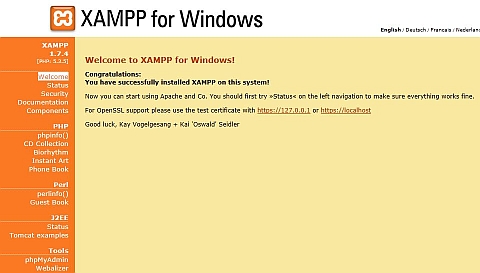
This should give you this Welcome and Information screen:

Xampp configuration Windows 7 64 bit

In this screen there should be a page with a column of options down the left side.  Now depending on your screen size and whether your browser has toolbars installed, you may miss the bottom few lines. On our test laptop with a 15.4″ screen this missed the last few rows.

Xampp configuration screen cannot read lower items


No problem though, we can disable the toolbars temporarily or just type in the browser command we require.  Here you can see the last entry for reference:

Xampp configuration screen fixed

Right, so we can now setup WordPress as all we require is Apache and MySQL to simulate our server.

Setup WordPress in Xampp

We are going to use phpMyAdmin to create our database that WordPress will run on.  On the Xampp info page, click on the menu item ‘phpMyAdmin’ OR in your browser go to

https://localhost/phpmyadmin/

Note I am using forward slashes here but if you use backslashes it will resolve to the same place. Best to use Unix server syntax though as it’s great practice if you are a Windows user wanting to do things correctly! It will stand you in good stead if you need to get your hands dirty on a real server.

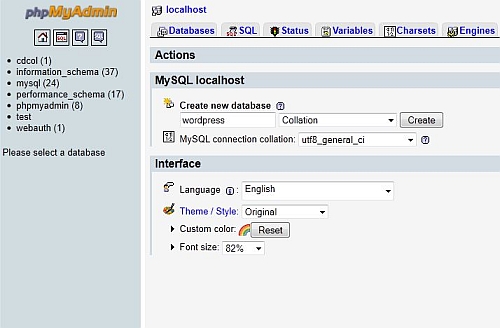
Okey dokey, let’s setup WordPress’s database. Under MySQL Localhost, type in “wordpress” as the database name. Check your options are as shown below:

Xampp phpmyadmin wordpress setup

If you are seeing a slightly different screen to the one above, this is because you’ll be running a later version of phpMyAdmin. No problem, the important thing to make sure you get right is the utf8_general_ci and the name of the database. The name of the database can be anything really, just don’t use special characters. I often use the name of the domain I am developing.

Let’s move on to WordPress now. Download the latest and greatest version from here and unzip it to your desktop. You should now have a folder called wordpress. Open this and look for the file

wp-config-sample.php
Look for the following lines

/** The name of the database for WordPress */
define('DB_NAME', 'database_name_here');

/** MySQL database username */
define('DB_USER', 'username_here');

/** MySQL database password */
define('DB_PASSWORD', 'password_here');

/** MySQL hostname */
define('DB_HOST', 'localhost');

/** Database Charset to use in creating database tables. */
define('DB_CHARSET', 'utf8');

Carefully edit the lines to read this:

/** The name of the database for WordPress */
define('DB_NAME', 'wordpress');

/** MySQL database username */
define('DB_USER', 'root');

/** MySQL database password */
define('DB_PASSWORD', '');

/** MySQL hostname */
define('DB_HOST', 'localhost');

/** Database Charset to use in creating database tables. */
define('DB_CHARSET', 'utf8');

I’d advise you stick to this because in Xampp, ‘root’ is the default user and there is no password. Note that I only modded 3 lines, I just left the last 2 in for info as some people change these unnecessarily. Now save this file as wp-config.php in the same wordpress directory (it will not work if you just save it as wp-config-sample.php!)

Copy the whole wordpress folder over to the xampp htdocs directory so you now have

d:\xampp\htdocs\wordpress

Developer tip:

If you are setting up Xampp as a test environment for building client websites, use the name of the client or their domain instead of ‘wordpress’ as a folder name. At this point, you can copy the folder to another within htdocs and rename it to something else, ready for your next project,eg:

htdocs\domain1

htdocs\domain2

Navigate in your browser to

https://localhost/wordpress/wp-admin/install.php

and you should see the WordPress installation routine. Choose the following:

Site name: TESTSITE

Username: abc

Password: abc

Untick the “Allow my site to appear in search engines…” box

Add any email address

Click “Install WordPress”

At the ‘Success’ screen, login with username: abc and password: abc

You can now login at any time that xampp is running Apache and MySQL by going to this url in your browser:

https://localhost/wordpress/wp-login.php


Congratulations! You can now modify your WordPress theme files directly in the WordPress themes folder (wp-content/themes/theme-name) and refresh your browser page for quick and easy theme or template development with no FTP! Once you have modded your files then you can save them elsewhere as a backup and upload them to your server. I recommend installing Mozy (see review) or Livedrive (see review) for a secure and easy online backup.


If you want to check out some more useful and interesting stuff you can do with Xampp and php, take a look at this book


Copy Horde emails to another server with Horde installed

Horde email sync and exportProblem: You have Horde emails stored on one server and wish to copy them to another.  This is often as part of a server upgrade, say from reseller to VPS or Dedicated Server.

You may want to keep the client up and running on the old webmail until they can go live onto the new domain.  I looked into many ways to do this.  First off, exporting the emails via Horde seemed the best option.  Problem is, the reseller account they had kept timing out and there were 1200 emails and attachments totalling 2GB to copy over.  If your setup is smaller, you could try exporting like this:

Copy Horde emails using the MBOX download method

  • Click on Mail (left column)
  • Folders (top bar)
  • Select the folder you wish to export, eg Inbox
  • In the “Choose Action” dropdown menu select “Download”
  • OK the message about it taking time.

You will now have that folder stored on your hard drive to export back to the new Horde installation.

To import simply repeat the above but from the “Choose action” dropdown menu, select Import Messages, then Browse to the folder on your PC and select “Import”. Make sure you have selected the correct target folder first.

Copy emails to Horde using IMAP and fetch mail

You can also try adding the settings for your IMAP server directly into Horde’s ‘Fetch mail’ function.  I find this flaky on many server setups and the import usually does not work on larger mailboxes.

  • Options
  • Fetch Mail
  • Edit your preferences for accessing other mail accounts
  • Create a new account
  • IMAP
  • Fill in your other server’s IMAP details
  • Create

A better way to avoid server limitations

Memory limitations on reseller accounts are a problem.  Copying 1GB of data required much more memory on the last reseller account I had to copy from. Here’s a typical error:

Fatal error: Allowed memory size of 67108864 bytes exhausted (tried to allocate 9817178 bytes) in /usr/local/psa/psa-horde/imp/lib/Folder.php on line 600

Now my way of doing this (if you get an error using the folder import or fetch mail methods) is to use a third party app to download emails from one place and upload them to the new place.  I have tried quite a few including the command line IMAPcopy etc but none worked first time every time like this.  What is it I hear you cry….?  Thunderbird!  Yes that’s right. The free and stable Mozilla Thunderbird email client.

How to use Thunderbird to copy email accounts from Horde to Horde

Download and install Thunderbird.  Simply create an IMAP account that links to server 1 (we’ll call it “Source”).  Create another for server 2 (we’ll call it “Destination”).  Test that both accounts function correctly (you can send an email from your own email account to both and watch them appear in Thunderbird).  Allow the emails on server 1 time to fully download and check the total mails against the reported total in Horde.

Then, in the first account (Source), use CTRL-A to select all of the emails in the Inbox folder. Now, holding the CTRL key (so it duplicates not moves!), drag and drop the selected emails to the destination folder (eg Inbox on Destination).  Now you can see the upload of the source files to the destination server.  Done!

Bear in mind this will be restricted by your upload speed, so it could be a couple of hours for a few GB of files and attachments.  Thing is, this works so well you can leave it running overnight if required,  and you also get a bonus working backup of the emails during transfer.  I’m amazed that it needs a solution like this but hey-ho, I’m happy I found a solid solution to a common problem.

Your comments please!


Should I block the Yandex bot?

Should the Yandex Russian Search Engine Bot be blocked from spidering your pages?  I believe it should.  I did some serious testing using server logs and honeypots and this bot currently does not respect robots.txt files.  Worse still it applies such a server load that it must be contained.

I initially had this code (amongst others) in the .htaccess file:

SetEnvIfNoCase User-Agent "^Yandex bot" bad_bot

<Limit GET POST>
Order Allow,Deny
Allow from all
Deny from env=bad_bot
</Limit>

but because it’s a persistent little critter I now have this as the first line:

SetEnvIfNoCase User-Agent "^Yandex*" bad_bot

If it bothers me any more, I shall start to fight back and start a campaign against it.  One of our team got so fed up he did this:

# permanently redirect specific IP request for entire site
Options +FollowSymlinks
RewriteEngine on
RewriteCond %{REMOTE_HOST} 77\.88\.26\.27
RewriteRule \.shtml$ https://www.youtube.com/watch?v=oHg5SJYRHA0 [R=301,L]

Now the Yandex bot gets RickRolled every visit.  Imagine half a million sites doing this…..